Simplified Anatomical Articulation Model
thingiverse
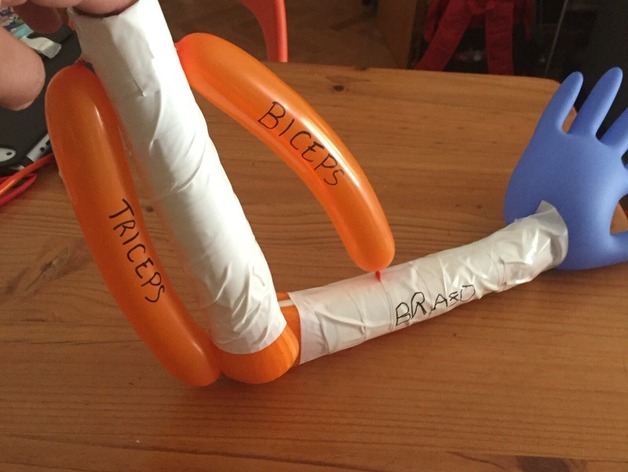
This simplified model of an articulation or joint, will help teachers show kids (3-12) how muscles, bones, tendons hinged by articulations work. It is inspired by the elbow joint and it is meant to show how the arm moves. The model requires additional tubes, preferably cardboard, and some long balloons (the type to build balloon animals out of), and optionally tape and latex glove to make the hand. This makes it ideal for crafts project for kids to do. It is customizable so it fits all tubes around the world. The design includes a ring to tie the balloons to. I am opened to suggestions to make the model more anatomically accurate, or general improvements; like for example making a 3rd piece to help to tie the balloons on the opposite side of the tube of the joint. This model may also be used for engineering, but probably requires some modifications. Post-Printing Step 0 printing Measure your tubes, inner tube Radius (diameter/2) is used for ConnectorR parameter. The wall/thickness of the tube is to be used as ConnectorOverlap parameter. Step 1 fit the two parts together Careful when joining the parts, as for, and depending on the printing quality and material, it may snap. Position one hand around the outer joint part (the spherical part), while gently pushing the inner part in with the other hand. Step 2 fit to tubes If printed with the correct parameters the pieces will be perfectly fitted to the tubes. To ensure a more permanent fit use non-toxic glue. Cyanoacrylate based glue (like Super Glue) might not be the best option as it does not stick well with paper, and may dissolve your 3D-printed pieces; apppart from being toxic. Step 3 (Optional) decorate You may paint your model, before fitting the balloons (better not paint those). Make sure you use non-toxic paints that will stick both to the tubes and material used for the pieces. Another addition, may be a an inflated latex glove, use tape to fix it to the end of the tube. Another way is to push a toothpick through the tube and the knot of the glove (but make sure not to puncture the glove). Step 4 fit the muscles (balloons) It is recommended to use a red balloons, to act as muscles, most text books will depict muscles as red. Fill a balloon so that the length of the inflated part is less than that of the tube. Push the inflated part to the middle, leaving 2 deflated "strings" on either sides. Tie (or tape) one side to the top of the tube (on the same tube, but opposite to the outer joint part, the spherical part). Make sure there is an appropriate tension, before tying the other to the space in the inner joint near to the tube (that is it's purpose). Repeat with the other muscle. For the opposite muscle (the triceps in the arm joint) make sure the balloon string goes through the channel around the top of the inner joint part (that is it's purpose). A single balloon for both muscles may be used. Balloons may be decorated with felt-tip pen, to show the muscle fibers and or veins and arteries. How I Designed This Inspiration This thing was inspired by a co-worker of mine, and a crafts project she found (The 3D design is in fact an improvement for that project). Works used pie.scad copyright Chris Petersen, 2013 Licensed under LGPL and CC-SA Thing http://www.thingiverse.com/thing:109467 Source https://github.com/dotscad/dotscad/blob/master/pie.scad Project: Elbow Articulation model Objectives Demonstrate how muscles, bones, tendons hinged by articulations work. It is inspired by the elbow joint and it is meant to show how the arm moves. Audiences Teachers, and Kids from 3 to 12. Preparation The model requires additional tubes, preferably cardboard, and some long balloons (the type to build balloon animals out of) or rubber bands, and optionally tape and latex glove to make the hand. Steps Follow the Post-Printing section. Results The model shows how muscles pull bones together, and how articulations turn this pull into rotational motion. The difference in pull force between the muscles control the speed, force and direction of the rotational motion. The visualization of these mechanics will make it easier to understand how the body is able to move.
With this file you will be able to print Simplified Anatomical Articulation Model with your 3D printer. Click on the button and save the file on your computer to work, edit or customize your design. You can also find more 3D designs for printers on Simplified Anatomical Articulation Model.