Sine & Cosine Waves Stencil
thingiverse
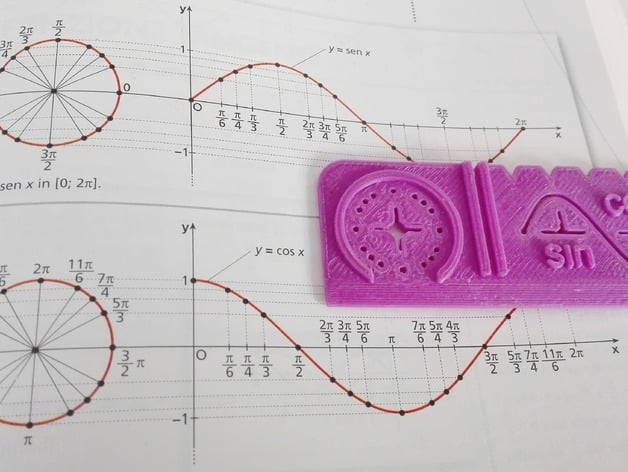
This is my project of a functions drawer (or stencil). The idea came out trying to teach students the sine and cosine waves' Theory, having a handy and portable object which allows them to draw a correct wave form with its own unit circle. Print Settings Printer: Rostock Mini Rafts: No Supports: No Resolution: 0.2mm Infill: 30% How I Designed This For all my designs, I’ve always used the 2D/3D software AutoCAD student edition, for this one precisely the 2016 version. AutoCAD doesn’t implement a native tool for creating functions, so I downloaded an external free one (that’s actually very simple to use, even for beginners) called AutoLISP. FIRST VERSION (mechanical pencil 1mm) You must use a mechanical pencil with 1mm of lead diameter. From 2D To 3D FINAL VERSION (mechanical pencil 0.5mm) You must use a mechanical pencil with 0.5mm of lead diameter. From 2D To 3D Project: Functions Learning Objectives • Study and learn functions theory; • Introduce students to 3D software (AutoCAD and others); • Make students aware about the differences between Sinusoidal and Cosinusoidal waves; • Learn how to draw functions; • Study of the Unit Circle and its different degrees. Source: Wikipedia Audience • All the students that are attending a secondary school (IT and Electronic classes); • Each class allowed to use PCs (get start with 3D software); • Each class allowed to use Electronic labs (such as utilizing oscilloscopes or multimeters...); • Each person who wants to start the study of trigonometric functions (who is already studying it either); • Teachers can use it to improve their teaching system. Preparation • Students will need PCs with AutoCAD installed; • Students should have some knowledge about 2D drawing (but also beginners will learn to use it); • A teacher will follow and lead the students on modelling the object, and help them with 3D printer software and hardware; • Students should make a report about actions they've needed to take to get the result; • The teacher must document all the steps taken by the students and write down each student's improvement; • Students will need a mechanical pencil with lead of 0.5mm to use it; • At the end students can start or continue with theory, making the realized objects useful. Lead 0.5mm Students at Work They will have to choose sinusoidal waves with different periods and amplitudes (using whichever 3D program they want). As I said, I used Autocad so I'm going to introduce you to which field you must consider: Period; Amplitude (pp stands for peak-to-peak); Number of cycles (how many times a period is repeated ); After choosing the period and amplitude values, and the number of cycles though, they can create as many different waves they want. period and amplitude doubled After the waves have been created, students can make a forward step offsetting, creating edges and extruding the whole draw. (like the following image) Steps Study Sine and Cosine trigonometric functions; Learn how to use a 2D/3D software, such as AutoCAD; Design the object helping yourself with the AutoLISP tool; Send it to the 3D printer; Make your observations about the result; Start with using it for personal and educational purposes; Results At the end of this experience, each student should have learnt: • Trigonometric functions theory; • Basics of 2D/3D modelling; • 3D printer settings and materials; Once students have reported every single step they made, the experiment is finished. Rendered Stencils How I Printed it Rostock Mini in action Final Product
With this file you will be able to print Sine & Cosine Waves Stencil with your 3D printer. Click on the button and save the file on your computer to work, edit or customize your design. You can also find more 3D designs for printers on Sine & Cosine Waves Stencil.