Six Fret Guitar for Clone Hero
prusaprinters
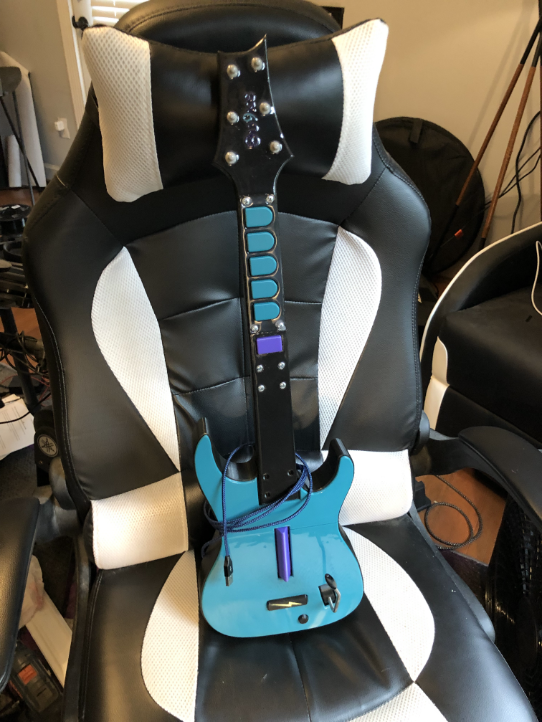
<p><strong>FRIENDLY WARNING</strong>: I am still in the process of ironing out some flaws, so certain files are subject to change over time and may not match certain pictures provided. This is my first design and has flaws of which I had to work around post printing. Some pieces are non manifold but should still work as I already tested them. Here is an imgur album for reference, but some pics are outdated. <a href="https://imgur.com/a/o4x85oR">https://imgur.com/a/o4x85oR</a>. I recently updated the central Arduino board and its standoffs, so the complications involving those should be eliminated. The central board design no longer matches what is shown in the imgur album, but it should still fit since I did not change the mounting holes.</p><p><i><strong>PCB gerber files with updated central board layout</strong></i> <a href="https://drive.google.com/drive/folders/1vN7dPXsBpTjFeMrkNIt4Y44kilc3SgwA?usp=sharing">https://drive.google.com/drive/folders/1vN7dPXsBpTjFeMrkNIt4Y44kilc3SgwA?usp=sharing</a><br><br><i><strong>Short demo</strong></i> <a href="https://youtu.be/DEDeb04nW3o">https://youtu.be/DEDeb04nW3o</a></p><p>This design was built from the ground up. The only pieces not 100% original are the frets, whammy assembly, and strum bar. They were modified from preexisting designs to fit my needs. Strum bar and frets modified from Josh Designs' Les Paul <a href="https://www.printables.com/model/227773-les-paul-clone-hero-controller">https://www.printables.com/model/227773-les-paul-clone-hero-controller</a> and the neck assembly was inspired by Josh Designs but was technically remade by me since the dimensions needed to be different. The Whammy assembly was modified from here <a href="https://learn.adafruit.com/mx-midi-guitar/whammy-assembly">https://learn.adafruit.com/mx-midi-guitar/whammy-assembly</a><br> </p><p><i><strong>Hardware I used</strong></i><br>Kailh Box Navy for the strum bar<br>Kailh Choc Low Profiles for the frets and start/select buttons<br>4 ¼" Gilmour length whammy bar <a href="https://www.stratcat.biz/4027.shtml">https://www.stratcat.biz/4027.shtml</a><br>Potentiometer with built-in knob <a href="https://www.adafruit.com/product/4133">https://www.adafruit.com/product/4133</a><br>8 M4-.70 x 25mm long machine screws for the neck (by the fret buttons)<br>4 M4-.70 x 30mm long machine screws the attaching neck to the body<br>M4 hex nuts<br>M4 screws and hex nuts for attaching to body pieces together (also used super glue)<br>3-24 thread rolling screws for screwing on the back plate and PCBs<br>1/8" diameter steel smooth rod to run through the strum bar which I found at a local hardware store<br>6.35x22.2 extension spring for the whammy bar (the resistance isn't as high as I would like, but it at least works)</p><p><strong>TIPS</strong><br>1. The positioning for the whammy potentiometer is very close to the Select button (woops), so you may need to partially snip the metal of the pot in order to keep it from touching the Select button. You can try to flip the whammy assembly around so the potentiometer is away from the select button instead of towards it, but I have not tried this. I also super glued the potentiometer knob inside the whammy hole it inserts into, but that is optional.</p><p>2. I HIGHLY recommend to NOT fully support inside the neck, otherwise it will be a pain to remove it afterwards. Only support using a narrower strip(s) if you have to.</p><p>3. The snap-on cantilevers of the face plate can be difficult to snap onto the body, but it is possible. I probably should have adjusted the tolerance of the design, but I didn't.</p><p>4. There is chance there might be a VERY slight overhang of plastic on the top edge of the Fret Housing piece which can hinder fret motion. I used an Xacto knife and moved it along the inside walls of the fret holes to shave off that very thin overhang which solved the problem for me. Refer to pictures to see what I mean.</p><p>5. I oriented the pieces how I personally printed them to get the grain direction I wanted, but you can reorient if you want.</p><p>6. I recommend super gluing the body together along with screwing it down for added strength... also recommended to glue the head stock, but technically can be friction fit which I have not tested long term. Just DO NOT glue it to the fret housing so that you can take the housing back off later if you want to change out the fret buttons.</p><p>Printed with Ender3 with .2 resolution, 20% infill, supports</p><p> </p>
With this file you will be able to print Six Fret Guitar for Clone Hero with your 3D printer. Click on the button and save the file on your computer to work, edit or customize your design. You can also find more 3D designs for printers on Six Fret Guitar for Clone Hero.