Skywalker Legacy Lightsaber (Used by Anakin, Luke, Finn, Rey)
thingiverse
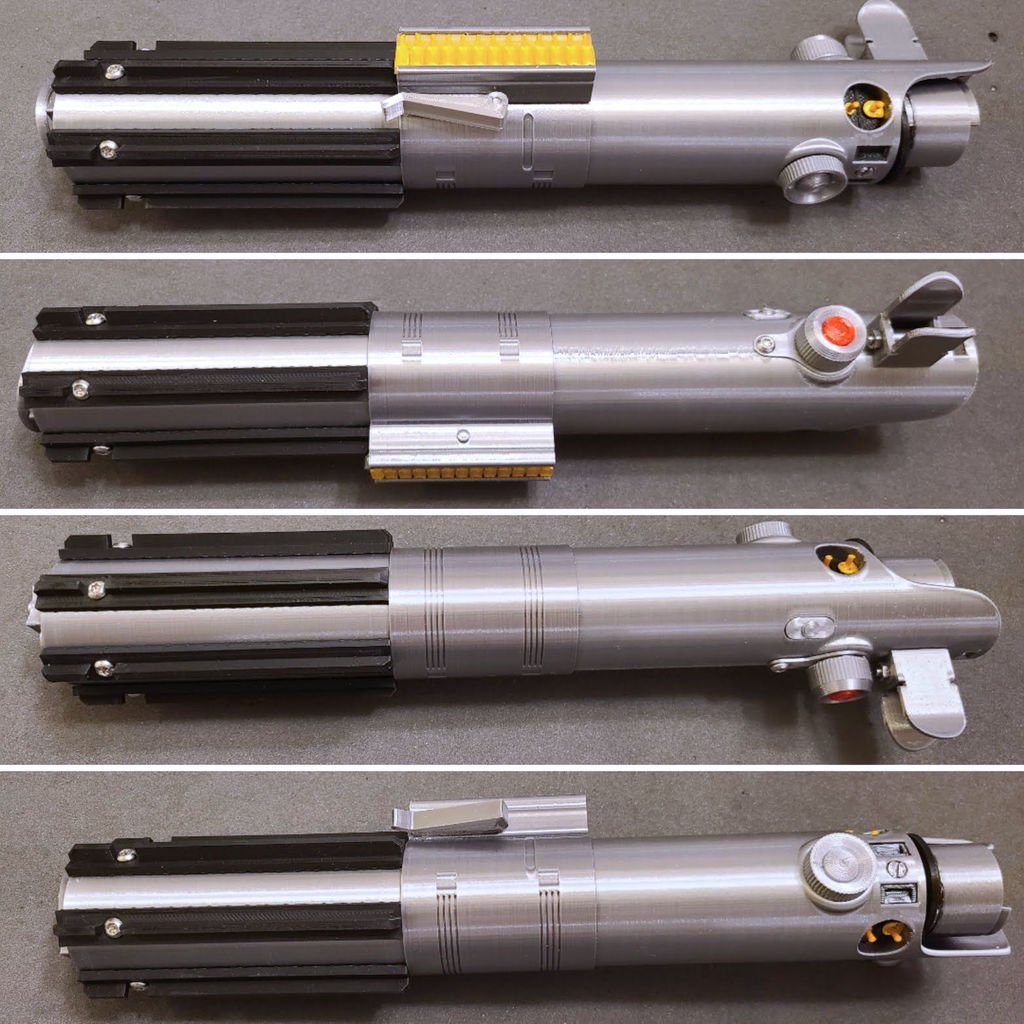
Please don't sell the files. You're welcome to make all the lightsabers you want and sell them online, to your friends, to your enemies - but the files are free. If you make this and think it's worth it, consider buying the files on Etsy for $3. It helps pay for filament while I test designs. https://www.etsy.com/listing/1262137370/skywalker-legacy-lightsaber-with-stand I wanted an easy to print, reasonably accurate, and sturdy Skywalker Legacy lightsaber. I decided to make my own because that way I could have everything I want in it. This is pretty close to the real dimensions but I adjusted things to make it easier to print and more sturdy when completed. I designed this with 360 side cylinders for the larger parts including the grip and emitter ring. Even printed without Arc Welder you can see that it is really smooth. Hiding the seam is easy in the bottom and middle grip section. For the top section I just specified the back (I consider the side with the bunny ears the back). This is a link to the Tinkercad design. https://www.tinkercad.com/things/bytiLxYo7fA This is a stand I made for it and other sabers. https://www.thingiverse.com/thing:5443627 This is the Skywalker Legacy lightsaber and it was passed around quite a bit. Made and used by Anakin, given to Luke by Obi-Wan, Given to Finn for safe keeping be Maz, given to Rey, and then given back to Luke. Even Han used it to cut open a tauntaun. Hopefully my images are enough for assembly but here are a few notes. * I use clear non-foaming Gorilla Glue. It takes longer to cure than super glue but leaves no residue. It also provides more working time and allows you to reposition things when you make a mistake. * Depending on your printer some of the parts will be a tight fit. I use a razor to remove the lip on the base of the grip sockets to make the pieces a little smoother when assembling. * If you're having a hard time getting smaller parts to fit into place, try printing them on a raft. This will typically eliminate any elephant foot on the first couple layers. Also, give sandpaper a try to help them fit. I prefer 220 grit. I do a little sanding on the sides of that small elongated button and it snaps right in place. * I used M3 Torx Safety screws to in the ribs, to secure the dials, in the grip cap, and the bunny ears. * For me the ribs snap tightly into place but I still use a little glue and wrap the lower grip in rubber bands until I'm sure the glue has cured. * I found inserting the thumb lever into the middle grip section was best left until the end. After gluing I used a tiny clamp to hold it into place. While it isn't exactly like the real thing, it is sturdy and shouldn't break off if you get a little animated while swinging the saber around. * I used pieces of gold filament from the spool to make the posts in the plug insert. Secure the plug insert first then insert the filament and cut it flush with the grip. Then hit it with a little flame to smooth it out. * The end cap for the lower grip should be oriented with the screws and d-ring sockets directly opposite the switch in the middle grip section. * This is designed to take a 1/4 inch threaded rod. This provides strength and a little weight. If you're going to use a 1/4 inch threaded rod here are some tips. 1. Don't insert the rod until the glue is cured. Hold the section that the end of the rod is going through very tightly. 2. I find it best to cut the rod to 235mm and cut a slit in one end so you can screw it in. 3. Heat up the first few inches of the rod and it goes in a lot easier. Not so hot it melts the plastic, just enough to help deform it to the shape of the threads. 4. Insert it from the base. If you slip and scratch up the base it won't matter because it gets covered with a cap. It's best to use a drill with a flathead bit. 5. Keep a steady pace - this will keep the rod warm and it will move through the hole more easily. 6. Make sure it doesn't protrude more than about 3/8" or about 10mm so the emitter post can slip over it completely. I put a bit of glue on the threads to sure the emitter post. * Some notes about assembly order of the emitter. 1. Insert the emitter base in place first. The round portion goes down and the elongated portion sticks out about 1mm past the grip edge. 2. Insert the emitter ring. I used a little glue where the surfaces mate with the grip but this is really tight after the bunny ears are screwed in so glue isn't necessary to keep it in place. 3. Attach the bunny ears and screw into place. 4. Place the emitter post in the hole in the emitter base. (Over the threaded rod if you used one.
With this file you will be able to print Skywalker Legacy Lightsaber (Used by Anakin, Luke, Finn, Rey) with your 3D printer. Click on the button and save the file on your computer to work, edit or customize your design. You can also find more 3D designs for printers on Skywalker Legacy Lightsaber (Used by Anakin, Luke, Finn, Rey).