Slack Lack Resized for Prusa V2 Enclosure Acrylic Kit
thingiverse
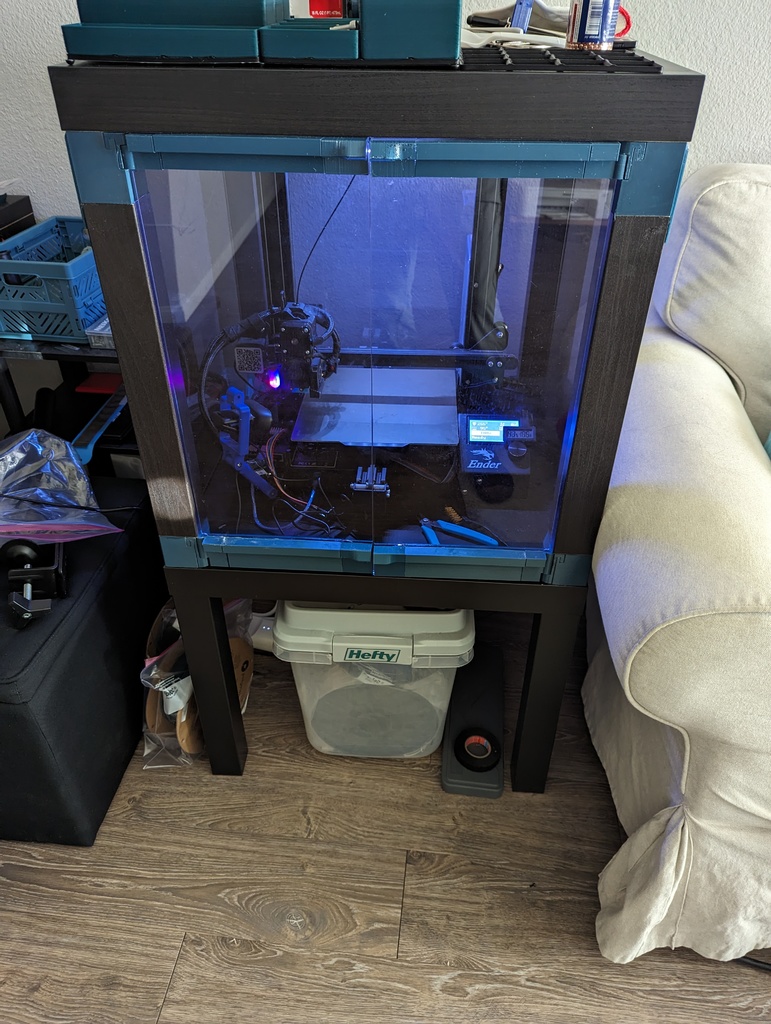
Remix of the Slack Lack Enclosure by nnorton00, using componentsmodified by falo2k and GedKerezis. Sized specifically for the Prusa Enclosure V2 acrylic kit that can be found on Amazon (440x473mm & 220x505mm, 3mm thickness), as well as for some 20x5x2mm magnets (also from Amazon). Design will fit 440x505mm walls as well .This is confirmed to fit an Ender 3 pro, but will probably fit similarly sized printers. Printed using Push Plastic PETG, 20% infill. Slack Lack: https://www.thingiverse.com/thing:3485510 Slack Lack Resized: https://www.thingiverse.com/thing:4444364 Prusa "Slack Lack" Enclosure: https://www.thingiverse.com/thing:4881752 Background = I was looking to make a Slack Lack enclosure using the precut sheet kits that are currently found on Amazon. I found that both outsourcing the acrylic cutting to a machine shop and cutting acrylic sheet stock myself proved to be much more expensive than the premade kits. The original Prusa V1 Enclosure kit did not provide enough height, and the V2 kit did not have a specific remix yet. To resize the height of the enclosure, I used falo2k's +30mm extended top spacers as a reference; I changed the height of these by doing a split body operation in Solidworks to cut out a small section of the middle, and merged the two resulting bodies to avoid modifying any critical geometry. You can repeat this process incase you need the enclosure to be taller or shorter. Supplies needed == Prusa Enclosure V2 Acrylic Kit 5x20x2mm magnets (12x) 1 kg of filament (maybe more) Ruler Glue Strong Adhesive OR screws called out in original project (I used JB Weld Clearweld) Drill if using screws Knife or Acrylic scoring tool Optional but recommended - Rotary tool Calipers Sandpaper Build Process = 0. Instructions will be assuming use of adhesive instead of fasteners 1. Print parts in accordance with BOM 2. Clean and sand surfaces to prepare for adhesive. Attach top spacers to underside of upper lack table top, using pre-drilled holes as guides. Attach bottom spacers to legs. Attach 3 catches and catch-wire to lower lack table top. Allow to cure. Optional: After curing, attach 4 catches to other side of legs. Allows for easier test fitting before final assembly. 3. Mark outer corners of acrylic for cutting; about 5x28mm area for top corner, 5x48mm for bottom. I used a rotary tool for this part. 4. Place legs onto catches, slot in side panels. Place upper table top onto legs. Begin assembling hinges and barrel hinges. Tape magnets into magnet holes, ensuring polarities are correct. Slot hinges into spacers, and test fit acrylic doors without gluing. Cut/Sand door corners as needed. You may or may not need to sand down either the top or bottom edge of the door acrylic depending on the tolerances on the acrylic you source. 5. Once test fits are acceptable, finish gluing magnets and doors. Once cured, close doors to locate door stopper. Slide on the gap cover assemblies and install the walls. Attach door stop and you are done. Finish epoxying legs to upper table top. Closing Thoughts = It will save you alot of time and effort to get custom sized acrylic cut, but I understand this can be cost prohibitive for some. Modifying the door panels was my least favorite part. The acrylic sheet kit I ordered turned out to be a few mms too long and I ended up having to sand down the top edges for the doors to fit nicely. If I could do it over again I'd most likely buy custom sized acrylic from scs or a similar service. The epoxy is definitely strong enough, stronger than the fiber the table is made of. You will want to be careful about cleaning any excess epoxy during application to avoid any interferences with fit. I didn't pay attention to this and got some blobs of epoxy on some of my parts and needed to sand those down. Final Changes == +10.5mm to top spacers (in comparison to original Slack Lack Dimensions) -accommodates increased height of acrylic Increased magnet hole sizing for 20x5x2mm magnets sliding covers for the top of the wall panels to lock them into the legs and close the gap left at the top. Changelog and Project Notes: == 05JUNE2023 -- First post, currently a work in progress; I am using this to track my build progress and any changes I may have made so far. ~~If you find this early, all the stls are properly sized, except for the open tabs.~~ I will be resizing these relatively soon, but you can do so yourself if you don't want to wait for me to finish this project. This might not be a necessary operation after all, but I will be printing them later down the line in case I need to relocate the magnet holes to line up with the door stop. I will definitely standardize the part naming later, and will add a STEP assembly. I may or may not redo the BOM/exploded view so the part order makes more sense. I will be epoxying the assembly together instead of using wood screws, mainly because I've heard the internal structure of the lack tables isn't really suitable for using fasteners like these. I am going to first use epoxy (specifically JB Weld Clearweld) to bond the parts, but I am leaving the screw holes incase the epoxy is not sufficient. I will be sanding down the contacting surfaces first to improve adhesion. I am waiting to test fit the acrylic using just the top spacers/tracks as my printer is currently on the Lack that is supposed to be the base. I am worried that I will need to move the spacers slightly outwards to accommodate the extra width of the doors. There are holes in the door acrylic but I'm pretty sure the track will cover them. If not I will make a note in 'Closing Thoughts.' 07 JUNE 2023 -- After test fitting the doors, I will need to modify the barrel hinge pieces as the acrylic is cut too wide for the original design. It could technically fit If I moved the spacers a bit outward but they would need to overhang the table by a small margin. Added GedKerezis's remix as a source as I will be using his redesign of the barrel hinge as inspiration. This should be a quick fix. I also found the hinge to require sanding before it assembled nicely so I will widen the barrel hinge a bit. I am hoping an extra 2mm of width on each side will be sufficient, I just want to avoid redesigning the spacers and where the tracks sit. If it comes to that I might just let the spacers be wider than the table. 11 JUNE 2023 -- I have decided to make cut outs into the doors as redesigning the barrel hinge turned out to not provide enough extra width for the doors to sit in. I'll explain this somewhere in the main summary body later, but I will be using a rotary tool to make cut outs 5mm wide and the same vertical distance as the tracks. This could also be accomplished by the score and cut method, or even just using a file, but would require a bit more effort. I am almost done with printing and will be doing a full test fitting sometime either today or tomorrow. 15 JUNE 2023 -- Assembly is nearly finished, just need to clean up a few more parts. Decided to make use of the catch cutouts in the top spacers by printing another set of 4 catches and epoxying them to the other side of the legs. I'm hoping the side paneling will keep the legs stable since the legs will be basically free standing with just the catches and weight of the table top keeping them in place. This will let me add some covers for the gaps later down the line if I get around to it. Hopefully I will have this project wrapped up by this weekend. Looks like the side panels aren't high enough to slot into the top spacers, I will be designing some corner adapters to keep the panels in place. 19 JUNE 2023 -- Finished renaming parts, uploaded an exploded view sketch and STEP assembly. Just need to add pictures once I finish putting everything together. 24 NOV 2023 -- I forgot about this project for a few months but I finally finished it. I will be finalizing and cleaning up this page in the next few days. With the enclosure, preheating with the bed at 95C for an hour or two looks to get the enclosure temp up to around 100F or 38C. This works well enough for me to print ASA pretty easily. Some aluminum tape around any gaps might improve thermal efficiency but I think I am limited by the bed I have right now as well.
With this file you will be able to print Slack Lack Resized for Prusa V2 Enclosure Acrylic Kit with your 3D printer. Click on the button and save the file on your computer to work, edit or customize your design. You can also find more 3D designs for printers on Slack Lack Resized for Prusa V2 Enclosure Acrylic Kit.