Slav Arcade Joystick - SlavStick
thingiverse
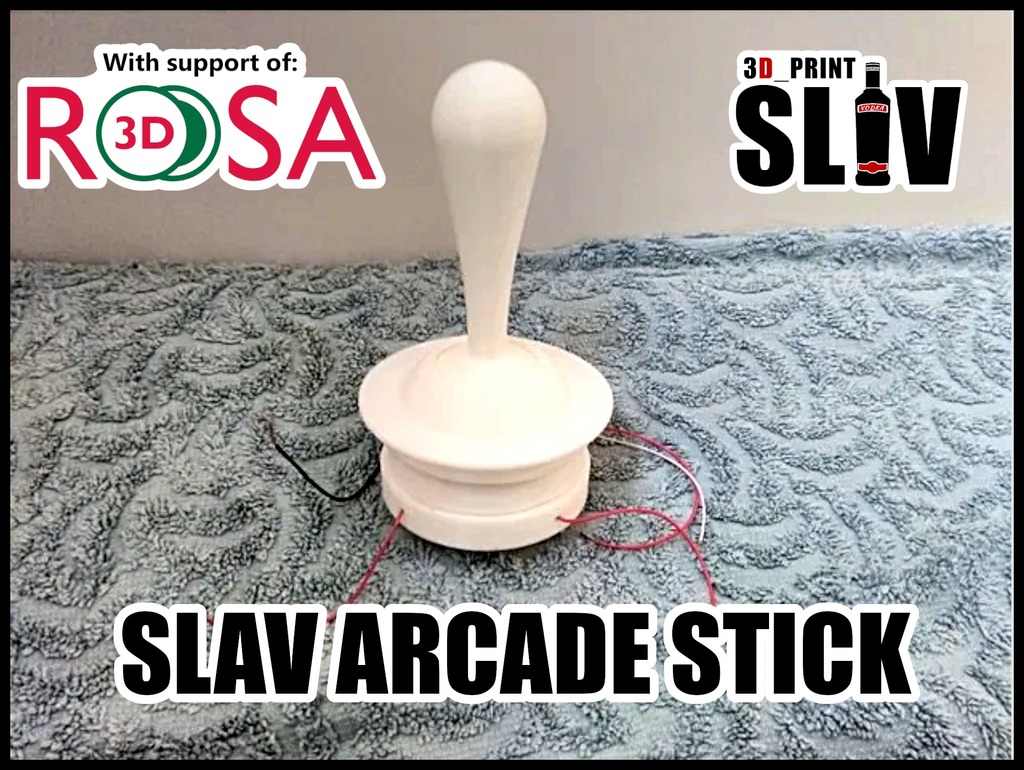
 ___________________________________ SlavStick ============================== Slav Arcade Joystick ----------------------------------- ______________________________________________ [](https://discord.gg/nHr7RV5) __________________________________________ [](http://bit.ly/2LMBt19) [Polish shop here.](http://bit.ly/2Xu2uIA) __________________________________________ [](https://www.facebook.com/3DPrintSlav) ____________________________________ [](https://paypal.me/BlackHideki) ______________________________________________________________ Needed hardware: -------------------------- + M3x6mm screws in quantity of 8 + M3 nuts in quantity of 4 + Some glue or 3d pen + Some wires. + 2.5mm wide skewer + 1L of fine Slav Vodka, or Kompot for alcoholically disadvantageous. DOES NOT REQUIRE MICROSWITCHES -------------------------------------- Printing and Assemble: ----------------------------- 1. Print all parts in orientation as uploaded, with supports touching buildplate only + "Joystick stick" and "Joystick peg" have to be printed with at least 4 bottom/top layers and 4-5 walls, all other parts can be printed with 3 walls and 3top/bottom layers 2. Insert a skewer in the "Joystick peg" hole. Insert peg into a square hole of "Joystick case" trimming a skewer to fit into a slot in "Joystick case". Fit have to be tight but not snagging. 3. Put a "Joystic peg" aside and screw 4xM3 screws into a "Joystick case" making sure you scre it from inside, not outside. Take 4 pieces of wire, strip its ends and tie them around screws on the outside. Screw on them 4xM3 nuts and tighten them so the wires and screws are well secured. Those wires functions as contact points. 4. Screw halfway 4xM3 screw into a "Joystick stick", take a long piece of wire, strip half of the wire insulation and tie the same wire around all 4 screws leaving an insulated part hanging from one of the screws. Tighten those screws. This wire will serve as common ground. 5. Screw the "Joystick spring" on the bottom of "Joystick case", be carefull around screws to not snag and break spring on them. This part does not have to be screwed down all the way, it have to be align so each of the 4 small holes on the side are close to screws. Thread the wires going out from screws trough those holes. 6. Insert a "Joystick peg" back into "Joystick case" by pulling spring aside and sliding it in, be carefull to not break spring. Shorter side from a skewer is going inside the "Joystic case" while longer one is the one that's sticking out of it and seats into a square piece on spring. 7. Thread a common ground wire trough a bigger hole in "Joystick case" and then trough one of the small holes on the side of "Joystick spring", then insert a "Joystick stick" on top of "Joystick body" to seat it onto a peg. Try twisting it gently to see if there is play in twisting motion, you want to be unable to twist it but able to move joystick in all directions that are normal for joysticks. 8. Screw the "Joystick plate" on top, and secure "Joystick spring" to "Joystick case" using a dab of glue or 3d pen so it does not unscrew, Thats it. Joystick works by shorting screws together, that allows you to have 8 types of input, 4 directional ones and 4 diagonal that you achieve by combining 2 directional ones. It can be installed by a putting it in a bit undersides hole (60mm), eighter by gluing it on place or using friction to fit it in. You have to connect that joystick to a device that would be able to read those shorts as inputs. I use old keyboard guts that I wired myself to be able to map each screw to an arrow key. You can use old keyboards, any type of old pads etc itp to solder wires to their appropriate pads and use joystick as an input. Do not insert any of it in any of your body cavities. Its not meant for that, the "Joystick JOYSTICK" part is for fun only. Its meant to be a gaming accessory and only that.
With this file you will be able to print Slav Arcade Joystick - SlavStick with your 3D printer. Click on the button and save the file on your computer to work, edit or customize your design. You can also find more 3D designs for printers on Slav Arcade Joystick - SlavStick.