Slice Engineering Adapter for the SeeMeCNC Artemis SE300
thingiverse
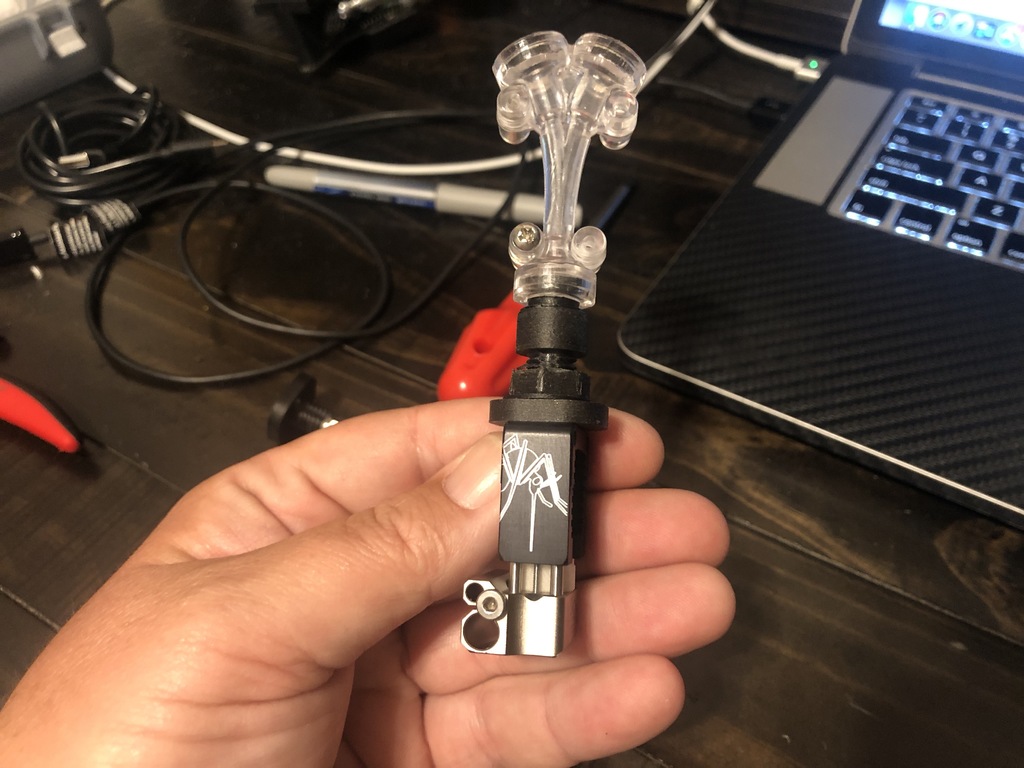
This is all the parts you need to successfully adapt a Slice Engineering Mosquito or Magnum to your SeeMeCnc Artemis, Rostock or any printer using their SE300 hotend system. I printed in Nylon CF for the most strength. I have not tested this for extended period of time. Directions: #1 print ALL Parts 100% infill. You will need 2 ea of the "Washer" files, 1 Adapter, 1 Nut, 1 Y Adapter, 3 Cooling Risers and 1 of the tool. -- Keep this in mind... I have tested this with Nylon and CF PETG from Atomic and FilamentOne and both performed great. I would say the Filament One CF PETG is more "rigid" and there for is what I used. PRINT EVERYTHING at 100% infill for strength. #2 Clean and/or Drill the holes on the adapter so you can insert the provided mounting screws from Slice freely into the hole. This is important so you can align the adapter to the top of the Hotend. #2 Test fit the Washer (should be loose) and the Nut (should be super tight). The Nut is not toleranced on purpose. We need this to be extremely tight with no wiggle. If yours is wiggly? Reprint it. #3 Assemble the adapter to the top of the Mosquito. Using the 2 screws Slice provides in the mounting kit. #4 Install a small length of PTFE tube into the Adapter. In my tests mine was about 35mm. It should be pushed ALL the way through the adapter and touch the top of the Mosquito. You need about 6mm of PTFE sticking out the top of the Adapter. Make sure you bevel the inside of the PTFE only at the top of the tube. This is so the filament path is SMOOTH. #5 put a washer over the adapter. This will sit between the adapter and the bottom of the effector. #6 I AM ASSUMING YOU HAVE YOUR HOTEND ASSEMBLED. However it should be noted that you can use the SeeMeCnc stuff. It's high quality. In my case I used the Slice Engineering stuff. Here's the deal... take the Boron Nitrate (yes you need this). Take your heater block, and put a SMALL amount into the heater and the thermistor hole. Slide in the Heater, all the way, and be prepared to catch the "excess" out the other side. Do the same with the Thermistor. THEN, insert the retaining screw. THEN, LEAVE it ALONE for at least 5 hours. This is to allow the Nitrate Paste to Dry and harden. The Paste is a key step that I couldn't find instructions for online and had to redo a few times. Once its dry everything should be snug in the heater block. CHECK IT! You do not want loose thermistor's or heaters. #7 Okay, at this point you should have removed your SE300 SeeMeCnc smart effector from the Fan shroud and mounting chassis. You have to do this to get the Mosquito in. There isn't room to install the mosquito from the bottom. Take off the three screws and remove the SE300 PCB. Take your assembled hotend assembly, with the adapter, with a washer, and stick it in the bottom hole of the SE300 PCB plate. Put another washer on top, and then the nut. Use the tool to cinch it all down while holding the hotend. It's hard to do this once installed. Use the took I Made and included. #8 - Install the three risers over the fan wiring as shown in the pics. #9 - Now you can marry the SE300 SeeMeCnc effector plate and the Fan Shroud. Use the factory screws to attach the PCB Effector Plate and the Fan Shroud. Make sure that no wires are pinched from the Fans, and that the risers are on the right orientation with the STEP facing into the middle of the assembly. .... Okay... at this point you should have the assembled hotend... the heater and thermistor installed and wired to the effector PCB, and the whole assembly put together. You do need to make sure the orientation is facing the right way. There isn't a lot of room for the fan shrouds to cleat the heater block. There is really only ONE way to make it work. See my photos. Take your complete assembly and install on your Artemis. Here is some setting notes... #1 BACKDOWN YOUR RETRACTIONS or your first prints will look horrible. The Mosquito and Magnum don not need that much retraction (See BrotherChris on Thingiverse and Chris Riley on YouTube). I use 3mm at 100mm/s, whereas I was using 6mm. Do some tests. #2 DO A M303 H1 S220 in the Duet3d terminal. This is a PID tune. You need to wait from room temp and idle, but I found this was needed. #3 DO A FIRST PROBE; On your duet web interface, go to settings, System Editor, and delete config-override.g and heightmap.csv then hit the emergency stop and let the Duet reset. After the machine restarts, hit the macro FIRST_PROBE. Okay... you should be good to go. Mine has been printing for about 24hours at this point and all is good. I should mention I did use a cooling fan for the hotend. I used the stock SeeMeCnc 12v fan. I just found screws from another Mosquito installed and attached the factory fan. Please feel free to contact me if you need help or have questions.
With this file you will be able to print Slice Engineering Adapter for the SeeMeCNC Artemis SE300 with your 3D printer. Click on the button and save the file on your computer to work, edit or customize your design. You can also find more 3D designs for printers on Slice Engineering Adapter for the SeeMeCNC Artemis SE300.