Slightly modified Seahawks Coaster and Logo - Go Hawks!
thingiverse
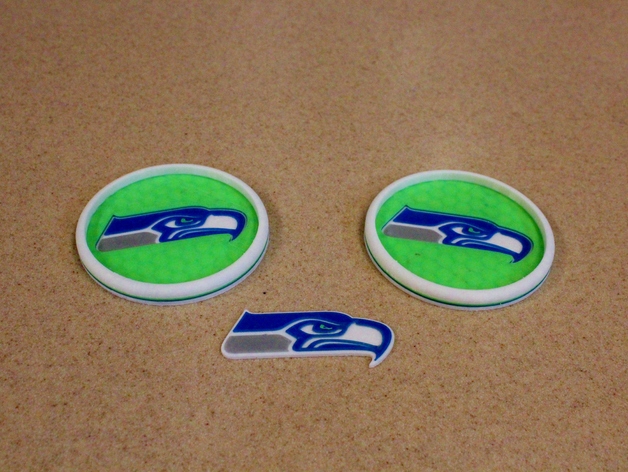
Go Hawks!!!! ======== I tried to print a coaster from "spondoro" before the NFC Championship game, but my temps were too low for the blue filament and it fell apart. Watching the game after a bit I was sure we were going to lose so I wouldn't have to make the coaster 'til next year, but the 'Hawks pulled through! So I had to figure out how to get it to print. In addition to fixing my temps, I decided to adjust some of the layer heights for "my" version (total ripoff of spondoro's). See Instructions To get my "layers" effect, I printed using Makerware at .2mm layer heights. The only layer that aligns with an even mm value is the green layer, so you can set a z-pause for that one but the rest need to be paused by hand or use other software or something. At my wife's request there's also the Logo at the same layers (so you can print it with a coaster), but without the coaster bit. Be careful to use temperatures appropriate for all of your filaments! Start with white Layer 11 (2.2mm) - Gray (slightly above 002mm) Layer 13 (2.6mm) - Blue Layer 15 (3.0mm) - Green (can set z-pause to 003mm) Layer 19+ (3.8+mm)- Back to white (can set z-pause to 004mm - can just leave green) (Optionally, start with green and then change to white at 1st mm for a green back. Also I forgot my green was glow-in-the-dark, which is cool-ish) Note that the first color change (to gray) is one layer above 002mm, so you can set pause to 002mm and then resume and only have to babysit one layer. I thought about even mm for the colors, but that's just too much depth. It needs two layers per color to look good (they bleed through some). Look at the preview for printing to get hints for what's going to be printed on the previous layer. Fortunately, the interesting stuff is currently printed last on those layers, so if you miss a little for the switch, that's OK. The last one isn't critical at all. Go Hawks!!! Of course the Logo belongs to the Seattle Seahawks, so if they ask me to, I'll take this down. Whatever part of the coaster is mine is under the Creative Commons Attribution-NonCommercial license. Remixed from Spondoro's coaster @ http://www.thingiverse.com/thing:573289/#files - that one has a more even green/white when viewed from the side, and is a little "deeper" in the middle. Spondoro's green edge lines up better with the curve, but I prefer the white ring. I also moved the green layer up on the outside edge so that Makerware's slicer doesn't stick a blue layer under it, making a dark shadow (so now we have a dark honeycomb). There's a sketchup file of my effort if you want to muck with bits. The Seahawks Logo is, of course, not mine, so please only do this for fun, no commercial stuff. Instructions To get my "layers" effect, I printed using Makerware at .2mm layer heights. The only layer that aligns with an even mm value is the green layer, so you can set a z-pause for that one but the rest need to be paused by hand or use other software or something. At my wife's request there's also the Logo at the same layers (so you can print it with a coaster), but without the coaster bit. Be careful to use temperatures appropriate for all of your filaments! Start with white Layer 11 (2.2mm) - Gray (slightly above 002mm) Layer 13 (2.6mm) - Blue Layer 15 (3.0mm) - Green (can set z-pause to 003mm) Layer 19+ (3.8+mm)- Back to white (can set z-pause to 004mm - can just leave green) (Optionally, start with green and then change to white at 1st mm for a green back. Also I forgot my green was glow-in-the-dark, which is cool-ish) Note that the first color change (to gray) is one layer above 002mm, so you can set pause to 002mm and then resume and only have to babysit one layer. I thought about even mm for the colors, but that's just too much depth. It needs two layers per color to look good (they bleed through some). Look at the preview for printing to get hints for what's going to be printed on the previous layer. Fortunately, the interesting stuff is currently printed last on those layers, so if you miss a little for the switch, that's OK. The last one isn't critical at all. The stand-alone version is really hard to print the green eye. I printed it with a coaster, but if the printer wants to print the eye first, my printer had a hard time getting enough filament out. It works better to change filament on one of the edges or middle honeycomb. Go Hawks!!! Thanks Spondoro Remixed from Spondoro's coaster @ http://www.thingiverse.com/thing:573289/#files - that one has a more even green/white when viewed from the side, and is a little "deeper" in the middle. Spondoro's green edge lines up better with the curve, but I prefer the white ring. I also moved the green layer up on the outside edge so that Makerware's slicer doesn't stick a blue layer under it, making a dark shadow (so now we have a dark honeycomb). There's a sketchup file of my effort if you want to muck with bits. Legal The Seahawks Logo is, of course, not mine, so please only do this for fun, no commercial stuff. I'm happy to take this down if they want me to, but I thought maybe other 12 men would appreciate it. Go Hawks!!!
With this file you will be able to print Slightly modified Seahawks Coaster and Logo - Go Hawks! with your 3D printer. Click on the button and save the file on your computer to work, edit or customize your design. You can also find more 3D designs for printers on Slightly modified Seahawks Coaster and Logo - Go Hawks!.