Slim X Axis Cable Chain with Extruder and Hotend Mount for Ender 3 Pro
thingiverse
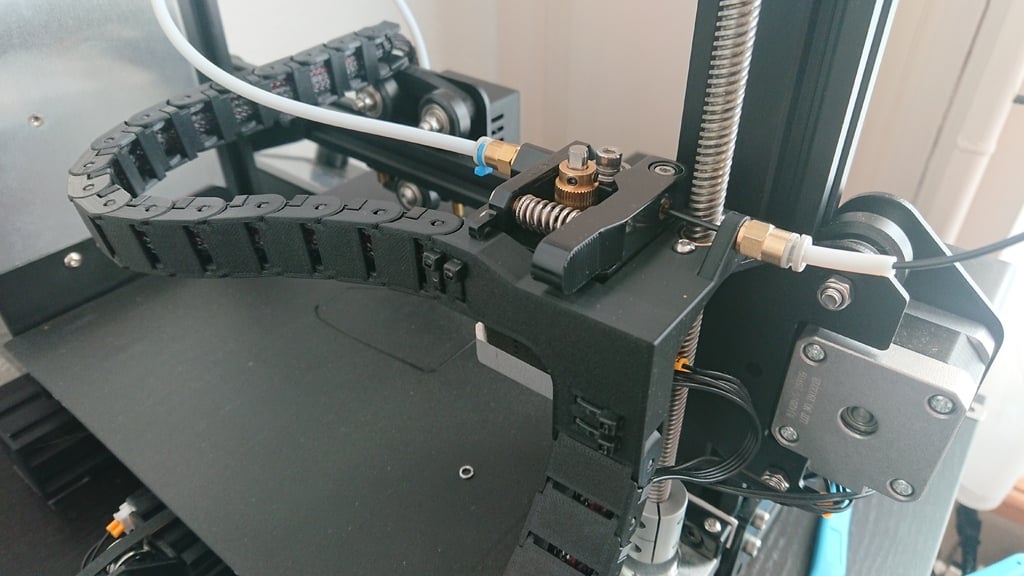
*****Please post your makes and report your issues, thanks***** <h2>Slim X Axis Cable Chain for Ender 3 Pro</h2> *****READ INSTRUCTIONS BELOW***** _________________________________ <b>Full Z-heigt</b> <b>Full X-width</b> <b>No supports for printing</b> <b>Great filament guide</b> <b>Absolute clean design</b> <i>Be careful when printing on full height, there may be some conflict from the cable chain with the ptfe-tubing!!!</i> __________________________________ **UPDATE 27. July 2020** I renamed the extruder-mounts and added versions for dual-drive extruder and 32mm. **UPDATE 29. June 2020** I replaced the hotend mount with a new version that has a tighter fit. This should prevent it from getting loose or making ratling noise. **UPDATE 8. May 2020** I replaced the extruder mounts with new ones to fit different machines perfectly (with stock and accesorie extruder). Simply measure the distance between the edge of the extruder/bracket to the outer diameter of the leadscrewnut to determine, which one you need. (See the picture) **UPDATE 1. May 2020** <s>I just added an alternative extruder mount for 0.5mm more clearence if your z-nut/rod is closer to the aluminium profile and the original would not fit. (Thanks @Manderlindli for reporting this issue)</s> **UPDATE 28. April 2020** I just added an alternative extruder mount for better fit with the stock extruder. The original still works! But its pushed down a little by the cable claw. The new one has a cutout for the claw. __________________________________ <h2>Y Axis and Z Axis - Heated Bed and Extruder</h2> I used the cable chain parts for the other axis from: https://www.thingiverse.com/thing:2920060 And the cable links from: https://www.thingiverse.com/thing:3491926 (do not use his bed spacers and mount!!!) __________________________________ **Why i designed this!** I am new into 3d-Printing and just got an Ender 3 Pro a month ago. I wanted a clean printer with no cables hanging around. The design from johnniewhiskey is great. But i also wanted to add a cable chain on the x-axis. I tried some extruder and hotend mountings and it worked but i was not satisfied. I searched on Thingiverse for a design. But there is no design i know that allows to move the z-axis to 250mm. There is no design that prints without support. There are great designs for mounting the cable chain on the front, BUT it can be a pain to install it because of the cable lenght and routing. __________________________________ <h1>Instructions</h1> <h2>Requirements</h2> <h3>Material</h3> 6x slim cable ties (mine were 1mm x 2.5mm) 1x m6 push fit (optional, came as a spare) 1x piece of ptfe-tube about 25mm long (optional, cut it from your bowden) <h3>Tools (all shipped with the ender)</h3> blue cuter allen keys wrench <h3>Print</h3> 1x hotend mount 1x extruder mount 16x slim links 16x slim link covers *Choosing the extruder mount: Remove one screw of the leadscrewnut and the extruder spring. Measure the distance between the edge of the extruder/bracket to the outer diameter of the leadscrewnut (Photo). The measured distance coresponds to the name of the file you need. The tolarance is about +/- 0.75mm There are three versions for each distance: <b>stock</b> for the stock plastic extruder with the claw on the side <b>alu</b> for the silver or red aluminium extruder with single drive and idlerwheel <b>alu-dd</b> for the red aluminium extruder with dual drive gears (bond-tech)* 0.2 layer height, 3 perimeters, 20% Infill (Honeycomb) Cable chain from thingiverse for Y and Z axis. As mentioned above. >I used the cable chain parts for the other axis from: >https://www.thingiverse.com/thing:2920060 > >And the cable links from: >https://www.thingiverse.com/thing:3491926 (do not use his bed spacers and mount!!!) <h2>Installation</h2> <h3>Preparation</h3> Make shure all the links are moving freely. Especially at the mountings! <h3>#1</h3> Cut the cable ties that hold the tube and the cables together. Remove the filament out of your system. <h3>#2</h3> Unscrew the springt and remove it from the extruder. Remove the extruder lever. <h3>#3</h3> Install the hotend-mount and secure the cable with cable ties. Install the slim cable links with covers (16x) on the cable and attach it to the hotend-mount. <h3>#4</h3> Unscrew the two bolts from the lead-screw-nut and take them apart. Pay attention not to loose the 4 smal spring washers. The lead-screw-nut must rest in place! <h3>#4</h3> Guide the extruder-mount over your lead-screw. Place your cable on the inside of the extruder-mount and add some cable ties, do not tighten them yet! <h3>#5</h3> Wiggle the extruder mount in place. If you have the stock extruder pay attention to the cable claws (pictures) and guide it in there first. <h3>#6</h3> Reinsert the two screws for the lead-screw-nut to secure the extruder mount. Allign the mount before thightening. IMPORTANT: Only use the 2 spring washers on the bottom! If you have proper alignment of your complete Z-rod and extruder bracket you can assemble it without the spring washers <h3>#7</h3> Attach the cable chain on the extruder mount and secure the cable ties next to the x-axis. Make sure ther cable is not too tight or too lose in the chain. Secure the lower cable ties for the z-chain. <h3>#8 (optional)</h3> Screw in the ptfe-push-fit and add some tubing. You may could remove any printed filament guide on top of the printer. <h3>#9</h3> Reasemble your extruder in the oposite direction. The lever first and then the spring. <h3>#10</h3> Add cable chain for your z-axis. As mentioned above. Whatch picture for routing the cables.
With this file you will be able to print Slim X Axis Cable Chain with Extruder and Hotend Mount for Ender 3 Pro with your 3D printer. Click on the button and save the file on your computer to work, edit or customize your design. You can also find more 3D designs for printers on Slim X Axis Cable Chain with Extruder and Hotend Mount for Ender 3 Pro.