Small Sanding Block
prusaprinters
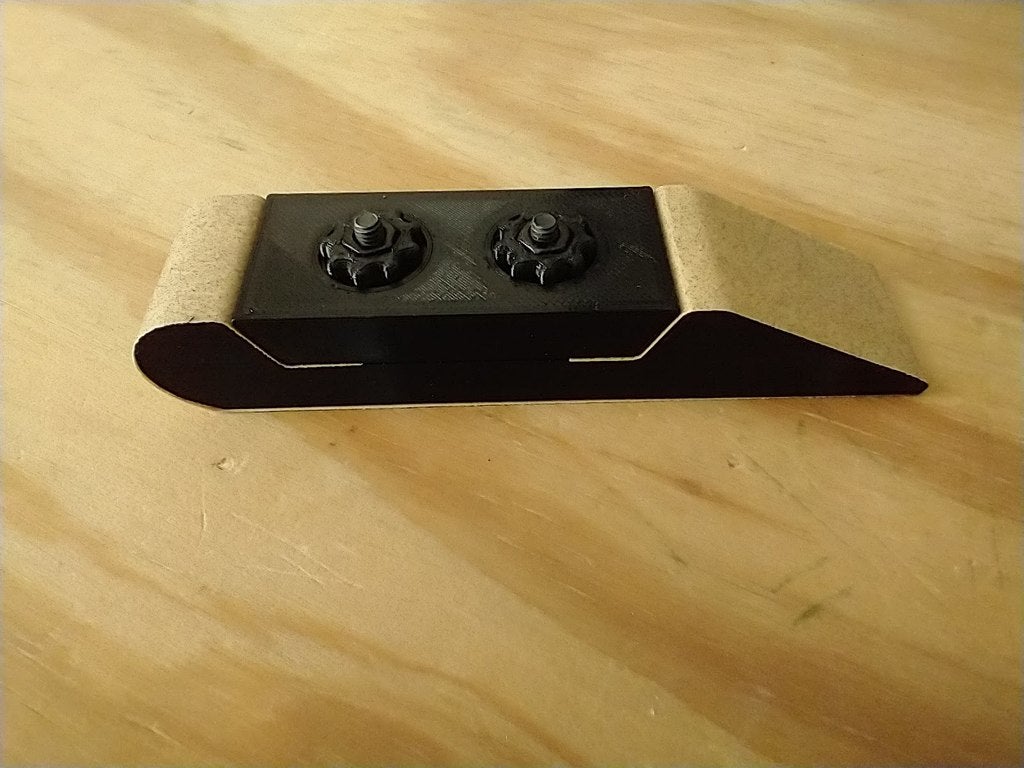
<p>When I saw <a href="https://www.thingiverse.com/thing:4633924">this sanding block</a> I knew I wanted one, but that particular design didn't work well with my FDM printer. I redesigned it and it prints great on my Prusa Mini!</p> <h3>Print instructions</h3><h3>Category: Hand Tools Summary</h3> <p>When I saw <a href="https://www.thingiverse.com/thing:4633924">this sanding block</a> I knew I wanted one, but that particular design didn't work well with my FDM printer. I redesigned it and it prints great on my Prusa Mini!</p> <h3> Print Settings</h3> <p><strong>Printer:</strong> Prusa MINI</p> <p><strong>Rafts:</strong> No</p> <p><strong>Supports:</strong> No</p> <p><strong>Resolution:</strong> 0.2</p> <p><strong>Infill:</strong> 15</p> <p><strong>Filament:</strong> Hatchbox PETG Black<br/> <strong>Notes:</strong></p> <p>This is printed in Hatchbox PETG. Unfortunately I didn't save my exact settings when I printed it so I'm not 100% sure on the settings. Note that the .3mf file is set for PLA, this print should work in either material.</p> <h3> Post-Printing</h3> <p><strong>Assembly Requirements</strong></p> <p>To assemble this sanding block you will need 2 M4x20 bolts and 4 M4 nuts. No other post-processing is required before assembly.</p> <p>Note that the below steps correspond with the included pictures.</p> <p>Add two M4 nuts (one each) to the two M4 bolts. This will prevent the bolts from spinning when we tighten them later.</p> <p>Insert the bolts up through the bottom of the main body. (This area may be a little messy due to the overhang. That's okay, just clear any mess out enough to get the bolts in.)</p> <p>Put the caps into the holes, but don't insert them all the way! Leave a little bit hanging out.</p> <p>Lay the main body on a flat surface and push down. This will push the caps perfectly flush to the bottom of the sanding block.</p> <p>The caps are now perfectly flush.</p> <p>Next, we'll add the "holder". This piece holds the sandpaper strip in place.</p> <p>Just slide it down onto the two bolts.</p> <p>Next you'll need the two knobs and two M4 nuts</p> <p>Place the nuts in the knobs, then screw them onto the bolts. Leave them loose at this point, so you can insert the sandpaper.</p> <p>Cut a strip of sandpaper 1 inch wide. The sheets I had happened to be the perfect length, but you may need to trim yours to fit.</p> <p>Slide the sandpaper in between the pieces, hold it taut, and tighten the knobs. You're ready to sand!</p>
With this file you will be able to print Small Sanding Block with your 3D printer. Click on the button and save the file on your computer to work, edit or customize your design. You can also find more 3D designs for printers on Small Sanding Block.