Smarthome 3-button Remote w/ OLED
thingiverse
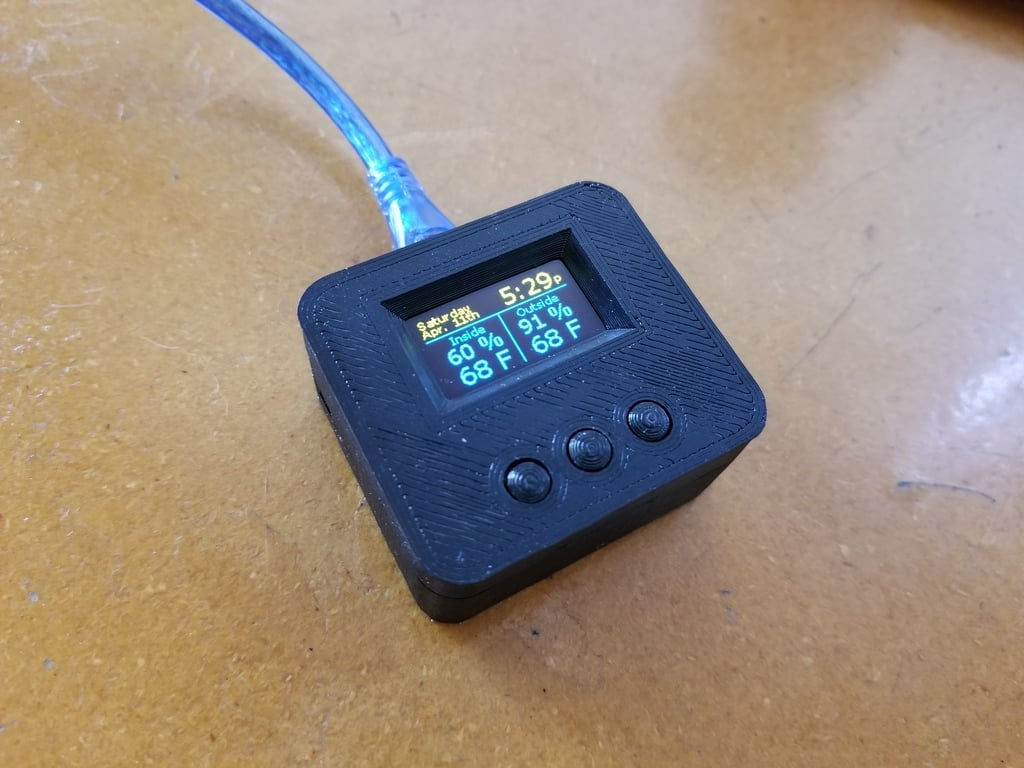
I designed this box for a Wemos D1 Mini powered smarthome remote. Here is the short list of the specific parts I used in this project: Wemos D1 Mini: https://www.amazon.com/gp/product/B081PX9YFV/ref=ppx_yo_dt_b_asin_title_o06_s00?ie=UTF8&psc=1 SSD1306 64x128 OLED display: https://www.amazon.com/PEMENOL-Display-0-96inch-Raspberry-Microcontroller/dp/B07F3KY8NF/ref=sr_1_3?crid=3QXQAY17JCDZC&dchild=1&keywords=ssd1306+oled&qid=1585187363&sprefix=ssd13%2Caps%2C197&sr=8-3 3@ 6x6x5mm momentary N/O tactile buttons: https://www.amazon.com/Momentary-Tactile-Through-Breadboard-Friendly/dp/B07WF76VHT/ref=sr_1_5?dchild=1&keywords=6mm+button&qid=1585596563&sr=8-5 You could do whatever you want with this combo of hardware. I program these things with esphome for homeassistant. The OLED display shows date, time, inside/outside temp/humidity, and the buttons just report their states to home assistant for triggering various automations I use. The wemos and oled boards are secured with melt down pins and PCB rails. Press the part onto the pins/rails, heat a bolt or screwdriver and melt the pins/rails down against the boards to fix them permanently. The 6mm buttons are press fit into the button holder, the buttons are placed in the 3 holes, then the button holder is secured to the lid with melt down pins. I uploaded 2 different button versions to give a decent fit with an assortment of button heights ranging from 5.5mm to 6.5mm. Use the 6.5 if you have taller switches, 5.5 for shorter switches. The buttons don't use much material; so I recommend just printing a set of each style if you're not sure which one will fit your buttons best. It is easier to solder all wires to the boards first, before permanently mounting the boards in the box. You can save on bulky wiring by connecting the common pins on the buttons together, and then running a wire from the commons to the OLED ground pin. The OLED can be safely powered from the wemos 3v3 pin. The square hole is sized to fit the largest micro USB end I had on hand; it should fit most cords you might use. There is an additional 2mm hole near the usb port that can be used for a separate power cable if desired (or just use a usb cable to provide power). The small square hole on the side provides access to the wemos reset button, but could also be used to pass the power cable through the side. The lid can be snapped on as shown in the pics, or you can rotate it 180 degrees with respect to the base. This may be useful if you want your wire holes to be located on the opposite side (like USB out the botton vs the top, or wires out the left vs right). [Update: 12/11/2020 I was kindly asked by a TV member for my design file to use for making some changes. So I uploaded my Freecad 0.18 file "esphomeoled.fcstd" for all to edit.]
With this file you will be able to print Smarthome 3-button Remote w/ OLED with your 3D printer. Click on the button and save the file on your computer to work, edit or customize your design. You can also find more 3D designs for printers on Smarthome 3-button Remote w/ OLED.