SmartrapCore Alu X-Carriage with balanced belt tensioning
thingiverse
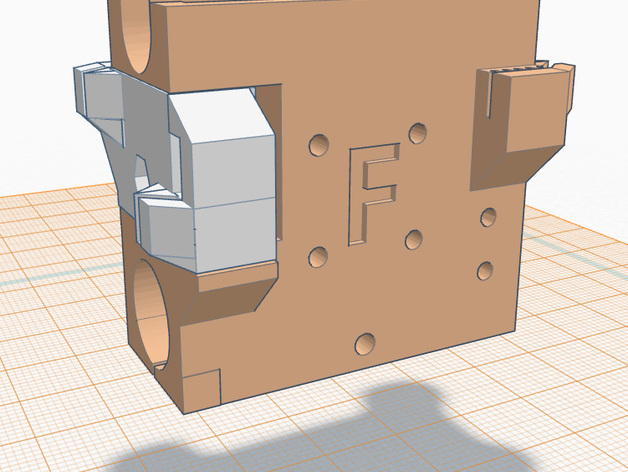
This is an x-carriage for the SmartRapCore Alu (and wooden version if using 8mm rods) printer. Based on the original part by Smartfriendz (http://smartfriendz.com/en/) and inspired by mbthor's (http://www.thingiverse.com/mbthor/about) design (http://www.thingiverse.com/thing:1566017) this design features a belt retaining mechanism which allows both belts to be simultaneously tensioned. This alleviates the usual corexy problem of having to adjust the two belts to achieve square objects in the x and y dimensions. However, and this bit is important, the two belts MUST be the exact same length and clipped into the carriage so that each belt has equal initial tension, i.e. inserted with the same number of teeth engaged on each belt. There are two versions, one is designed for printers which have been converted to use f608zz bearings instead of the printed pulley sleeves. The other fits the original SCALU printer. You will need to add one m4 bolt and one m4 nut or locknut. I used a 60mm m4 bolt (with a few washers at the head end to make it slightly shorter). The lock nut should be heat pressed into the tensioner. You might want to cut this bolt so that you have 5mm of space between the tensioner and the carriage initially. Don't have the bolt too long as it will protrude and hit your y slide, which also reduces usable x width. Use your original bearings and belts. This is a work in progress, and whilst it can be printed and I am using it now I have not done substantial testing yet. I expect the belt clips to stand up to some use but they might need to be reinforced later. Please check out mbthor's version above as this promises to be a much neater, sleeker solution. I acknowledge his considerable help and advice. Update 26-08-16 the part cracked around the mounting holes for the inductive sensor, I have reprinted mine in PETG and it appears to be much stronger than in ABS. Update 04/09/16 - added one part a thumbwheel. Adjusting the belt tension was difficult with the 60mm m4 bolt as getting the screwdriver/allen key to it was difficult. This part is a thumbwheel. Take your m4 bolt, heat the head and press it into the thumbwheel until the slot/cross head melts into the thumbwheel. Update 25-05-2016 - so about 20 hours printing on this carriage and no sign of anything problematic. Update 16-06-2016 - I am using the f608zz bearing version and found the belt clips were slightly too narrow for perfectly parallel belts between the y-slides and the x-carriage. This is because the belt is too stiff and doesn't want to exit totally straight (I am using steel reinforced belts it might be perfect for neoprene belts). So I modified my version by cutting a small amount around 1mm off the protruding section of the belt clip. However since this is not exactly the right method I have changed the files here which are now called V2. If you have already made it, cutting a little off might be easier than reprinting. Print Settings Printer: SmartRapCore Alu Supports: Yes Resolution: 0.26 Infill: 40-60%
With this file you will be able to print SmartrapCore Alu X-Carriage with balanced belt tensioning with your 3D printer. Click on the button and save the file on your computer to work, edit or customize your design. You can also find more 3D designs for printers on SmartrapCore Alu X-Carriage with balanced belt tensioning.