Snap-on CTC Dual bed levelling jig
thingiverse
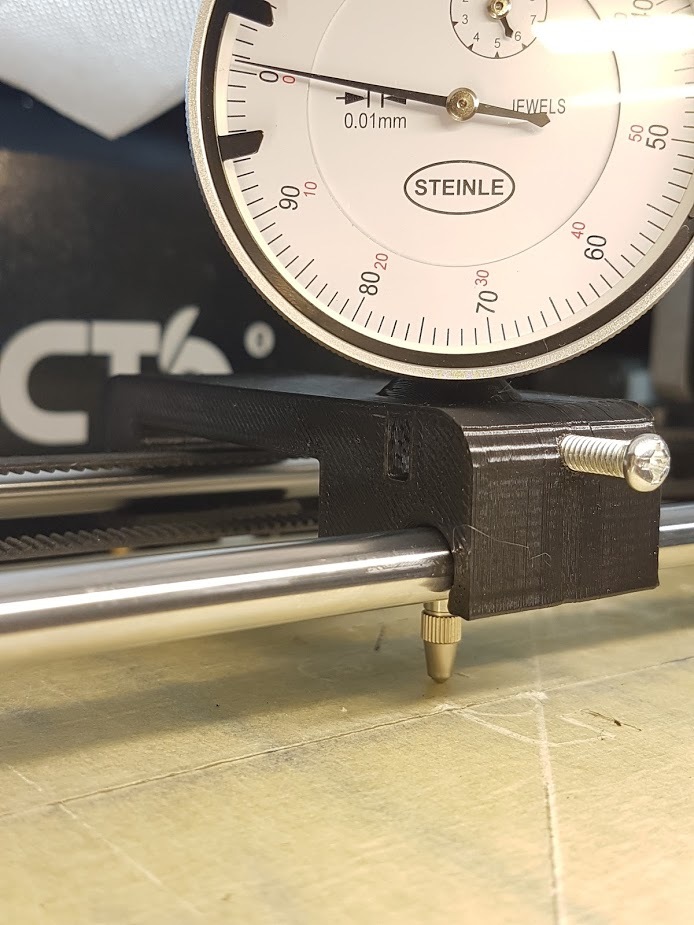
Designed from scratch using the layout and coarse dimensions from https://www.thingiverse.com/thing:2460482 OnShape link where you can edit to your custom specifications: https://cad.onshape.com/documents/28e0bcaa853c187d0624b81f/w/fd7acef5713bafce038c5cfe/e/7e7969d14473af0ccc5dd0ed **Improvements:** - snaps on instead of using magnets or other means - wider base for improved stability - longer support for the indicator shaft - offset on top to allow clearance for the indicator dial **Instructions:** printed laying on one side, PLA, infill 15%, no raft or support. The indicator shaft will deform a bit while printing, hence why it's oversized. **Design notes:** Distance between rails is 70mm, rail diameter is 8mm, indicator shaft diameter is also 8mm. All holes have been oversized to 8.5-8.7mm, this is both to allow for printer tolerances and to make it easier to slide the "carriage". You can edit the first two sketches to reduce the oversize, if you want a tighter setup. I currently have about 0.05mm slop/play with this setup, but my bed is warped almost 0.2mm, so the jig play doesn't affect the readings so much. The chamfer on top is ugly but allows for better printing without supports. The snap-on distance is 0.7mm. You can increase it if you want a tighter fit, decrease it if the required force to snap is too high. **Post-printing:** The indicator should be a tight fit ("good enough") but there is a hole for an M4 screw that's designed to be tapped. There's also an M4 nut retainer, if you don't want to tap the hole. You can also probably just drive the screw in, without tapping,
With this file you will be able to print Snap-on CTC Dual bed levelling jig with your 3D printer. Click on the button and save the file on your computer to work, edit or customize your design. You can also find more 3D designs for printers on Snap-on CTC Dual bed levelling jig.