Snap On Zeus chassis ears oscilloscope adapter
prusaprinters
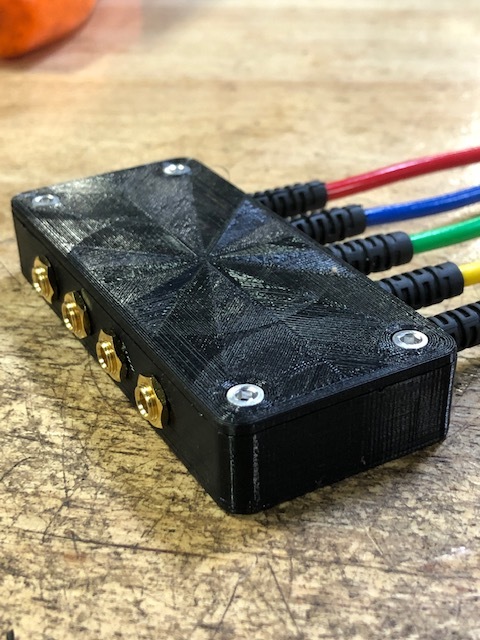
<p>This is an adapter to use "chassis ears" with 1/8" phone jacks with a 4-Channel Snap On oscilloscope that uses banana plugs.</p> <p>Assembly:</p> <p>You may find that you need to ream the holes slightly for the hardware depending on material used, I simply used a drill bit and very carefully cleaned the holes. You may also find that you may not need the heat inserts if the holes are the right size, you can simply drive the screw into the plastic.</p> <p>I found it helpful to use a small pocket screw driver to insert the strain reliefs into their holes prior to inserting the wires.</p> <p>While installing the phone jacks, align them so that the ground pins are all in line. I chose to align them on top.</p> <p>The wires are a snug fit so I had to snip off some insulation at the end and shape it into a point, I was then able to grab the wire with some pliers and pull them through.</p> <p>Its a good idea to give some slack in the wire before adding some hot glue to the solder joints and where the wires come into the box. Don't be afraid to add a lot of hot glue for extra vibration resistance or in case a wire get pulled on too hard. (also don't forget to test your wiring before adding too much hot glue, I used stereo jacks so there was a possibility of wiring it wrong. Mono jacks would be better in my case).</p> <p>Parts needed:</p> <p>-3D printer obviously :)</p> <p>-4x M2x12mm socket head cap screws</p> <p>-4x M2 heat-set inserts</p> <p>-4x 1/8" phone jacks</p> <p>-5x 4mm cable strain reliefs</p> <p>-5x banana plug wires</p> <p>-2"-3" of wire to connect grounds across input jacks.</p> <p>-(optional) hot glue or some other means of vibration protection for wires and solder joints.</p> <p>Links to parts:</p> <p>-1/8" phone jacks: https://www.amazon.com/dp/B06XFT3NWB?psc=1&ref=ppx_yo2_dt_b_product_details</p> <p>-Banana plug wire set: https://www.amazon.com/dp/B07179VF5J?psc=1&ref=ppx_yo2_dt_b_product_details</p> <p>-4mm cable strain relief: https://www.amazon.com/dp/B00XBG5U82?psc=1&ref=ppx_yo2_dt_b_product_details</p> <p>-M2 heat set inserts (the ones I used): https://www.amazon.com/gp/product/B07WH59N6T/ref=ppx_yo_dt_b_search_asin_title?ie=UTF8&psc=1</p> <p>-M2 Screws (the ones I used): https://www.amazon.com/gp/product/B071KBVZVV/ref=ppx_yo_dt_b_search_asin_title?ie=UTF8&th=1</p> <h3>Print Settings</h3> <p><strong>Printer Brand:</strong></p> <p>Creality</p> <p class="detail-setting printer"><strong>Printer: </strong> <div><p>Ender 3 Pro</p></div> <p><strong>Rafts:</strong></p> <p>Doesn't Matter</p> <p class="detail-setting supports"><strong>Supports: </strong> <div><p>Doesn't Matter</p></div> <p><strong>Filament:</strong> Overture PETG Black</p> </p></p> Category: Automotive
With this file you will be able to print Snap On Zeus chassis ears oscilloscope adapter with your 3D printer. Click on the button and save the file on your computer to work, edit or customize your design. You can also find more 3D designs for printers on Snap On Zeus chassis ears oscilloscope adapter.