Snap Together Hydraulic Cherry Picker
thingiverse
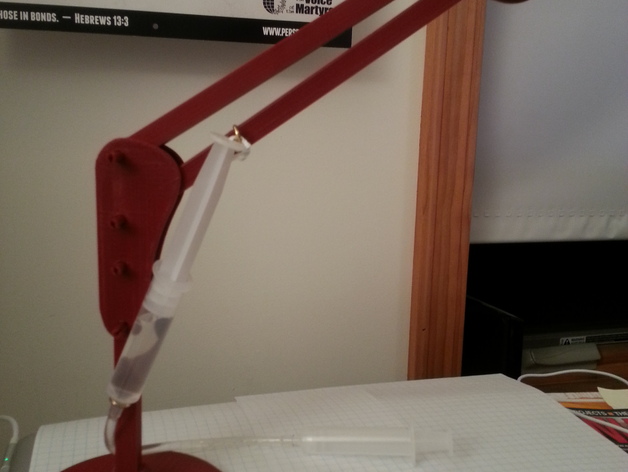
I have one of these models from a kit. However, it is wooden. I like playing with it, and since I have a Replicator, naturally the idea came to reproduce it in ABS plastic! This really works. The pins will snap in, and they have plenty of room left over if you want to add other things to it. There are some non-plastic things to buy to operate it, however. Have fun! Instructions Instructions are simple: 1.) Print it! There are only 7 pins needed, but I added one more because I always seem to break one. I included all of the skp files with the stl's. 2.) Assemble it according to the picture. It is rather simple, you can figure it out! :) 3.) To operate it: You will need two plastic syringes and about 16 cm or 6.3 inches of plastic tubing. Get tubing that will fit over the nozzels of the syringes. Also, make sure that there is a hole or loop of some kind on the end of the syringe plungers to hook wire into or through. This is critical! You can find the syringes at drug stores, and possibly kitchen stores. 4.) You will also need two eye screws, and some solid wire to hook one of the syringes up to the vertical support and the bottom support arm. 5.) Once you have the eye screws, screw one into the vertical support rod where the starter hole is. All of the rods are 10 mm thick, so be careful not to screw all the way through the rod. The other eye screw goes into the bottom support arm. The bottom arm has a starter hole in it - just screw the remaining eye screw into that hole. 6.) Attach an empty syringe to the eye screw in the bottom support arm (the support arms are the mostly horizontal ones). You will use wire (I used a twist tie) to attach the syringe plunger to the eye screw. Place the nozzle of this syringe into the other eye screw. Don't attach tubing just yet. Patience, Grasshopper! 7.) Charge the hydraulic system: using the other syringe, attach the tubing to it's nozzle and place the other end into some water (food coloring optional, but it is nice). Slowly pull back on the plunger to suck water into the syringe. Tap the syringe to dislodge air bubbles, and push the water back out to expell any air. You will have to do this a few times to get rid of air bubbles. When the plunger is pulled all the way back, and the syringe cylinder and the tube is full of water and has no air bubbles in it, you are ready to attach it to the syringe already connected to the arm. Make sure the syringe plunger on the arm is pushed all the way IN, and then attached the end of the tube full of water to the nozzle in the eye screw. That is it! Now push the plunger on the free syringe and watch the arm go up! Pull it out, and the arm comes down. A few other things: in the picture with all of the parts, I forgot to add the pins in. My bad - hope that does not confuse anyone. Second, the hole at the end of the arm has a pin in it, but nothing is attached. That was done on purpose: make your own basket, platform, whatever! The arm is surprisingly strong, so you can add something of your own design to pick stuff up. A neat little cherry picker basket would look just great on the end of the arm! Hope you enjoy this! I look forward to seeing many deriviatives. Happy "hydraulicing"! Update (12/31/2012): I am designing a hydraulic lifter to replace the syringe attached to the arm. All you will need will be the tubing and one syringe, since I will be adding the brackets to replace the eye screws. Stay tuned for more details!
With this file you will be able to print Snap Together Hydraulic Cherry Picker with your 3D printer. Click on the button and save the file on your computer to work, edit or customize your design. You can also find more 3D designs for printers on Snap Together Hydraulic Cherry Picker.