Snapmaker 2.0 SBR16 linear guides support
thingiverse
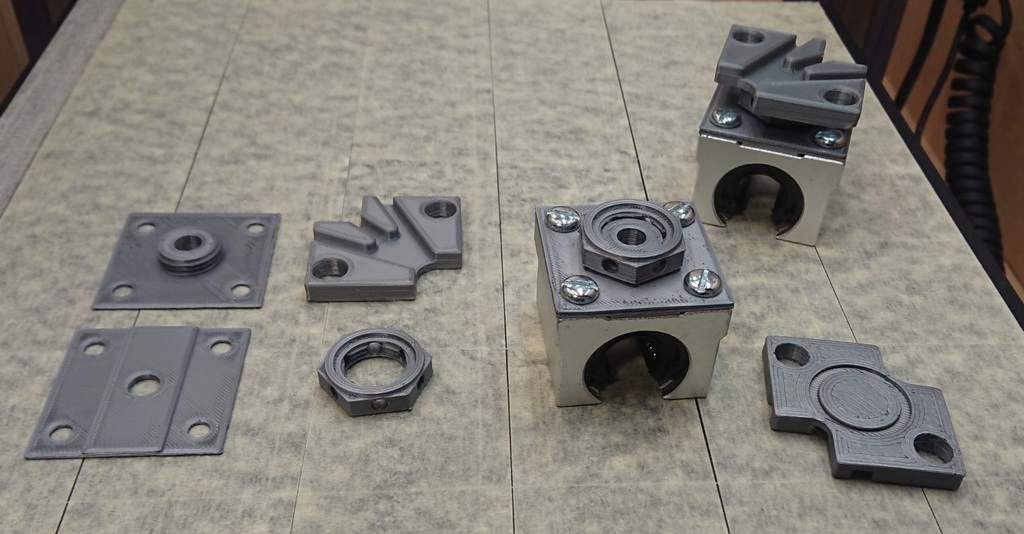
# Adapters for linear guides for the Snapmaker 2.0 To reduce the wobbling of the build plate I have installed linear guides that provide additional support. These adapters help to connect the guides to the buildplate. Especially when doing cnc tasks, the buildplate can be pushed down by the toolhead. This results in less accurate work and may reduce the quality of your work. Some people also report some instability of the platform in general. However, this can vary between different devices. A wonderful job was already done by [3DNate](https://www.thingiverse.com/3dnate/) with this design: https://www.thingiverse.com/thing:4860729 The only drawback, you need to accurately measure the the height, print and make sure it fits and/or create intermediate pieces to the exact needed height. I wanted to make this adjustable so it's easier to install and use. Therefore a simple design was created with a nut that can be adjusted. Similar to how a lot of tables can be leveled by turning one of the feet into a higher or lower position. I have used an SBR-16 linear rail for my modification. If you are using another type of rail, you may need to make some adjustments. ## Why use this? To provide extra support to the build plate. Note, this is no replacement for tramming your machine (i.e. especially make sure both vertical axis are aligned to the horizontal plane). That still needs to be done reliably. ## Overview of elements - **bottomwiththread**: The bottom part that is mounted to the guide that rolls over the rail. You need 4 of these. - **bottomfiller**: The guide has a small cutout, this fills that cutout to provide extra support. This could have been combined with the bottomwiththread, but then you would need supports which I wanted to avoid. You need 4 of these. - **nut**: The nut that screws onto the thread and thus pushes upwards. There are holes in the side to allow putting in a screw to fixate in a final position or put in a drup of glue. Probably not needed to fixate it that way. - **railtopwithhole**: a remix of the design by 3Dnate to "grab" the Snapmaker carriage. You need 4 of these. It's not strictly necessary, but if you want to make sure the holes are aligned you should mirror 2 of them. If you have a new style of bed for the snapmaker (the design has been revised) it should be possible to replace that stl to generate a fitting part for your needs. - **wrench**: The clearance between the bed & adapter is rather small which means most standard wrenches (or fingers for that matter :) ) won't fit between. this thin wrench does. Where possible all objects are parameterized so they can easily be adjusted. Holes are foreseen so the set screws to adjust the guides are accessible. ## What to watch out for when using this - These are not a replacement for tramming your machine ## How to print Make sure to print the threads with a high quality setting. I have had great success with a variable layer height in Prusaslicer to get a good balance between speed and quality. (threaded parts with a layer height of 0.08 to 0.12, other parts of the print with a layer height of 0.30). After printing and putting the nut on the thread, don't force it. The tolerance is low, if you feel too much resistance, unscrew a bit, tighten again just a bit further, unscrew etc. Repeat that until it fits perfectly and you can easily tighten and loosen the nut. ## Result In action: https://youtu.be/2wn5efR2PGg ## Other There are some alternative approaches in the OpenScad file using more of a type jack wrench approach, however, there was too little clearance between the rail and buildplate to make this work. Those are still in the code, but lack a bit of documentation. The relevant code for the third and final iteration is at the bottom of the file. (look for "third and final iteration") **Warning if you have the new bed** The version for the new bed does not provide enough clearance to install it. A possible workaround is to insert spacers between the y-rail and bed. I've had a chance to get a better look at the new platform as someone has taken the time to model it which makes it a lot easier to inspect it without having it physically: https://cults3d.com/en/3d-model/tool/snapmaker-2-0-platform-3d-model-a250-a350-a350t If you look at the files for the new and old model, it becomes very clear that the new model is thicker/higher than the old one. (the pointy ends especially) And it is that 3mm that we're missing indeed. If I make the top part thin enough, it falls apart as the different segments are no longer connected :( So coming up with a solution will be more complex than just shaving off a part. Something that, in all honesty, I won't be doing just for fun as I have other projects lined up right now. And not being able to test it myself makes that a pain. It should be doable however: * the bottom part could be reduced to just fill the recess skipping the holes to attach it. it will stay in place just because of the pressure and it is only there to provide some support. That will save 1mm. * the threaded part and screw could both lose 1mm as well. if needed. (perhaps remove the holes in the nut to make sure it stays strong enough). with that I think it's also possible to shave up 1.5-2mm which should bring it in range of what's needed. If someone wants to make these necessary changes I'll be happy to explain the OpenScad code if needed to get you started. **End Warning** To generate the threaded parts, I've made use of the excellent [threadlib](https://github.com/adrianschlatter/threadlib) library, put that in a "threadlib" folder in the source directory to build the project. ## Source Openscad source file is available on github: https://github.com/brvdboss/snapmaker-linearguides-support
With this file you will be able to print Snapmaker 2.0 SBR16 linear guides support with your 3D printer. Click on the button and save the file on your computer to work, edit or customize your design. You can also find more 3D designs for printers on Snapmaker 2.0 SBR16 linear guides support.