Snapper Mini - YA9GRA - Software and instructions
prusaprinters
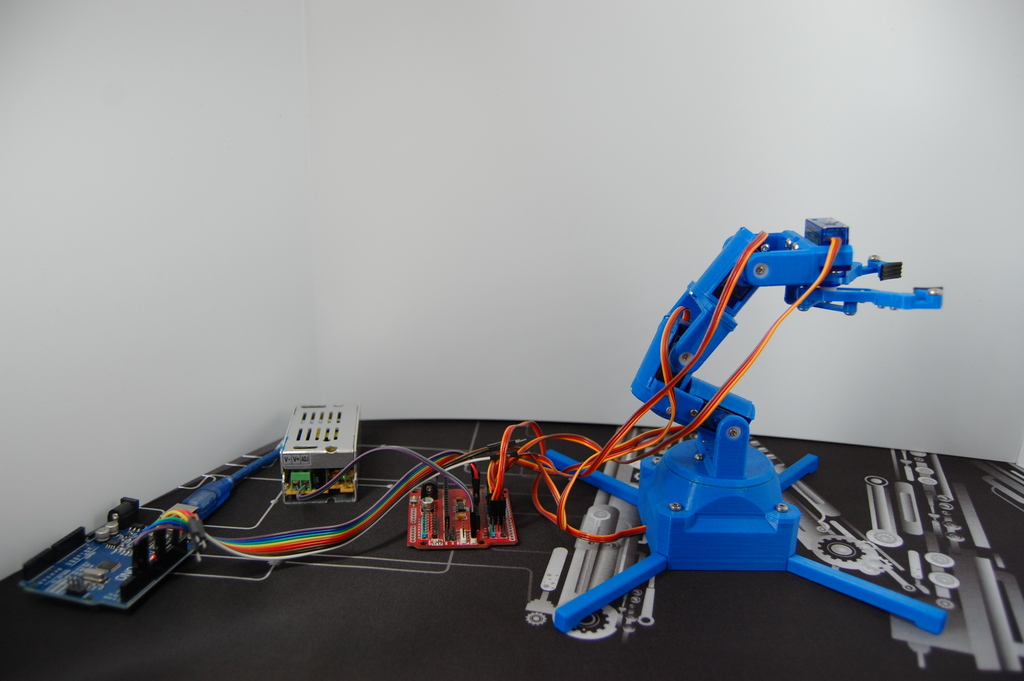
<p>This is made to try helping others to make this fun little RobotGeek 9G robot arm.</p> <p>I will try to explain what is needed to build it. Program it and what pc software to use to control it.</p> <p> <figure class="media"> <oembed url="https://youtu.be/-JbckB2klfs"></oembed> </figure> </p> <h3>Post-Printing</h3> <p><strong>Part List</strong></p> <p>1x Arduino Uno <a href="https://goo.gl/Ha2f1n">https://goo.gl/Ha2f1n</a> or Nano <a href="https://goo.gl/YUGV6z">https://goo.gl/YUGV6z</a></p> <p>5x 9g servos <a href="https://goo.gl/J1YWQp">https://goo.gl/J1YWQp</a></p> <p>1x 5vdc 2A power supply <a href="https://goo.gl/56VuYa">https://goo.gl/56VuYa</a></p> <p>Jumper wires <a href="https://goo.gl/FQ2PcX">https://goo.gl/FQ2PcX</a></p> <p>M2 Screws <a href="https://goo.gl/WvFAcR">https://goo.gl/WvFAcR</a></p> <p>M3x6 Button head screws <a href="https://goo.gl/zfVDhX">https://goo.gl/zfVDhX</a></p> <p>M3x6 Countersunk screws <a href="https://goo.gl/S96ZKi">https://goo.gl/S96ZKi</a></p> <p>Maybe an Arduino nano breakout board. <a href="https://goo.gl/CEnQHM">https://goo.gl/CEnQHM</a></p> <p>or a breadboard <a href="https://goo.gl/nJUkLB">https://goo.gl/nJUkLB</a></p> <p>Everything listed is from Banggood.</p> <p><strong>Arduino Code</strong></p> <p>Download the SB_SnapperArmLinkSerial.zip file and unzip it.</p> <p>I assume you already have the Arduino IDE installed. Otherwise there are plenty of youtube videos out there explaining how to install it.</p> <p>Connect your Arduino Uno to your PC.</p> <p>Open SB_SnapperArmLinkSerial.ino</p> <p>Select your Board type in the tools menu under Board and select the com port the Uno is connected to.</p> <p>Press the upload button.</p> <p>The Arduino IDE will verify the code followed by the download.</p> <p>Now the Arduino board is ready to go.</p> <p><strong>Tying it all together</strong></p> <p>Connect the Arduino to the Breadboard or to the Nano breakout board. (I have used the Nano breakout board)</p> <p>Use the Pins 3,5,6,9,10 and GND</p> <p>See pictures for reference.</p> <p><strong>BE VERY CAREFULL WHEN WORKING WITH THE MAIN LINE SUPPLY. IT CAN KILL YOU.</strong></p> <p>Now also connect the 5v power supply to the "Breadboard" allowing it to feed all the servos but not the Arduino. Make sure the Minus (GND) of the power supply and the Arduino are also connected.</p> <p><strong>BE VERY CAREFULL WHEN WORKING WITH THE MAIN LINE SUPPLY. IT CAN KILL YOU.</strong></p> <p><strong>PC Software</strong></p> <p>The software used on the PC are the InterbotiX Arm Link Software.</p> <p>Download the ArmLink_1.6_Windows64_with_java.zip and unzip it.</p> <p>In the folder you find an ArmLink.exe file <em>This will not install anything on your PC</em></p> <p>With the Arduino connected to your PC double click the ArmLink.exe file.</p> <p>The program will start up and you can select the Com port for your Arduino in the dropdown box.</p> <p>Press Connect after selecting the right Com port.</p> <p>This screen will appear when connected.</p> <p>I use the Backhoe mode selected in the bottom of the screen.</p> <p>with this mode you control all axis individually.</p> <p>Now you can move each axis by moving the "sliders"</p> <p>To make the Arm move to the position push Update. <em>Go easy on the sliders in the beginning</em></p> <p>The Delta slider controls at what speed the move will be done. Lower number = Higher speed.</p> <p>The Pause value is how long the Arm stays in the position before moving to the next position.</p> <p>When you have gotten the Arm to a position you wish as a starting position press the New Pose button.</p> <p>Move the arm to the next position and again press the New Pose button.</p> <p>Continue until you have all the desired positions.</p> <p>Pressing Play Poses will start the sequence you have programmed.</p> <p>To stop it again press Stop Poses.</p> <p>If you want to change a little on one step simply click on the step in the sequence. Press Load Pose followed by Update and the arm will go to that position.</p> <p>Make the changes you want and press Save Pose to save the new position into the step in your sequence.</p> <p><strong>I really hope this will help someone out there.</strong></p> <p>If you have any questions please write it in the comment section and I'll answer as fast as possible.</p> <p>*<strong>Happy Making</strong>*</p> Category: Robotics
With this file you will be able to print Snapper Mini - YA9GRA - Software and instructions with your 3D printer. Click on the button and save the file on your computer to work, edit or customize your design. You can also find more 3D designs for printers on Snapper Mini - YA9GRA - Software and instructions.