Snappy RepRap - Snap Together Printable 3D Printer
thingiverse
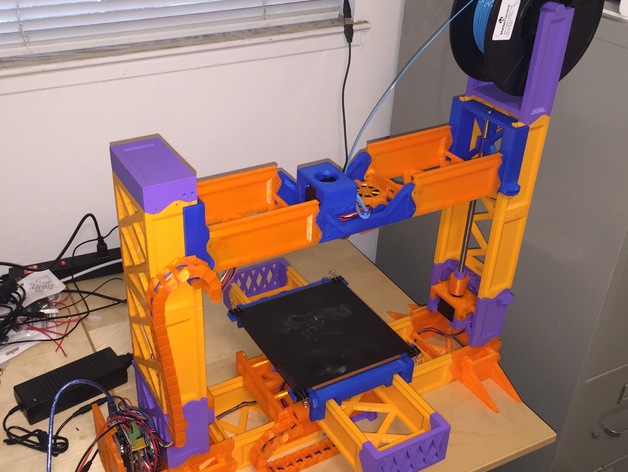
NOTE: THIS DESIGN IS OBSOLETED BY SNAPPY 3.0 The world's most printable 3d printer! (At least at the time I write this.) A cheap, snap-together, nearly screw-less 3D printer (reprap) design that minimizes use of non-printed parts. Current parts cost: under $300, including the cost of plastic used to print the parts! The two photos of parts shown above? Those were printed by my own snappy. You can get the OpenSCAD sources at:https://github.com/revarbat/snappy-reprap Print Settings Printer: Prusa i3 Rafts: No Supports: No Resolution: 0.25 Infill: 20% Notes: Designed to be printed in PLA. You can probably use ABS or other materials, but the snap joiners may need glue or acetone to hold the parts together better if the finish is too slippery. Post-Printing Assembly Tools You will need the following tools to assemble this printer. Qty Description 1 Multimeter for checking wiring. 1 Soldering iron. 1 Small rubber mallet to help convince some parts to join. 1 Mineral oil for lubrication. 1 Fine grit sandpaper to clean up the rails. 1 Optional cyanoacrylate glue. (super-glue) Electronic Parts You'll need controller electronics to drive the Snappy. Here's what I recommend. Prices given are based on what I found on Amazon with a cursory search. All Qty Description Total Cost Where Found 1 Power Supply, 120W. (300W w/ Heated Bed) ~$20 Amazon.com 1 Controller electronics. (RAMPS1.4+2560+Pololus) ~$45 Amazon.com 3 Mechanical microswitch end-stops and wiring. ~$ 5 Amazon.com 5 NEMA17 Stepper Motors, 40mm length, 1m cable ~$65 Amazon.com 1 J-Head Extruder hot end w/heater, thermistor. ~$32 Amazon.com 2 40mm 12v 2-pin cooling fan, 10mm thick. ~$ 4 Amazon.com 1m Wire, dual conductor, 22 gauge, stranded ~$ 1 Amazon.com 1 Heated Build Platform. (optional) ~$ 9 Amazon.com Non-Printable Hardware You'll need the following Hardware to build the cartesian frame: Qty Description Total Cost Where Found 2.4Kg Plastic Filament. (@ $30/Kg) ~$72 MatterHackers.com 2 ACME threaded rod, 3/8"-8 x 12" ~$18 McMaster.com 1 Extruder Drive Gear ~$ 4 Amazon.com 1 686 bearing. ~$ 1 Amazon.com 1 Borosilicate glass build platform. (213x200mm) ~$22 Amazon.com 4 Mini binder clips. ~$ 3 Amazon.com Printed Parts All parts should be printable inside a 150mm x 135mm x 110mm build volume. The sled end-cap part, which is longer than 150mm, can be printed diagonally. You will need to print out the following parts: Qty Name 2 Rail X-Y Motor Segments (download) 1 Drive Gears (download) 4 Motor Mount Plates (download) 10 Rail Segments (download) 4 X-Y Slider Sleds (download) 2 X-Y Joiners (download) 2 Sled Endcaps (download) 1 Platform Supports Set (download) 2 Rail Y Endcaps (download) 2 Y-Z Bottom Joiners (download) 4 Support Legs (download) 2 Rail Z Motor Segments (download) 2 Lifter Rod Couplers (download) 2 Lifter Lock Nuts (download) 2 Z Slider Sleds (download) 1 J-Head Extruder Platform (download) 1 Extruder Motor Clip (download) 1 Extruder Idler & Latch (download) 1 Extruder Fan Shroud (download) 1 Extruder Fan Clip (download) 1 Cooling Fan Shroud (download) 1 Rail Z Endcap (download) 1 Spool Holder (download) 2 Cable Chain Link Sets (download) 1 Cable-Chain Mounts Set (download) And one of the following motherboard mounts, depending on which electronics you use: Qty Name 1 RAMPS MotherBoard Mount (download) 1 RAMBo MotherBoard Mount (download) So, overall, about 160+ hours of printing. Parts Assembly Instructions for assembling the parts into the finished cartesian frame can be found at:https://github.com/revarbat/snappy-reprap/wiki/Assembly Connecting the Electronics Refer to the wiring info given with the controller board of your choice. Firmware Settings I recommend Marlin firmware. Whatever firmware you choose, though, here's the important parameters you're going to have to configure: Steps/mm for X and Y axes: 80 Steps/mm for Z axis: 1007.875 for ACME 3/8"-8 threaded rod. Steps/mm for extruder: About 96 (Will need calibration) X & Y axes homes towards the minimum (negative) direction. Z axis homes towards up/max/positive direction. The X/Y position when homed is 0, 0 The Z position when homed is around 160, and you will need to calibrate this for your printer and extruder. For Marlin firmware, edit these values in configuration.h: #define MOTHERBOARD BOARD_RAMPS_13_EFF #define TEMP_SENSOR_0 1 #define TEMP_SENSOR_1 0 #define INVERT_X_DIR false #define INVERT_Y_DIR false #define INVERT_Z_DIR false #define Z_HOME_DIR 1 #define X_MAX_POS 190 #define Y_MAX_POS 190 #define Z_MAX_POS 160 #define MANUAL_Z_HOME_POS 160 #define DEFAULT_AXIS_STEPS_PER_UNIT {80, 80, 1007.875, 96.0} For Marlin firmware, edit these additional values in configuration_adv.h: #define CONTROLLERFAN_PIN 10 #define CONTROLLERFAN_SECS 300 #define EXTRUDER_0_AUTO_FAN_PIN 10 How I Designed This This is basically the result of trying out a bunch of ideas I had about how to replace non-printed parts in various reprap designs with printed parts. Since I'm a programmer, I wrote it all up in OpenSCAD.
With this file you will be able to print Snappy RepRap - Snap Together Printable 3D Printer with your 3D printer. Click on the button and save the file on your computer to work, edit or customize your design. You can also find more 3D designs for printers on Snappy RepRap - Snap Together Printable 3D Printer.