Snow Globe
thingiverse
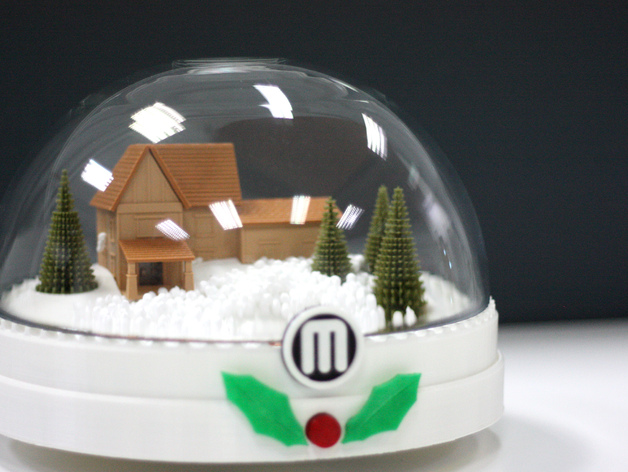
It's almost Christmas, so bring out the Snow Globes! This one combines MakerBot 3D Printing with littleBits Electronics. It's a long but rewarding project! The electronics are really simple to work with and are housed in the base of the globe. Give us a shout if you run into any issues! Video Link: https://youtu.be/yIq1SI4NSpM Details of any non-3D Printed parts that are required are listed at the bottom of the page. Print the following parts: In True White: 1 x Lower_Base.STL 1 x Upper_Base.STL 4 x Foot.STL In True White and True Black: 1 x MBT_Logo.STL N.B. Print the MBT_Logo.STL in True White filament, set the pause height to 4mm, then change to True Black filament. In Light Brown: 1 x House.STL In True Brown: 1 x Roof_Porch.STL 1 x Roof_1.STL 1 x Roof_2.STL 1 x Roof_3.STL 1 x Roof_4.STL 1 x Side_Roof_1.STL 1 x Side_Roof_2.STL 1 x Pier.STL In Army Green or True Green: 2 x Tree_1.STL 2 x Tree_2.STL N.B. Print the Trees without Supports to get the full effect! In Translucent Green: 1 x Holly_LHS.STL 1 x Holly_RHS.STL In Translucent Red: 1 x Push_Button.STL In Translucent Blue: 1 x Lake.STL In Translucent Yellow: 1 x Door_Front.STL Please leave your comments and suggestions! We'd love to hear them. Designed by the MakerBot UK Team - Sachin and Jonathan Print Settings Printer Brand: MakerBot Printer: MakerBot Replicator Z18 Rafts: Yes Supports: No Resolution: 200 Microns Notes: All parts print without Support. Support has been modelled into the 'Holly' parts - these can be broken off post-printing. Both the Lower and Upper Bases have been modelled with corner tabs to help with adhesion and avoid warping on the Z18 build plate. These can be snapped off post-printing. Post-Printing Step 1: Lower and Upper Bases The Lower and Upper Bases have been designed with corner tabs to help with adhesion and avoid warping on the Z18 build plate. These tabs can be snapped off using a pair of pliers. You may need to sand the edges down for a smoother finish. Step 2: Holly The Holly Leaves have been modelled with built in Support. This can be removed easily with a pair of pliers. You may need to clear away any excess filament with a file or craft knife. Step 3: Assembly Start by snapping the roofs onto the house. It should be a fairly snug fit, but don't worry if its a little loose, you can always add some adhesive to keep them in place. Slide the yellow Door Front piece into the underside of the house, so that it is flat against the front door. There is an undercut gap in the house for this piece to slide into. This translucent yellow will give the whole house a warm glow when the LED shines through it! Place the two larger trees in the larger holes in the Upper Base, and the smaller trees next to each other in the smaller holes. We used some adhesive to secure them in place. Snap the Lake into place, and slide the Pier into the slot sitting just above the Lake, cut out of the Upper Base. Snap the MBT Logo into the front of the Upper Base, marked out by the circular cut out. Push the Feet into the holes in the Lower Base and secure with adhesive, if required. Slide the Push Button through the front hole in the Lower Base, and leave slightly protruding as shown in the images above. Snap the left and right Holly Leaves into their respective holes. Step 4: Electronics Place the Battery into the battery housing on the right hand side of the Lower Base. Guide the Battery cable around to the central Power/Input housing and connect the cable to the Power module. Connect the Power module to the Input Button and place into position as shown below. Connect one of the Wire modules onto the end of the Button. Guide the Wire module around to the Fork housing. Fit the Fork Module into this housing and connect the Wire module to the single end. Connect both fans either end of the Fork module's output, and connect another Wire module to the last remaining output in the centre of the Fork (shown below). Connect the output end of this Wire module to the RBG LED, and mount this onto the block positioned to the left of the Fork module housing, also shown below. Place the Fans onto the fan locators and switch on the Power module. You're almost done, all that's left is... Step 5: The finishing touches... Mount the Upper Base onto the Lower Base, ensuring that there aren't any cables in the way. Check that the RGB LED is exposed through the slot in the Upper Base. Place the House into the cutout in the Upper Base. Cover the Lake with a few polystyrene balls and mount the Glass Bowl onto the Upper Base. You're done! Now have fun :) The other bits you'll need... littleBits Modules You will need the following to complete your Snow Globe: Power: 1 x Power (http://littlebits.cc/bits/littlebits-power) 1 x Battery + Cable (http://littlebits.cc/accessories/battery-plus-cable) Input: 1 x Button (http://littlebits.cc/bits/button) Wire: 2 x Wire (http://littlebits.cc/bits/wire-bit) 1 x Fork (http://littlebits.cc/bits/fork) Output: 1 x RGB LED (http://littlebits.cc/bits/rgb-led) 2 x Fan (http://littlebits.cc/bits/fan) Glass Dome We bought our Glass Dome from Ikea - here's the link: http://www.ikea.com/gb/en/catalog/products/10057251/#/90057247 Polystyrene Balls We used polystyrene packaging material, but you can pick this sort of stuff up at hobby and craft stores.
With this file you will be able to print Snow Globe with your 3D printer. Click on the button and save the file on your computer to work, edit or customize your design. You can also find more 3D designs for printers on Snow Globe.