SoC ExoSkeleton DevTop 2.0
thingiverse
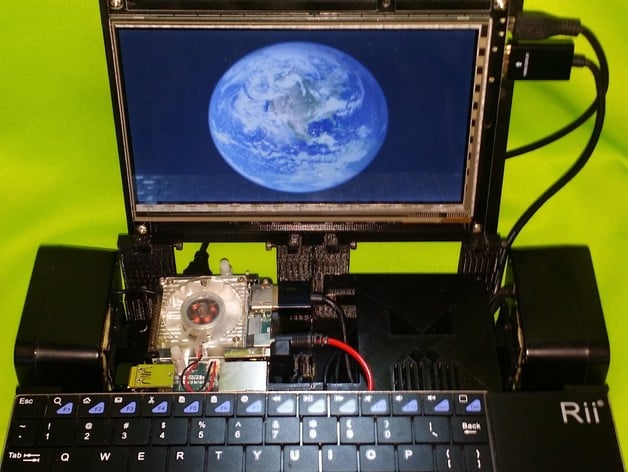
**Customizable SoC Enclosure with Chassis** The design of this enclosure allows for easy interchanging of various System-on-Chip (SoC) projects, protecting them when not in use. **Challenges and Solutions** * Weak mounting posts at low infill percentages. + Solution: Increase infill percentage to 40-60% for strong mounting posts. * Difficulty with aligning parts during assembly. + Solution: Use Superglue or Gorilla glue to bond the two halves together, ensuring a secure fit. **Assembly and Finishing** 1. Print the enclosure components at .12mm - .20mm layers with a .4MM nozzle. 2. Trim the brim neatly from all parts to ensure a clean finish. 3. Apply Superglue or Gorilla glue to bond the two halves together, ensuring all contacting surfaces are secure. 4. Allow the glue to dry completely before working on the hinges and other components. 5. Work out screw and hinge holes with a drill bit to ensure proper fitment. 6. Shorten speaker and USB cables to fit within the case. **Electronics Integration** 1. Connect speakers to the RAVPower battery's 1AMP 5v port. 2. Connect the USB hub to the RAVPower battery's 2.1AMP 5v port using a 5v 2MM to USB cable. 3. Connect the SoC of choice to the RAVPower battery's 2.4AMP 5v port. 4. Solder a USB power cable for the SoC to the battery and monitor. 5. Power on the system and connect the Rii keyboard. **Revision Notes** * Version 1 offers a 2.5" HDD mount and a tighter fit for the original Bluetooth RII Keyboard, but with a smaller battery. * The new design fits the rounded edge new style of RII well, but may require gorilla tape to snug up the fit for older styles with flat edges. **Conclusion** This customizable SoC enclosure offers flexibility and ease of use, making it an essential tool for those who work on multiple electronics projects. With its modular design and secure bonding system, it provides a solid foundation for a wide range of applications.
With this file you will be able to print SoC ExoSkeleton DevTop 2.0 with your 3D printer. Click on the button and save the file on your computer to work, edit or customize your design. You can also find more 3D designs for printers on SoC ExoSkeleton DevTop 2.0.