SoC ExoSkeleton DevTop
thingiverse
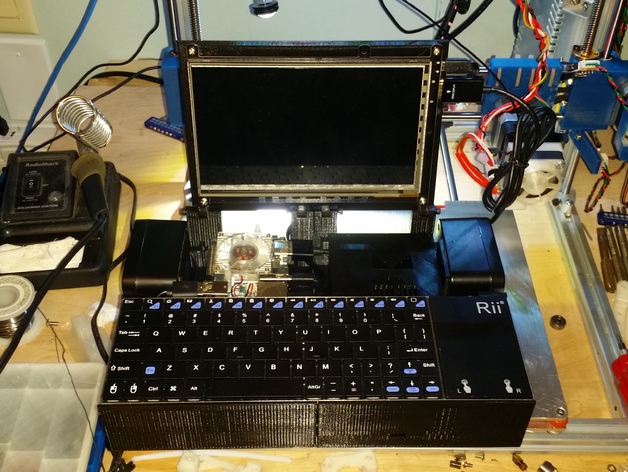
NEW VERSION!http://www.thingiverse.com/thing:1810728 Introducing - The "SoC ExoSkeleton" https://www.youtube.com/watch?v=cjATbCNmyYAFULLY CUSTOMIZABLE! All Drawings Included! Designed as an "Easy-Print" portable Development Platform for: Education and Classroom Programming (C, Python, and many others) Robotics Circuit Prototyping Circuit Design Testing SoC Testing and Design Firmware Development SoC Software Development Plus... Portable Gaming (w/Wifi and Bluetooth)(droid, nix and doze!) Portable NAS Wifi-Hotspot (with Android SoC) Octoprint Interface w/touch controls Portable Penetration Tester OBD-II Diagnostic Station (Code Scanner) LED Lighting Controller LED Signboard Controller Relay Controller for mid-sized Robotic Machinery CNC/Laser Cutter Control/Monitoring Drone Base Station Tor Node Portable PRom and EPRom Programmer And so many more I can't think of... This system has been designed and sized to fit ANY of the following: http://www.Adafruit.com (Linux and Android) Raspberry PI 1 Raspberry PI 2 Raspberry PI 3 Raspberry PI Zero (Both models fit on project boards) Raspberry PI A and B would likely fit on the Topmost project board. But were not tested. http://www.Hardkernel.com/ (Linux and Android) Odroid C0 Odroid C1 Odroid C2 Odroid XU4 http://www.Up-board.org/ (Linux, Windows 7, 8, 8.1, and 10) Up-board All Current 2016 Models Should Fit, but Untested: Banana Pi HummingBoard Beaglebone Black Lemon Pi Orange Pi And Many Others! The system Build as Shown Uses the Following Hardware: SoC shown = Odroid Xu4http://www.hardkernel.com/main/products/prdt_info.php?g_code=G143452239825 $74.00 Specifically designed to use a Rii Bluetooth Ultraslim Wireless Keyboard. K12BThttps://www.amazon.com/Rii-Portable-Wireless-Bluetooth-Stainless/dp/B017QZ483G/ref=sr_1_3?s=electronics&ie=UTF8&qid=1473192283&sr=1-3&keywords=Rii+Bluetooth $29.00 (Also works with the 2.4 GHz Wireless Version) Screen Shown = Odroid Vu7http://www.hardkernel.com/main/products/prdt_info.php?g_code=G144549683088 $55.00 (Can use Vu7+ for higher resolution for only 14$ more)http://www.hardkernel.com/main/products/prdt_info.php?g_code=G145981837236 $69.00 Battery Used = Anker Astro E3 10000mAh (1.5-6 Hours life depending on SoC and USBs connected/used. 6Hrs = Screen OFF!)https://www.amazon.com/Anker-10000mAh-Portable-Gerneration-Technology/dp/B009USAJCC $26.00 Speakers Used = HP USB Mini Speakershttp://www.ebay.com/itm/HP-Multimedia-Computer-Speakers-630797-001-USB-Powered-Desktop-Laptop-Music/112021578927?_trksid=p2352135.c100669.m3726&_trkparms=aid%3D222007%26algo%3DSIC.MBE%26ao%3D1%26asc%3D37107%26meid%3D80e650864c824d938ae1e205ded37f92%26pid%3D100669%26rk%3D2%26rkt%3D5%26sd%3D222238798129 $11.00 USB Hub Used = Ultra Slim 2.0 4 Port Hub, with DC Port for Powered Hubhttp://usbfever.com/index.php?main_page=product_info&cPath=17_92&products_id=439 $12.00 HDMI Cable (LEFT Angled)http://usbfever.com/index.php?main_page=product_info&cPath=160_162&products_id=2824 $5.00 Sound Card (Only Needed on some SoCs)https://www.amazon.com/gp/product/B00IRVQ0F8/ref=oh_aui_detailpage_o00_s01?ie=UTF8&psc=1 $7.00 5v USB power Cable with Switch (Only needed on some SoCs)https://www.amazon.com/gp/product/B00GGX94JI/ref=oh_aui_detailpage_o00_s00?ie=UTF8&psc=1 $7.00 Project PCBs (Fits TOPmost project plate, must be cut down for lower)https://www.amazon.com/gp/product/B0147YM3DG/ref=oh_aui_detailpage_o00_s00?ie=UTF8&psc=1 5 for $5.00 Some USB micro cables to chop up, and a bit of solder and shrink tubing. M2 and M3 hardware. Obviously MOST of the above are optional. All you really need is a Screen, and SoC, a Power source, Bluetooth Keyboard, and some Cables. Oh, and Superglue or Epoxy... Total with all parts used = $231.00 Taking advantage of shipping deals on Amazon and Ebay, only 12$ in Additional Shipping. All Features : The DevTop is completely Flexible in its design, and is pretty much just a final "Rough Draft" Its meant to be something that has the needed dimensions already there, with tested clearance for the items listed in the build above, and is ready to be redesigned and reshaped or enclosed to your hearts desire! The design STLs include the Hinge as an individual printable part, that can be bonded or glued to any screen you require, or imported back into Sketchup and added directly into your designs. The SoC can be mounted front to back or side to side. Depending on Port Placement and User Need. EASY PRINT... This unit was created with ease of printing in mind. The 2 halves are built to be glued or bonded together after printing, and the Screen prints in one piece. Those 3 Pieces are all that is "Required" to get the Devtop up and running. The Project Plates and LED eyes are Optional. Hinges are made with a "Tight" Tolerance, to provide a slight tension after inserting the M3 Screws. This allows the screen to hold open or shut, without springs or latches. Just keep the screws Snug. Hinge is made to bond the 2 Halves together. providing a greater support for larger screens. (10 - 13.1") Led (Eyes) that Light up with the Monitor Switch or External Switch) Space Under Keyboard for a Flat 12v AA Battery Pack. Built in Speakers with USB Power. 2.5" Hdd/SDD/Msata Mounting Tabs (Over Battery) 4 Port Internal USB 2.0 Hub for extra connectivity. Layback Grooves on the Hinge Backs, allow for an Extra 10 Degrees of Back tilt on the Screen. Make the Monitor Hinge Mounting holes "Taller" for a greater layback. Open Chassis for Easy Access for Wiring and Cables to Robotics projects, or any other non-chassis mounted project or peripheral. ALL Sketchup Drawings and STLs are Included. (Showing Progression) Get the Latest Version of the Monitor, Left and Right Sides to build the most recent revision of the unit. Feel Free to modify and Redesign this unit all you like! ANY Prusa with a build area of 180x180x140+ can print this model. (Currently) This was created as a useful purpose to all the SoC projects I had half finished, laying around my house. Now They all have a chassis I can drop them into interchangeably, as needed, while using my old cases, to protect the SoC when not in use. Or, With the Up-Board that is soon to ship out, You can have a Ready and waiting Netbook Windows 7, 8, 8.1, and 10 Netbook/Laptop at your disposal as a part of your SoC Arsenal! :-D (Nerd-Gasm!) For Quick changes and Someone who moves through a lot of electronics projects, I find this unit to be almost a necessity. With enough Flexibility to make it Truly Useful! A place for Everything, EVERYTHING in its PLACE! :-P Enjoy! Z Print Settings Printer Brand: RepRap Printer: FolgerTech Prusa i3 Aluminum 2020 Rafts: Doesn't Matter Supports: Doesn't Matter Resolution: .12mm - .20mm Layers .4MM nozzle Infill: 35-60% for Mounting Post Strength Notes: Printing under 30% will make weak Mounting posts that break off with ease and cannot be tapped for a screw to be inserted. At that infill, they simply twist right off the model. Post-Printing Finishing and Bonding... Final Assembly... Trim the Brim Neatly from all parts. Try to be as Even as possible. The seam will show a lot otherwise. Glue the 2 halves together by standing them up on a table, one atop the other. This creates just enough pressure to bond them with Superglue. Be sure to glue all contacting surfaces between the two halves. A good bond makes it feel like one piece afterwards. Gently work the hinges down onto the tabs BEFORE allowing the model to Fully dry. This will ensure the hinges are able to fit, and that the glue (Like Gorilla Glue), cannot push the hinges apart while drying/reacting. Lay down on Plastic Wrap to Completely Dry. As it peels away easily or can be trimmed. Add the Speakers as Shown. I Used Gorilla Glue here, and Superglue to bond the halves. Shorten the speaker and USB cables coming from them to fit into the case, making sure they reach the USB sound card or SoC Sound Jack, and the Battery USB Port. Screw in the SoC of Choice, Solder up a USB power Cable for the SoC to the Battery and your Monitor, Power it all up, and Connect your Rii Keyboard! Bam... up and Running!
With this file you will be able to print SoC ExoSkeleton DevTop with your 3D printer. Click on the button and save the file on your computer to work, edit or customize your design. You can also find more 3D designs for printers on SoC ExoSkeleton DevTop.