Solar water heater - cheap DIY
thingiverse
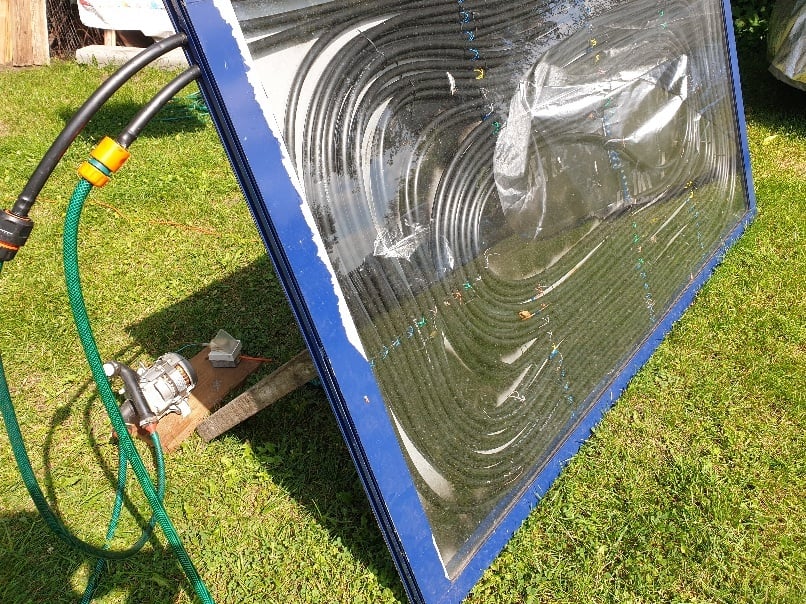
As my SPA pool uses over 2.3KW to heat (warm a bit - that they should write in the manual) I had built my own solar heater from old window, 100m of 16mm garden watering PE pipe conveniently in black and sheet of Dibond from old sign. Window is 2m by 1m and i have printed holders for pipe and secured it with zip-ties or thin wire from Ethernet cable. I used double spiral design - I had routed pipe every second slot in holder, and when i was inside I flipped pipe and turned around and go back. I fought that this way i will not have outlet of the pipe on the middle of window - but two pipes are near each other. This method is... #!@$! - PE pipe does not like tight bending - It will fold and it is impossible to unfold it and stay tubular. I had to cut those folds and use connector. I glued connectors to Dibond and after I had finished pipe routing i put on window (aluminium frame) and screw it together. Panel works. SPA built in heater is warming up 0.9m3 of water in 2deg C every hour. at evening water is ready. Solar panel directed at sun at about 12 o'clock raise water temp from 26-28deg C to 36deg C till 18:00. My family is happy with it. But there is some problems - you have to have another water pump - SPA pump has outlet 1" and when connected to 16mm pipe via adapter - pump displays error of flow problem :( I put into SPA standard garden pump with 1 1/4 connectors - it has no problem with pipe diameter - but there is a catch - pump uses 900W of power So I've tried old dishwasher pump (180W) and it works (it has to be primed as it can't suck water from pool when empty. And there is slow flow and air pockets problem. This is due to spiral design of this panel - water has to be sucked from pool, raised to height of inlet (1m) it flows down the pipe and then it has to be risen again because of spiral - and water is going up and down for 20 times as there is so many coils) So i designed a U bend for connecting straight pieces of pipe. it is tight U bend - to conserve space and maximize number of pipes (most likely one cannot buy such connector nowhere) I also had redesigned pipe holder - sockets are now deeper so there should be no need to tie pipe to holder (i left the wiring holes if pipe starts to be uncooperative. As holder is long and does not have to much bottom area - I added some rafts 0.3mm (1 layer) and printing in ABS went fine. ridge on top is to add ..rigidity :) now to rebuild panel I opened it and cut pipe to about 2m pieces , connected it all in zig-zag pattern and to keep pipes from changing position i used holders to clip them together why so much fuss ? now pump is rising water only about 1m high and then it flows only down (removing air pockets is also easier) - and after that it is going straight to the pool materials needed : window frame (u can build frame from planks and put glass) - I used aluminium 100m of PE 16mm BLACK! garden watering pipe - about 25euro connectors from 16mm pipe to Gardena hose connectors - 2pcs 4 euro - or print it but injection molded part will be stronger :) screws, rivets for holders back plate thermal isolation for back side of panel zip-ties and wire pump of your choice (i'm considering buying solar powered pump - about 20$ - it will be sun-o-matic :)) tools: drill step drill for holes :) in side of the frame for pipes riveter panel is leaning on two pieces of 2by4s but I have to weld a base with wheels - so my mother could move it around with sun by herself UPDATE: I recommend to print as thick as possible - even give 3 lines with 0.7 or more width - currently I am redoing this panel from old spiral design to paralel one - but now O have to fight (literally) with bend pipes :( as they were on spool then bought and later all season mounted as double spiral) I have added 2 photos - old one design being demounted, second is PETG pipe holder which ...melted because panel was left on sun for few days without water flowing inside I hope that ABS u-bends will hold - as water on outlet is never above 40 degrees C - and if not used panel will be turned around sun side (it will be mounted on shop cart - pictures soon)
With this file you will be able to print Solar water heater - cheap DIY with your 3D printer. Click on the button and save the file on your computer to work, edit or customize your design. You can also find more 3D designs for printers on Solar water heater - cheap DIY.