Solenoid motor
thingiverse
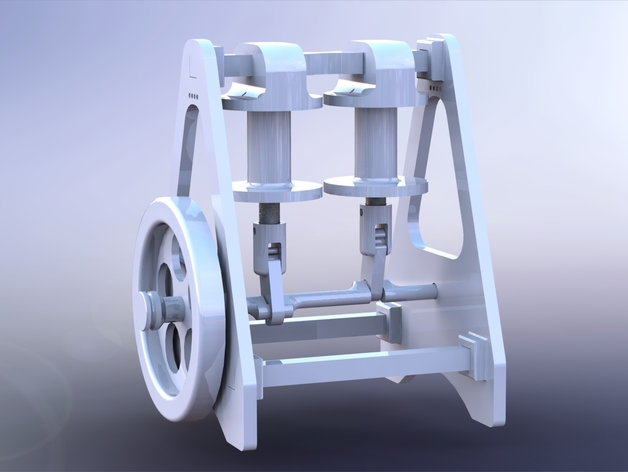
This is a functional model of a solenoid engine that I have already made and is currently working fine. I am sharing my SolidWorks 2014 files so you can adjust the model as needed. The following hardware will be necessary to assemble the motor: 6mm balls for the flywheel (not essential, but the motor should still work without them) Coil wire (I used 1mm wire) 2x 8x40 metal rods 2x Rectifier diodes 1x Capacitor 1000u/25V 2x Micro roller switches - these can be found on eBay 10Pcs KW12-3 Micro Roller Lever Arm Normally Open Close Limit Switch Assembly instructions: Print all necessary parts. 2x Connecting rods 2x Piston connecting rods 2x Coil holder1 2x Coil holder2 1x Commutator 2x Piston holders 1x Connecting rod top 2x Walls 1x Crankshaft 1x Ignition wheel 1x Flywheel (I suggest using 30% honeycomb infill and only printing supports if necessary) Glue together the coil holder1 and coil holder2 parts with acetone, then wind coils onto them. Connect the metal rod to the piston holders (I drilled a 2.5mm hole into the pistons and used a piece of 2.5mm welding wire as cotter pins, but making a thread on the end of the rods would also work). Connect the piston rods to the piston holders and the crankshaft. Everything should move freely before you do this, so use some sandpaper to finish the parts. Attach both coils to the top connecting rod and insert the pistons into the holes in the coil holders (which are assembled with the crankshaft and piston rods). Then, put everything together (attach walls to each side, making sure the crankshaft fits through the holes). Glue the flywheel onto the crankshaft and attach the commutator to the opposite wall (insert metal balls into the flywheel before attaching it if you have them). Insert switches into the commutator and attach the ignition wheel. You will then need to solder everything down, remembering to connect diodes to the coils. Find the correct spot for the ignition by turning the ignition wheel (this is the hardest part - I had to print multiple ignition wheels before getting it right). All done! If everything is properly connected, the motor should run. I needed at least 15V (3A) to get it running. Good luck! I welcome any suggestions on how to improve this model, so feel free to email me, send a private message, or leave a comment. Thanks! Printer settings: Printer: DaVinci AiO Rafts: No Supports: Doesn't Matter Resolution: 0.2 Infill: 30%
With this file you will be able to print Solenoid motor with your 3D printer. Click on the button and save the file on your computer to work, edit or customize your design. You can also find more 3D designs for printers on Solenoid motor.