Solenoid Probe
thingiverse
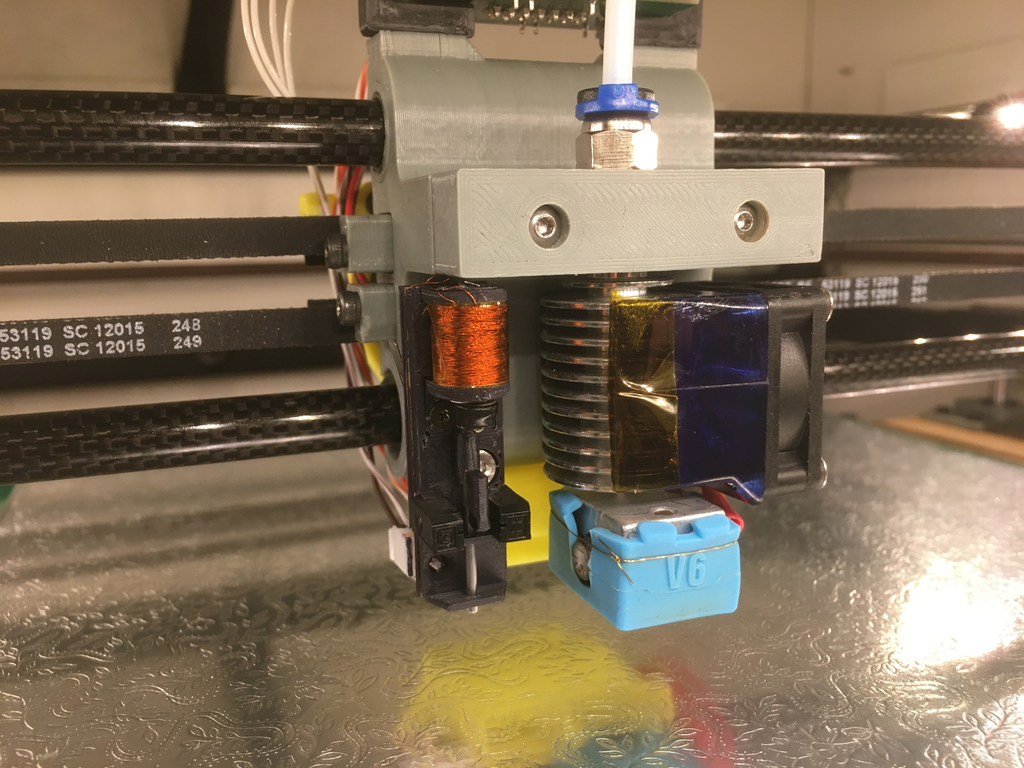
This remix uses a solenoid to drive the plunger. Detection is based on a photo-interrupter. ATTiny13A controls the H-bridge which drives the solenoid. Plunger displacement is 7mm. It triggers at 4mm, and retracts 3mm above nozzle, and is quite accurate. Additional details: The part is not published because it is very specific to my printer and mounting location, and would be of little use to others. The details are here if someone wants to replicate it for their printer. **Electronics:** The circuit diagram and ATTiny13 code is added to the files. Originally I intended to use servo signals, but in the heated chamber, the tiny13 internal RC clock drifted significantly, making accurate angle measurements unreliable. Its better to use an external Xtal oscillator based part like Tiny2313 for that application. The current code, just expects the High/Low signal and stows/deploys the probe. Maximum temperature this setup can be used is 80 deg C - which is the rated temperature of ATtiny13A. All other components can go upto 160 degrees. In Klipper, I define following configuration: ``` [output_pin PROBECONTROL] pin: ar15 pwm: False value: 1 shutdown_value: 1 [probe] pin: ^ar19 x_offset: -25.0 y_offset: 0.0 z_offset: 4.0 speed: 5.0 lift_speed: 20.0 activate_gcode: SET_PIN PIN=PROBECONTROL VALUE=0 G4 P150 deactivate_gcode: SET_PIN PIN=PROBECONTROL VALUE=1 ``` **Solenoid and Probe:** All parts are printed in ABS. The printed solenoid core is a hollow 3mm diameter with 1mm wall thickness. It is wound from 0.14mm enameled copper wire, length approx 24 m. The coil resistance is 25 ohm, leading to a current draw of 200 mA for 100 ms when the coil is operating. The wound coil length is 10 mm. An M3 screw at the top grabs the stowed plunger. It has to be adjusted so that it is not actually touching the plunger, or else probe won't deploy - the electromagnet has less repulsive force compared to the magnetic attraction of the 5mm rare earth magnet used. **Plunger:** It is made from 2mm iron wire. A 5mm rare earth magnet is glued to the top and then another 10mm section is glued to it. The 10mm section is what moves in/out of solenoid. In the fully deployed position, it is still 3mm inside the solenoid. This is done because I didn't have a 2mm weak magnet, which could be directly glued to the top of a plunger. Care must be taken that when the solenoid pulls the plunger in - that it does not physically touch the grab screw at the top. Once deployed, the gravity keeps it down. A flag mounted on the plunger, interrupts the light path when plunger moves up as a result of touching the bed plate. If anything else is not clear - ask away; I will try to answer.
With this file you will be able to print Solenoid Probe with your 3D printer. Click on the button and save the file on your computer to work, edit or customize your design. You can also find more 3D designs for printers on Solenoid Probe.