Soliddoodle Hot-end rebuild
thingiverse
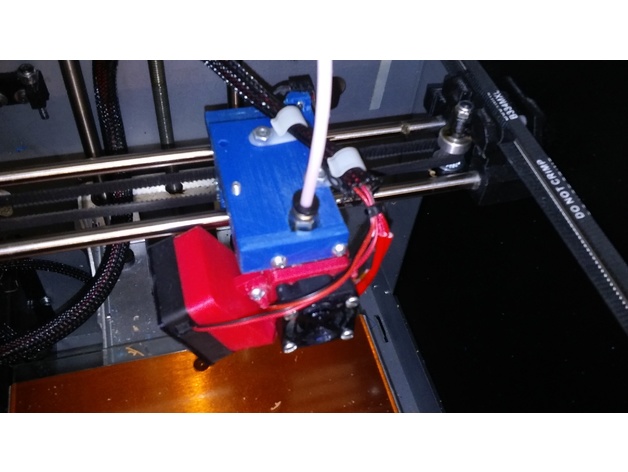
This project was completed almost two years a ago, but I still wanted to share it. At that time here at school we had one printer down because of a bad extruder, and another one in poor shape. When they were both up and running well, they both ran pretty much 8 plus hours a day so I think we had already had got our moneys worth. Since the rebuilding of both printers in 2015 they are still running strong. We needed to replace the existing Solidoodle extruder hot-end because that part was always out of stock when trying to order a replacement from Soliddoodle ($59). We had been trying to order a new hot end from Solidoodle for the printers for three months before finding out those parts were unavailable (we all know how that ended up). Decided if we wanted a working printer it would be best to try and order another different brand hot-end from the Internet and modify the X-axis carriage to hold that extruder. Found a hot-end kit on Amazon web site. There are several of the similar type being sold now for half what we paid. If you happen to pick one of them, make sure all the measurements are the same. [3d Cam] Metal J-head V6 hot end for RepRap 3d printer, 1.75mm filament tubing for “Bowden” extruder, 0.4mm nozzle Picked this “Hot-End” because it had all dimensions of the extruder and the possibilities for making the new setup a “Bowden” style filament feed with the direct drive extruder stepper motor mounted on the outside of the machine frame. Relocated the original extruder and motor mount to the outside of the printer case and converted it to a Bowden style feed. From web site: http://www.amazon.com/3D-CAM-Printer-Filament-Extruder/dp/B010MZ8RKW/ref=pd_sim_328_7?ie=UTF8&dpID=51gIFpO9XGL&dpSrc=sims&preST=_AC_UL160_SR160%2C160_&refRID=0WV9R5WW100NYVVMM4P8#customerReviews Print Settings Printer: Migbot i3 Rafts: No Supports: No Resolution: .2 Infill: 30 - 50% Notes: Parts on X-axis and around the extruder hot end were printed out of ABS. Other such as filament reel spool are PLA. Post-Printing Rebuilding the Extruder Hot-End First remove all the existing Solidoodle extruder hot end parts, the x-axis mounted extruder frame, drive motor, and fans. These parts were redrawn, modified and printed with ABS filament (ABS can take a higher temperature than PLA). The project also required a new hot end extruder cooling fan(30 mm) and fan for part cooling area cooling near nozzle(40mm). See Thingy - 780379 Web link: http://www.thingiverse.com/thing:780379 After the new extruder assembly on the X-axis is completed, the filament PTFE tubing can be installed out the back of the printer. Once this is done the external Bowden drive can be fabricated using the original drive motor by mounting it on the outside panel. Then a new filament spool holder was fabricated and mounted on the outside of the cabinet. See Thingy-2174411. Web link: http://www.thingiverse.com/thing:2174411 To layout and drill the mounting holes for the extruder drive motor and the filament spool holder, it is easier to take out the three small screws at the top of the printer and remove that side panel. The X-axis hot end extruder and Bowden setup was broken down to eight parts to print: 1). X-axis extruder mounting plate (mounts on the two X-axis 8 mm polished rods) 2). X-axis linear bearing covers (holds the linear bearing in X-axis extruder mounting plate) 3). Bowen hot-end extruder mounting plate (attaches the Bowden hot end to the X-axis mounting plate) 4). Bowden front cover (holds hot end into Bowden extruder mounting plate) 5). Small Bowden fitting adapter (on extruder motor end) 6). 30mm clamp fan mount (clamps to the hot end cooling fins) 7). 40mm duct fan mount (attaches to the 30mm clamp fan mount) 8). Z-offset adjustment bracket (needed because the new hot end is slightly longer than the old one. Also will need new bolt for adjustment) 1/4/2018 See new option for replacing the hot-end Bowden tubing fitting:https://www.thingiverse.com/thing:2747721 How I Designed This More detailed information: See more detailed instructions in attached Word Document (Extruder Project 3-28-2017) Requires that you do a auto PID tuning after installing the the new Hot-end. See attached Word document on Autotune. (Solidoodle Extruder Autotune 3-15-2016) added January 5, 2018 Solidoodle Hot-end Rebuild R1 - Hot end rebuild modification which eliminated the need for a bowden tubing fitting: https://www.thingiverse.com/thing:2747721
With this file you will be able to print Soliddoodle Hot-end rebuild with your 3D printer. Click on the button and save the file on your computer to work, edit or customize your design. You can also find more 3D designs for printers on Soliddoodle Hot-end rebuild.