Solidoodle 4 CoreXY rebuild
thingiverse
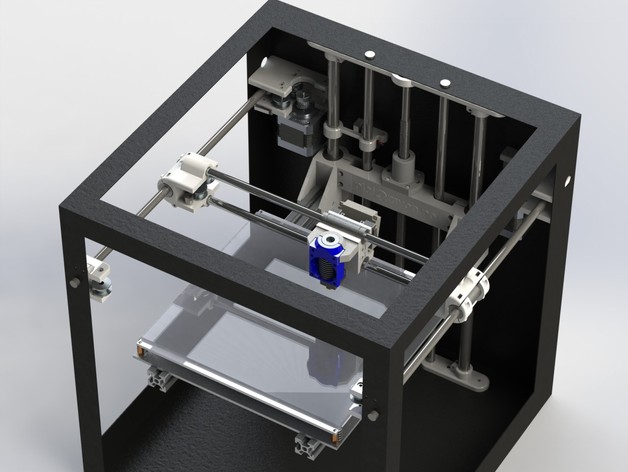
Update 24.02.2019: New x-carriage for better cable management and an IR z-probe mount is now available. x_carriage_v2_split.stl air-guide_v3.STL e3d-v6-mount2.STL e3d-v6-mount2-front.STL Fully working with great speed and quality prints so far. The movable area measures 198 x 230 x 185 mm^3, but is limited by the 200 x 200 mm^2 build plate (MK3 aluminium). Extending Z from 185 mm to 200 mm is possible with some tinkering. Parts used: 3 MKS stepper motors MKS Sbase controller board 4 microswitches for X and Y end stops 1 optoswitch for Z-min endstop 2 LM12LUU bearings for z-carriage 2 12mm shafts (373 mm long) 1 STU1204 Ballscrew for Z-stage 1 5 mm to 8 mm aluminium shaft coupler 4 LM8LUU linear bearings for X and Y stages 2m GT2 6mm belt 2 GT2 20t pulleys for steppers 10 GT2 20t idlers without teeth 2 GT2 20t idlers with teeth some m3 bolts (mainly 25mm and 12mm, four 30mm) M2.5x8 mm bolts for microswitches 40mm radial fan for filament cooling M2 bolts for radial fan E3D v6 hot end Prusa aluminum build plate for mounting MK3A to 3 ultimaker2 spring for bed leveling 2 400mm 2020 aluminium profile 5 10mm m3 standoffs First test: https://youtu.be/q6vgMexu5Rc Second test (benchy): https://youtu.be/DDXMY-l8RRY Complete solidworks assembly is included. Nema17, E3D v6 and chimera models are not made by me, but I cannot remember where I downloaded them. If the original authors of these recognize them, please let me know and I'll attribute you. Print Settings Printer Brand: Solidoodle Printer: Solidoodle 4 Rafts: No Supports: No Resolution: 0.2mm Infill: 40% Notes: All parts printed in PETG Post-Printing Drilling out 8mm shaft holes Drill all 8mm shaft holes with an 8mm drill
With this file you will be able to print Solidoodle 4 CoreXY rebuild with your 3D printer. Click on the button and save the file on your computer to work, edit or customize your design. You can also find more 3D designs for printers on Solidoodle 4 CoreXY rebuild.