Sonic Screwdriver For My Wife
thingiverse
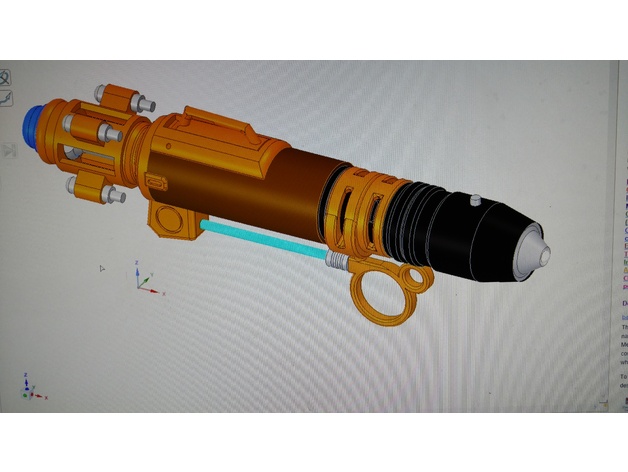
This started out as a simple Laser pointer for my wife but since I cant leave well enough alone it has turned into much more. First off need to give credit to TheDoctorsApprentice for the inspiration withhttps://www.thingiverse.com/thing:1232280 And Honus for his screwdriverhttp://www.instructables.com/id/DIY-functional-Sonic-Screwdriver/ They both gave me the crazy idea i could do this. It has taken me three months and many different redesigns to get it to this point. Now I have to say yes it is similar to River Song's Screwdriver but It is not exact. All I had to go by is pictures on the internet and we all know how accurate they are. The scale is off a bit making this one larger but I made it beefy to allow usage as a everyday tool, laser pointer. I also had to make room for the items inside the unit. Look back at the cross section you will see three red switches they are robbed from the control panel of a printer. they activate the leds and the laser pointer and the piezo speaker. I used a LIPO Charger in the front under the top cover at a angle to recharge it. I used a Arduino nano for my layout, it is the green board shown, but i will be using a Mini Pro for the actual brain. the battery is a 3.7v 500mah battery. Shown in purple in the cross section. I have it setup to use the front button for the Sonic Screwdriver activation. The lower rings when compressed will activate the laser pointer. Then the rear button activates the rear flash light. I was able to hide the front and laser buttons in the unit but came to the conclusion that fumbling around in the dark it would be easier to have the flash light button easy to find out on the top. I am using Bronze PLA for all the Yellow objects. Black PLA where they are black. Silver is Aluminum PLA. I used clear PLA for the front nose piece and the lower light bar, both are lit up with blue LEDS. I made the handle out of wood impregnated PLA. So I could stain it later on. I could not figure out the handle texture of the original, or I say could not figure out how to design it with the texture the original. So that is where this one started to deviate and it went down hill from there. Why all PLA well my homemade printer has alot of trouble printing ABS. So went with what I could. The green thing in front of the battery is the piezo speaker. The second rear ring has holes in it that will align with the holes in the first rear sleeve. This my attempt at a volume control for the speaker. The first rear ring has a odd lump off the side of it. That is used to keep the lower rings from being compressed in a hand bag or something, and the laser pointer being lit up. I am taking a chance that the rear flashlight button doesn't get compressed and draining the battery...I will just have to see. The top cover is hinged with a 2 mm rod I had laying around, something i pulled from a printer at one point. I found with my printer the hole printed smaller. I could of used abs 1.75mm filament as a hinge by drilling the hole out a bit. I designed this to be assembled together with glue, some of the fitting is tight just for that reason. I plan on adding for looks four tiny screws to the Handle Sleeve for show only. They are robbed from CD Rom drives and the perfect size. If that turns out good I just might add others in different places to simulate it being assembled that way. At this point what I want to do with the code is above me and have gotten some help but they are having some trouble also. Takes a engineer to go above board on his designs. Like they say: There comes a time in every project you have to send the engineer back to the office and just finish the darn thing. So here I am posting this and knowing I am leaving a lot out, but will keep track of this and update it as i go. At this point I am finishing the prints of mine and will be working on the wiring shortly. So that is why I don't have pictures of mine finished and working. I am thinking of making a box to carry this in. What I have in mind is something that would look like a large sun glasses case. I hope this item doesn't get flamed to awful much. I have spent awhile getting it to this point. I have to say it is the most intricate thing I have ever attempted. I still want to add and change it, but I am heading back to the office now........ Print Settings Printer: Home Made Rafts: Yes Supports: Yes Resolution: .1 Infill: Mostly 80% Notes: I tried to make each part easy to print and its orientation to the print bed with the least amount of supports. You will have to rotate them and look for curved chamfers that allow it to be printed with them facing down. The hardest item to print is the Front Handle Sleeve. That one had to have supports no matter what I did to it.
With this file you will be able to print Sonic Screwdriver For My Wife with your 3D printer. Click on the button and save the file on your computer to work, edit or customize your design. You can also find more 3D designs for printers on Sonic Screwdriver For My Wife.