Sony Action Camera Gimbal 2 axis
thingiverse
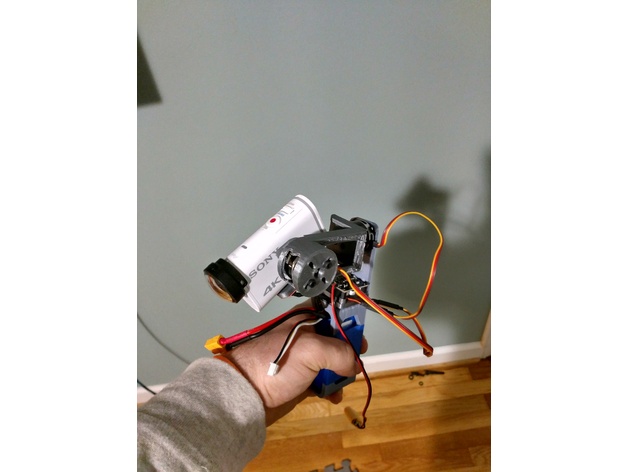
I noticed there weren't any gimbals on here that I liked for my sony X1000V action camera so I decided to make one. I kept it pretty simple, and I believe many other "barrel" style action cameras will work with this camera, as long as you have a tripod hole on the bottom of the camera(if not the only one you should have to re-design is the pitch). I'm using a Tarot Zyz22 gimbal controller and a couple of cheaper "Quanum 2208 Precision Brushless Gimbal Motors", but I believe these would be better suited to a camera with a lesser moment of inertia such as a go-pro. I'd recommend using slighly beefier motors... Once I do this I will update the files to show both new and old versions. I used Also be aware the adjusting settings with a Tarot zyz22 gimal is a f@%#@#$ nightmare. I've got mine dialed in decently, but it took about a week of tinkering to get it working and it's still not perfect. Things besides the print you'll need: Brushless Gimbal Controller (Arduino, Tarot zyz22, other) 2 gimbal motors (I used Quanum 2208 Precision motors) Battery + connectors 2 mm screws x 6 -10 (I really dont know how many I used... somewhere in there) 3mm screws x 6 - 10 ( I used 8 - 12 mm screws... you dont need to fill all the holes...) 1/4 -20 screw (1/2 inch... plus a couple washers) double sided tape to mount the gimbal controller and the accelerometer I needed some silly adapters to make my brushless motors talk to the gimbal controller.. they're ridiculously expensive, but try to make sure you find motors with the correct connectors to save yourself the trouble. Printing: Nothing to it... just print in a direction that makes sense. See print settings. Take all my settings with a grain of salt because I kinda make things up printing as I go... so I'm sure my settings aren't ideal. I printed at 202 C with a bed temp of 55C. Assembly: Attach Motors to Arms -> attach arms together -> zip tie (or tape) battery into holder -> sticky tape controller and accelerometer in place (I put the controller on top of the battery and the accelerometer under the camera plate) -> Attach camera via tripod screw (1/4 - 20) and use washers to make sure everything is snug. Calibrating and adjusting settings in gimbal controller: You're SOL if you need help from me. I literally tinkered and got it right(ish) via trial and error and never opened this catastrophically bad software ever again. Print Settings Printer Brand: Wanhao Printer: Wanhao Duplicator i3 V2 Rafts: Doesn't Matter Supports: Yes Resolution: 0.16 mm Infill: 50% + Notes: For mine I used 0.16mm.. I find this gives me reasonable quality and resolution around things like bolt holes without taking forever. Infill: The more the merrier.. I used like 15% for my first one and it actually held fine for just playing around... but I decided more was definitely necessary for a final product. Supports: Just for the Roll piece I think I used support to make the blank bit in the side work right. For everything else it's unnecessary.
With this file you will be able to print Sony Action Camera Gimbal 2 axis with your 3D printer. Click on the button and save the file on your computer to work, edit or customize your design. You can also find more 3D designs for printers on Sony Action Camera Gimbal 2 axis.