Sony NEX 5 Brushless Gimbal
thingiverse
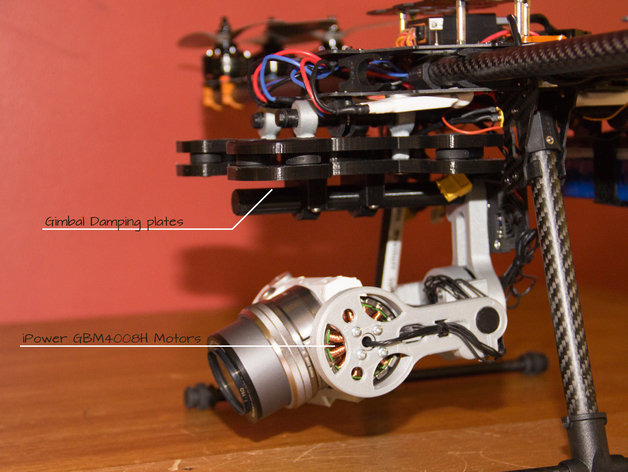
Worlds FIRST 3D printed gimbal for Sony NEX 5 cameras! Parts necessary: 2x iPower GBM4008H gimbal motors Martinez (or AlexMos) Gimbal Controller A bearing (OD: 28mm ID: 12mm) to fit inside the left arm some bolts and nuts Shock absorption rubbers (I used Tarot black) Preferably get some 16mm thick (hollow) Carbon Fiber tubes (I included files for tubes too, but they're not as rigid as I'd like) Please see the instructions for detailed construction manual. Instructions You need to print 1x base1.stl (bottom shock absorbtion plate) 1x base2.stl (top shock absorption plate) 4x base3.stl (tube connection clamps) 4x base4.stl (the rings to hang the gimbal on the rails). 1x NEX_5_imu.stl (case for Martinez IMU, I haven't provided any for AlexMos IMU's) 1x NEX_5_gimbal_left_pitch_arm.stl 2x NEX_5_gimbal_right_pitch_arm.stl (one for roll, one for pitch) 1x NEX_5_roll_link.stl (connection between roll motor and roll tube) 1x NEX_5_camera.stl (camera tray) 1x knobM5HEX.stl (knob to tighten camera to the provided tray) Printing NEX_5_roll_link.stl needs lot's of support, but it's fairly easy to clean up as the inside doesn't have to be that beautiful. While you are printing "NEX_5_camera.stl" file, pause the print halfway. There is a channel for the IMU wires to go through. Wait for the channel to appear and put a piece of strong string inside that you can use to pull the four wires for the IMU through. Assembly Please come back later for assembly instructions...
With this file you will be able to print Sony NEX 5 Brushless Gimbal with your 3D printer. Click on the button and save the file on your computer to work, edit or customize your design. You can also find more 3D designs for printers on Sony NEX 5 Brushless Gimbal.