Sound Effects/Audio Machine for Podcasts
thingiverse
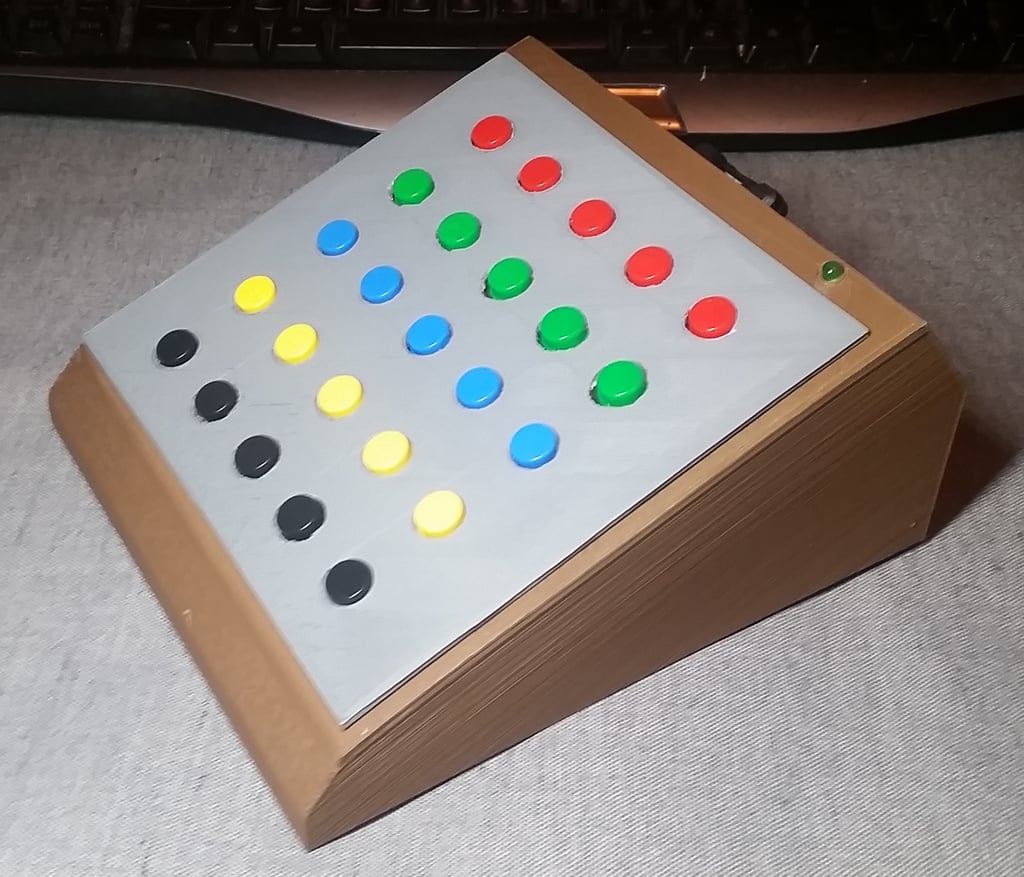
This is a two bank, 25 button Sound Effects/Audio Machine that triggers one sound effect (or any audio file) per button, which is read off an SD card that you populate. Change the bank switch from A to B to get a whole new set of audio to trigger. Perfect for podcasts. <b>This design has been updated to add a stop button to stop what audio is playing as well as a bank button to double the amount of audio tracks you can trigger (updated 6-9-19) Check the zip file for updated schematics and code. I did not include holes for the stop button, the bank switch or the bank B LED on the printable Main_Case.STL. You can drill them according to your choice of buttons/switches. The LED hole should be 5mm. I have also included the 3DS Max file in the .zip so you can add the holes or modify the case as needed.</b> Overly Simple Instructions: 1. Load up to 50 sound effects on to the SD card and insert the card into the Sound Effects/Audio Machine's card slot. 2. Power on the device. 3. With the Bank Switch in A, press and hold one of the 25 buttons to ready your sound effect. 4. Release the button to trigger audio from tracks 1-25. 5. With the Bank Switch in B, press and hold one of the 25 buttons to ready your sound effect. 6. Release the button to trigger audio from tracks 26-50. 7. If needed, press the Stop Button to stop what ever audio is playing. Schematics, diagrams, illustrations and code are in the zip file. The resistor values I have used for the key matrix can be modified to your liking. Upload 'Get_Keyboard_Matrix_Values.ino' to the Arduino Uno and press each button a few times to see the values displayed in the serial monitor. Choose the highest value for each key and then add 1. Ex: if repeatedly pressing button 08 gives you a highest value of 768, use 769 as the variable in the main code's 'decode' function. If there are button values close to each other, such as button 08 being 769 and button 04 being 772, you can add resistance directly to one of the button legs to increase it's value. It's probably best to have at least a 10 value difference between any given buttons. If you have any questions, email me at bob@schoolofawareness.com Materials I used: SparkFun MP3 Player Shield https://www.amazon.com/gp/product/B006TGID7Q Arduino Uno https://www.amazon.com/gp/product/B008GRTSV6/ 12x12x7.3 mm Tactile Push Button with Caps https://www.amazon.com/gp/product/B01E38OS7K Stop Button (normally open) https://www.amazon.com/Black-Momentary-Button-Switch-Normally/dp/B076P6154F Micro SD to SD Card Extension Cable Adapter https://www.amazon.com/gp/product/B01D9JIUU0 SD Card (anything small and cheap will work) https://www.amazon.com/Siitech-Premium-SDHC-Class-Memory/dp/B00DD1KI50 5.5mmx2.1mm DC Power Jack https://www.amazon.com/gp/product/B00MJVIFS2 Rocker Switch for power https://www.amazon.com/gp/product/B071Y7SMVQ Stop Button (or any normally open momentary switch) https://www.amazon.com/gp/product/B07F24Y1TB Bank Switch (or any spst rocker switch) https://www.amazon.com/uxcell-AC250V-Terminal-Toggle-Position/dp/B071DNCS51 3.5mm Socket Headphone Jack https://www.amazon.com/gp/product/B00EDNLE8W 2.1mm DC wire pigtails https://www.amazon.com/JacobsParts-Pigtail-Security-Voltage-Applications/dp/B00R1XZ09K 1/8" stereo male pigtail (Cheap solution, just cut the 1/4" end off and use the rest) https://www.amazon.com/LEMENG-QUAOGANG90-Degree-Angled-Stereo/dp/B01H3DWWUW (1 kit) Resistors https://www.amazon.com/gp/product/B072BL2VX1/ Prototype Perfboard board https://www.amazon.com/uxcell-15x20cm-Universal-Printed-Soldering/dp/B07DTK75KR Note: I could not find online the original prototype boards I used, so with the above link, you will need to cut two 2" x 5.6" (51.5 x 142mm) pieces and one 1.1" x 5.6" (27.5 x 142mm) piece. The holes on the boards are 2.54mm apart center to center, but the gap between boards needs to be 3.42mm (See diagram) Green 5mm LED https://www.amazon.com/100pcs-Ultra-Bright-Emitting-Diffused/dp/B01GE4WGTS (1 box) wire https://www.amazon.com/gp/product/B00B4ZQ3L0/ (1 Kit) Shrink Tube https://www.amazon.com/gp/product/B075WR9FVL/ Screws https://www.amazon.com/gp/product/B004W05UJU Adhesive Rubber Feet Bumper Pads https://www.amazon.com/gp/product/B072K4DV32/ Glue Gun and Glue https://www.amazon.com/AdTech-0453-2-Temp-Temperature-White/dp/B001689XCQ
With this file you will be able to print Sound Effects/Audio Machine for Podcasts with your 3D printer. Click on the button and save the file on your computer to work, edit or customize your design. You can also find more 3D designs for printers on Sound Effects/Audio Machine for Podcasts.