'Spanish' Pantile/Canal Tile Roofs for 28mm Wargame Buildings
thingiverse
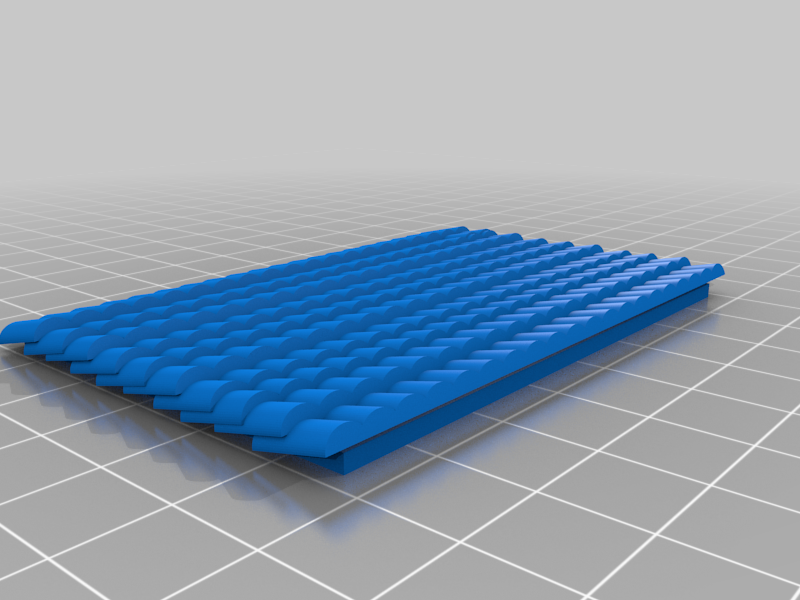
Pantile roofs, so useful for wargames buildings because they look right in southern Europe and parts of the Americas in any period, are kind of a pain to make, and sometimes difficult and/or expensive to get commercially. I discovered they're also hard to find STL files for, so I made some. I expect they'll see extensive use with my Peninsular War Napoleonics. These aren't perfect, but I think they work. The sizes are matched to go with a model I'm currently building; if design isn't your thing and you want some made to a particular size, get in touch and I'll see what I can do. They are scaled to "look about right" with commercially-made resin buildings and 28mm wargames miniatures I own (mostly Warlord Games and Perry Miniatures), so you may want to scale them up- or down a bit: I'd try around 55% for 1/100 or 15mm, 78% for 1/72 or 20mm, and 115% for 'heroic' 32mm (though they'd probably look ok as-is in 32mm). You will need to print two panels to make a full roof, and will need to put some sort of ridge-cap on the pair. Half a straw, some thin dowel, a bamboo skewer, or even a piece of scrap filament would probably work. As a rule more southern climes use a shallower, and more northern a steeper pitch to the roof (to allow snow to slide off). My model will use two of the longer panels to roof a 3" x 6" (75x150mm) section with a gable rising 0.5" (~13mm) above the side walls, and one shorter panel to roof an extension 2 x 3" (50x75mm) with a gable rising 17mm above the outer wall. The shallow pitch of these roofs is consistent with my resin buildings which will be used alongside the scratch-built model. There is a bit of overhang at the bottom and on both sides of both panels; I felt this would help it to look right and might facilitate gluing into place. The 2mm thick base of each panel is meant to represent the plank sub-roof which traditionally exists in this type of architecture. I printed with supports just to make sure the overhanging edges didn't collapse. They removed pretty easily. If you want taller roofs you could butt two panels together and glue them; this doesn't leave much overhang though so you might want to trim out some of the base of the "top" one to adjust the fit before gluing. You could probably also load two into your slicer, overlap them to achieve the look you want and print as a single piece, but I haven't tested this yet. I intended them as I'll be using them, separate pieces to combine into pairs as needed. I would recommend painting the underlying "planks" a dark brown or grey-brown and the tiles in reds and oranges for terracotta, blues and greys for slates, or browns for cedar shakes. At a pinch this could even be painted in yellows and tans as thatch, I suppose. Extra support beams underneath could be added to the full model and would look right; I'd suggest matchsticks or similar for these. My prints have some layer lines, which I expected but they don't bother me overmuch. You might be able to avoid these by using a finer resolution, and I'd imagine they'd print nicely in resin. I haven't tested either as yet, due to lack of both time and a resin printer (someday!). I would love to see what you do with these and hear how they work out for you, so please post comments and makes. Enjoy!
With this file you will be able to print 'Spanish' Pantile/Canal Tile Roofs for 28mm Wargame Buildings with your 3D printer. Click on the button and save the file on your computer to work, edit or customize your design. You can also find more 3D designs for printers on 'Spanish' Pantile/Canal Tile Roofs for 28mm Wargame Buildings.