
Sphere Aligner - An Analog Arcade Game
prusaprinters
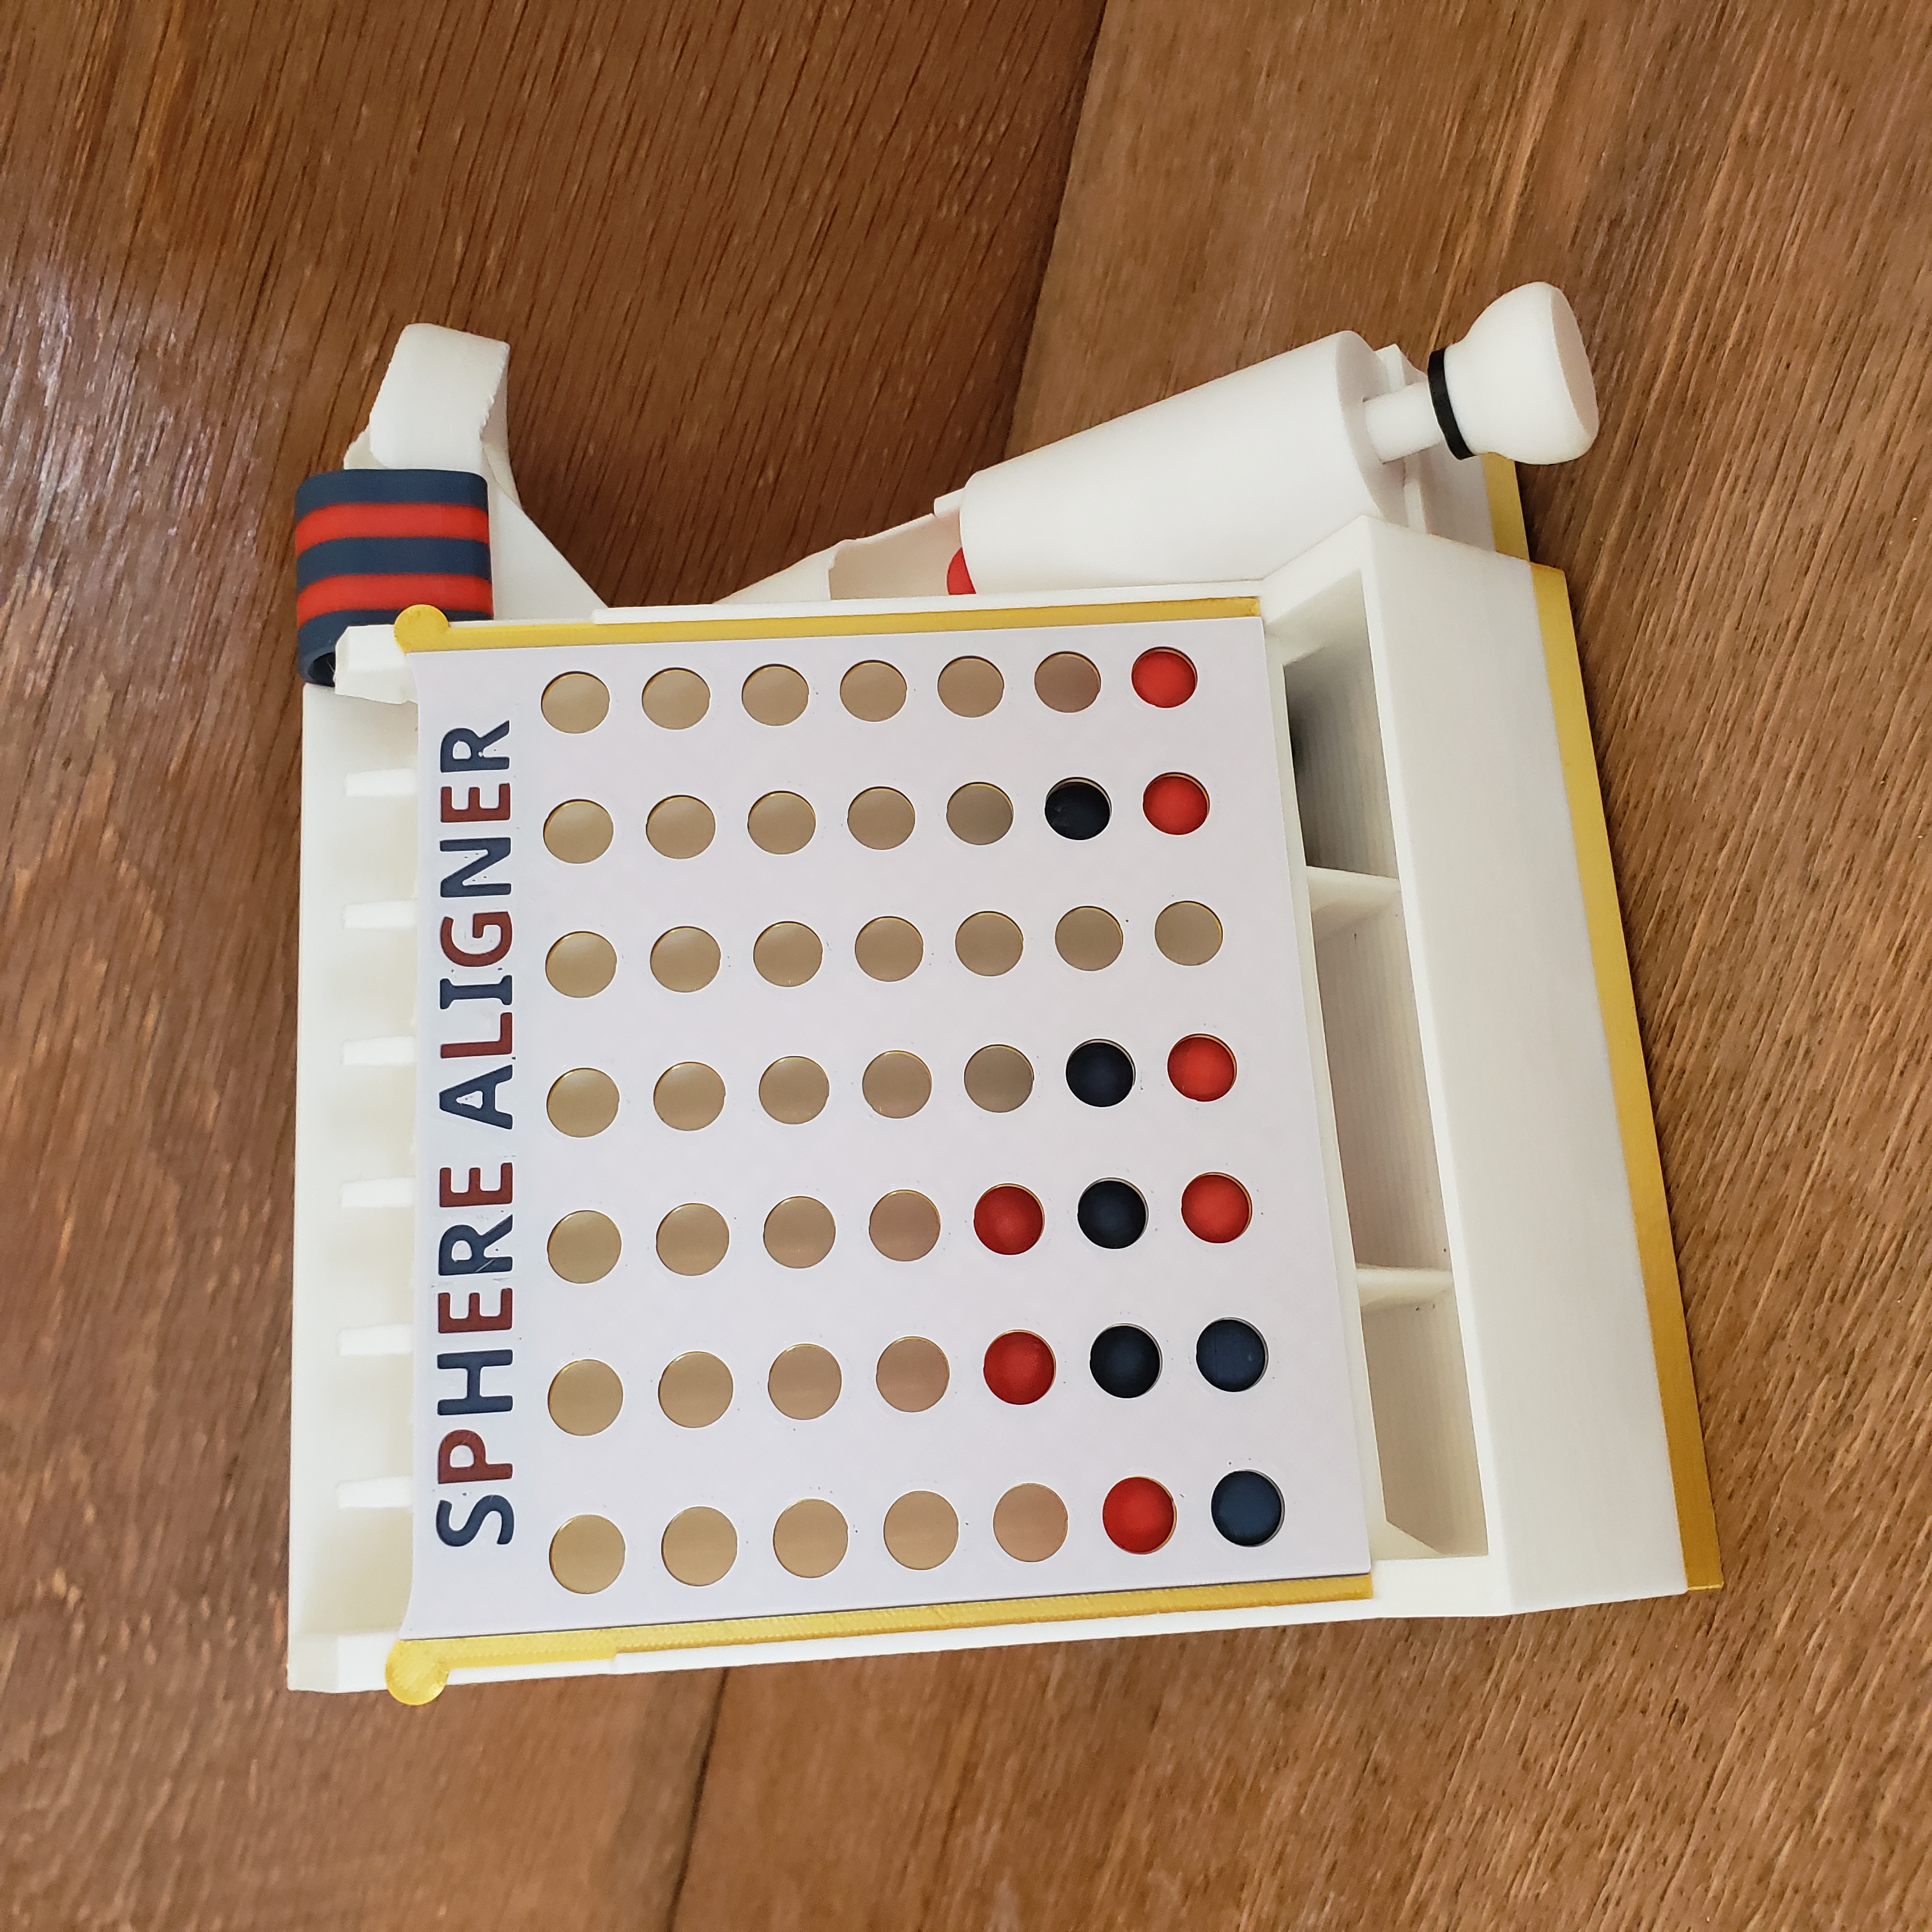
<p>Sphere Aligner is a fully 3d printed tabletop game developed for the PrusaPrinters 2021 tabletop and puzzle game competition! The game uses a robust pinball style spring launcher to shoot spheres up though a corkscrew tube, into a stepped filter system that guides the spheres down into one of 7 separate columns based on the power of the shot. Players compete to be the first to line up their spheres to get a predetermined number in a row.</p><figure class="media"><oembed url="https://www.youtube.com/watch?v=lkz7ixbkwNQ&ab_channel=3dprintedman"></oembed></figure><p>The spring launcher system is fully modular and can be very easily replaced or repaired by removing the key from the back side of the board. The key securely mounts the launcher to the game board, subverting the need for any traditional non-3d printed fasteners. The end grip of the launcher assembly can be un-threaded from the rod to conveniently free the spring from inside of the housing. </p><p>The front plate of the game board has a 7 by 7 grid of openings that make up the playing field for the spheres, which stack up in the columns behind it. When the game is over, the front plate can be slid upwards, releasing the spheres to fall down into the storage area behind the playing field.</p><figure class="media"><oembed url="https://www.youtube.com/watch?v=Wa1GjBxAbhE&ab_channel=ChristopherHuppertz"></oembed></figure><p>The only additional tools that are recommended for this project are a tube of super glue and some generic needle nose pliers. You could complete this project without them, but they will make the job of assembling the sphere halves together much easier.</p><p> </p><p><strong>SUGGESTED RULES</strong></p><p>1) To win a standard game, a player must align four spheres in a row, either horizontally, vertically, or diagonally in the playing field. To make the game easier or harder you can change the objective to aligning three or five in a row.</p><p>2) Players take alternating turns loading their spheres into the launcher and shooting them up the ramp into the playing field.</p><p>3) If the sphere bounces out of the confines of the game area, that is the end the player's turn.</p><p>4) If the sphere rolls back down into the launcher or stalls out somewhere along the way, the player may try again until they get the sphere into the playing area. (You can implement a 3 strikes rule to add more suspense to each attempt, if that better suits the flow of the game.)</p><p>5) If a sphere goes into an overfilled column, it is removed and the player’s turn is over.</p><p> </p><p><strong>SPRING DESIGN ATTRIBUTION</strong></p><p>The printable spring needed for this project was created by PrusaPrinters and Thingiverse user HeyVye and licensed under the Creative Commons – Attribution license. The spring is available as thing #4591444 on Thingiverse. Please attribute full credit for the spring design to HeyVye if it is used when remixing this project. All other parts and assemblies are original designs made specifically for this project!</p><p> </p><p><strong>GENERAL PRINTING INSTRUCTIONS</strong></p><p>This game was designed with FFF/FDM printers in mind. All parts used for testing were printed on a stock Prusa I3 MK3, without any real challenges. Some parts may be suited for SLA/resin printing, but that has not been tested as this point. The board for Sphere Aligner is rather large, so a 0.6mm diameter nozzle is recommended to reduce the overall print time. If you have not yet ventured into using larger diameter nozzles than the stock 0.4mm diameter size, I would highly recommend giving them a try. The downgrade in resolution when moving up to a 0.6mm from a 0.4mm nozzle is not too significant compared the large increase in overall print speed for most parts. However, the whole range of parts can be printed be printed using a 0.4mm nozzle if desired. I have provided some recommended settings for strength and print quality, but nothing should be particularly finicky if you would like to make you own adjustments. All parts are saved in their optimal printing orientation.</p><p> </p><p><strong>PART SPECIFIC PRINTING INSTRUCTIONS</strong></p><p>Base, PLA, 0.6mm nozzle, 0.35mm layers, 2 perimeters, >5% gyro infill, support from build plate, 5mm brim.</p><p>End grip, PLA, 0.6mm nozzle, 0.15mm layers, 4 perimeters.</p><p>Hemisphere and core, PLA, 0.4mm nozzle, 0.15mm layers, 2 perimeters, 15% infill, smooth build plate. It is important that the live Z height is set so that the first layer is not squished excessively. The hemispheres and cores need to stay close to dimensions of the model for the core to fit just right inside of the hemispheres. A full set is 25 spheres of each color. I would recommend reviewing the sphere assembly process section before printing these, and also starting out with some test spheres before printing a large batch so you know you are on the right track.</p><p>Plunger, PLA, 0.6mm nozzle, 4 perimeters, adaptive layer height (0.15mm for features at both ends, 0.4mm for the shank in the middle).</p><p>Gameboard, PLA, 0.6mm nozzle, 0.4mm layers, 15% infill, “support on build plate only”. I was focused on printing this part as fast as possible, but if I were to print this one again, I would have used adaptive layer height to make the ramps in the top portion that the spheres roll through to use a smaller layer height.</p><p>Spring, PETG, 0.6mm nozzle, 0.15mm layers, 100% infill, 5mm brim. Be careful to not damage the spring while removing the supports. PETG was chosen for durability. I have only used one spring throughout the design process and it is still working at full strength after well over a thousand cycles. </p><p>Front plate, PLA, 0.4mm nozzle, 0.2mm layers, 15% infill. The back surfaces of the letters are staggered so you can use filament swaps to incorporate the two colors you chose for the spheres if you want to add in a little extra flair.</p><p>Key, PLA, 0.6mm nozzle, 0.4mm layers, 3 perimeters, 15% infill.</p><p>Housing, PLA, 0.6mm nozzle, 0.4mm layers, 15% infill. </p><p><i>Tunnel (optional), PLA, 0.4mm nozzle, 0.2mm layers, 3 perimeters.</i></p><p> </p><p><strong>ASSEMBLY AND GAMEPLAY TIPS</strong></p><p>Assembling the spheres – Start by inserting the first layer side of the core into the hole of the first hemisphere. Snap the core into the hemisphere by squeezing the parts together with the needle nose pliers. Put a very small drop of super glue on the face of the second hemisphere. Place the face of the first hemisphere up against the second hemisphere, aligning the core into the remaining open hole. Press the two hemispheres together so that the glue will bond the two inner faces. It may help to use the pliers to squeeze the two halves together tight. Wipe off any excess glue from the sides of the sphere before it dries.</p><p> </p><p>Assembling the gameboard - Place the spring in the housing. Insert the threaded end of the plunger through the spring and out through the small end of housing. Thread the end grip onto the threaded end of the plunger. Place the launcher assembly onto the foundation on the side of the gameboard. Install the key into the keyway on the back side of the gameboard to secure the launcher in place. Slide the front plate into the grooves on the front face of the game board. <i>The optional “tunnel” part helps reduce the chance of a ball bouncing out of play. To add it to the gameboard, place the chamfered end towards the corkscrew loop and clip the two prongs of the tunnel down around the outer sides of the channel.</i></p><p> </p><p>Fine tuning adjustments – Here are a few different ways you can adjust your game if you are not getting satisfactory launch power for the spheres:</p><p> -Round off any sharp edges on the sliding surfaces of the launcher.</p><p> -Inspect the travel path of the sphere for any hidden obstructions left by the printing process.</p><p> -Adjust the infill and perimeters to make the spheres heavier or lighter to change how fast the spring can launch them (lighter = faster).</p><p> -Adjust the scale of the spheres to make them slightly smaller (the default size is 14.5mm). However, if they are made too small, they will not line up with the front plate grid.</p><p> -Adjust the length of the spring for more or less power (the fusion 360 files are available at the original source listed in the attribution section).</p><p> -The launcher housing system is designed to be modular so you can replace it entirely with a new design of your choosing that fits the foundation and key dimensions.</p><p><br>Playing the game – Some guy named Steve Jobs once said, “you’re holding it wrong.” The best method have found so far for launching spheres is to hold the game board with my right hand at the front and back of the bottom of the launcher foundation and then pull back the launcher with my left hand. It is very important to not let the impact of the end grip hitting the launcher housing shift the game board too much as it will cause the sphere to lose velocity. That grip arrangement also helps keep the plunger components centered within the housing to reduce friction and binding.</p><p> </p><p>Releasing the spheres – If a large amount of spheres are stacked up in the game board after a game is over, the spheres near the top will pick up enough speed to hop out and escape when you open the front plate. This can easily be fixed by blocking the opening with your hand as they fall down into the storage area.</p><p> </p><p> </p><p>Please let me know if you have any critiques or recommendations to make Sphere Aligner a better game in future revisions. </p><p>I have enjoyed working on this game for the competition and getting to finally play a working version of it with my family. I hope you enjoy it!</p><p> </p><p><i>Version 1.1 update: Added the “tunnel” part along with printing and assembly instructions for it. </i></p>
With this file you will be able to print Sphere Aligner - An Analog Arcade Game with your 3D printer. Click on the button and save the file on your computer to work, edit or customize your design. You can also find more 3D designs for printers on Sphere Aligner - An Analog Arcade Game.