Spidrack
thingiverse
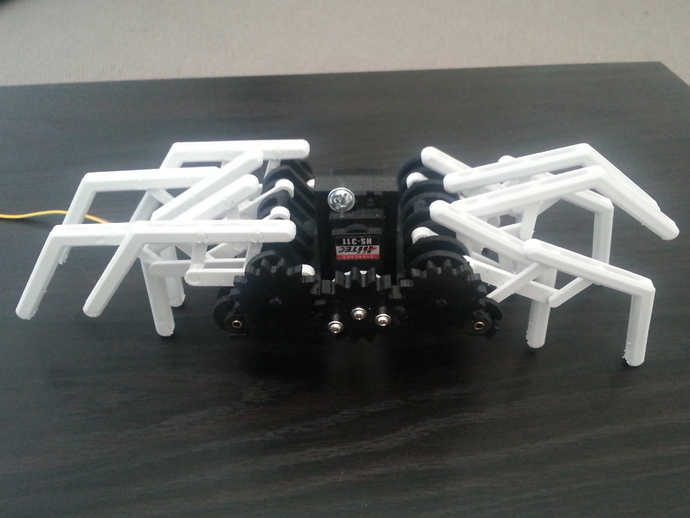
This walker robot features custom-designed legs, which are pre-assembled and specially modeled for easy printing. The body and crankshafts also come pre-assembled. It's perfect for carrying items like salt and pepper across a dining table while maintaining an even keel. Watch it in action on this YouTube video: http://youtu.be/fFPCq7Thvkk. The robot is made up of printleg.lua (print 12 times), printbody.lua (print once), printgears.lua (print once), servo-mount.stl (print once), and is designed to be printed with IceSL software. You'll also need a few screws, 4mm diameter metal tube for axels, and a servo motor (HS-311 modified for continuous rotation). At this time, the robot requires external power via a servo controller, but future versions will feature a small battery holder and servo controller. When printing the legs, ensure that the first layer isn't too squished so that the inner circles don't bond to the body of the legs. Assemble the legs by attaching them to the metal axel, then snapping the top hook-shaped part onto the crankshaft. After printing the body, remove the H-shaped support at the ends of the crankshafts and mount the gears with square holes on these ends. The third motor gear goes onto the servo, which is mounted to a bracket attached to the body with screws. The legs have been designed to keep the robot level during its walk, while being simple to print. When assembling the final product, ensure that the crankshafts are aligned so that legs with the most spacing on the left touch the ground along with legs with the smallest spacing on the right. The robot is slightly off-balance due to the servo, so a small counterweight has been added for balance. The design credits include gears based on parametric bevel gears by GregFrost and a mount for HS-311 servos by Hoeken. Have fun!
With this file you will be able to print Spidrack with your 3D printer. Click on the button and save the file on your computer to work, edit or customize your design. You can also find more 3D designs for printers on Spidrack.