spiggytech Monolith Open Chassis (FlexATX PSU Version)
prusaprinters
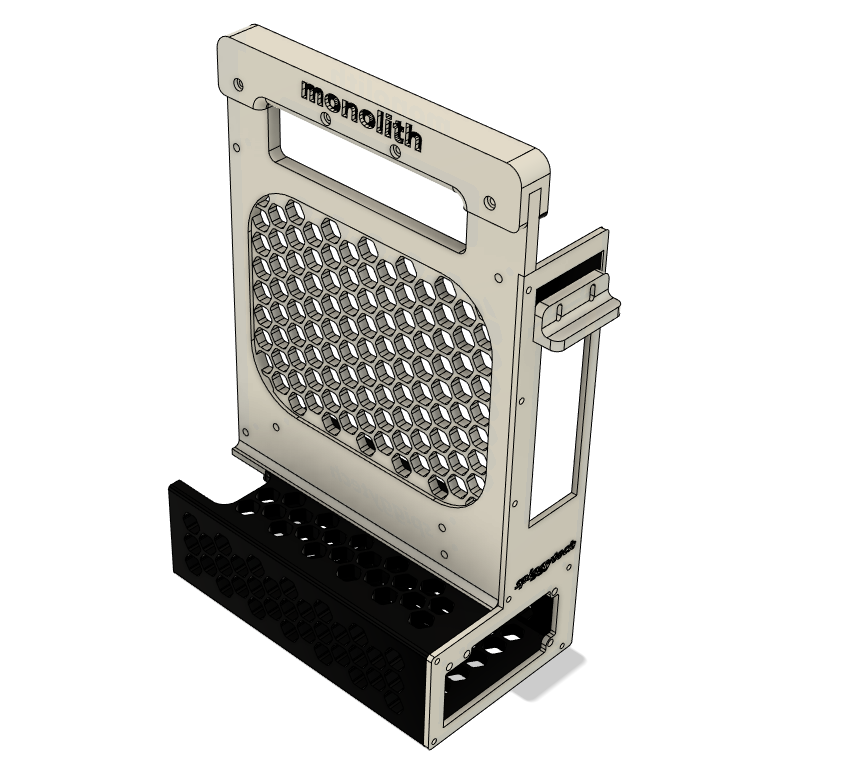
<p><strong>This is a work in progress</strong></p><p>The project started as a concept for a single print unibody open chassis. As I met the limits of my Prusa MK3S, I realized it was not possible and broke down the design into parts. </p><p>The enclosed design includes two types of motherboard trays of your liking. You can print the normal one that is a smaller profile. Or you can print the one with a cool carry handle.</p><p>For the SFX version, <a href="https://www.printables.com/model/306702-spiggytech-monolith-open-chassis-sfx-psu-version">click this link. </a></p><p> </p><p><strong>What you will find in this packet: </strong></p><ul><li>Base that houses your PSU</li><li>Backplate for your GPU/Mobo IO</li><li>GPU Mounting Bracket</li><li>Mobo Tray without carry handle</li><li>Mobo Tray with a carry handle (optional)</li><li>Carry Handle (optional) </li></ul><p><strong>The following materials will be required: </strong></p><ul><li><a href="https://a.co/d/4GQL7TJ">6mm Standoffs</a></li><li><a href="https://a.co/d/htfgM0G">M3x6mm Heat Inserts</a></li><li><a href="https://a.co/d/dCvP5dy">M3 Screw kit</a> </li><li><a href="https://a.co/d/5ymqT5i">16mm Button</a> </li><li><a href="https://a.co/d/3DLCAbJ">GPU Riser Cable</a></li></ul><p><strong>Here is a breakdown of components:</strong></p><p>Motherboard Tray</p><ul><li>4x Heat Inserts for Mobo Standoffs</li><li>4x Standoffs for Mobo</li><li>2x Heat Inserts for GPU Standoffs</li><li>2x Standoffs for Mobo</li><li>6x M3x6mm screws for all the standoffs</li><li>8x Heat Inserts for the back edge and bottom edge</li><li>4x Heat Inserts for the carry handle version</li></ul><p>PSU Base</p><ul><li>4x Heat Inserts</li></ul><p>Backplate</p><ul><li>8x M3x8mm screws</li></ul><p>GPU Mounting Bracket</p><ul><li>2x Heat Inserts</li><li>1x M3x6mm for mounting GPU</li><li>2x M3x10mm for mounting the bracket to the backplate</li><li>2x M3 nuts for securing the bracket to the backplate</li></ul><p>Carry Handle</p><ul><li>4x M3x10</li></ul><p><strong>Build Instructions:</strong></p><ol><li>Put the heat inserts into their respective components. I would start with the mobo tray because it uses 14x of those heat inserts. If you are using the carry handle version, install 4x more.</li><li>Attach 6x standoffs to the mobo tray. If you are using the carry handle version, install that as well with 4x M3x10 screws. The handle is directional, so pay attention. </li><li>Mount the PSU Base to the Mobo Tray with 8x M3x6mm screws</li><li>Mount the backplate and 8 screws.</li><li>Install the GPU bracket to the </li><li>Plug your necessary cables to the PSU and slide it into the housing. This is important because it will be difficult once the 16mm buttons are installed. </li><li>Secure the PSU to the backplate. You may need 4x longer #6-32 x1/4in screws because the backplate is chonky. I was able to complete the build with standard PSU screws. </li><li>Insert your 16mm button(s) into the PSU Base</li><li>Assemble your motherboard (RAM, CPU, SSD, and cooler). Attach mobo to the chassis</li><li>Attach your GPU riser to the mobo. Now attach the GPU to the Riser and gently finagle into the backplate.</li><li>Secure the GPU riser to the Mobo Tray</li><li>Screw down the GPU to the GPU bracket. Then tighten down the GPU bracket to the backplate. </li><li>Hook up the cables. Boot on the machine. </li><li>Let me know how you like it. If you have questions or concerns, I can be reached here or through the reddit page. </li></ol><p><strong>Build Notes:</strong></p><p>Please use 4 layers of wall for these prints so the heat inserts have more meat to grab.</p><p>For nifty color like mine, you can change filament colors at any time. I like the cookies & cream color as it matches the components to my PC. </p><p>I designed this chassis with <a href="https://www.silverstonetek.com/en/product/info/power-supplies/FX600Platinum/">in-line 150mm length FlexATX PSUs in mind</a>. If you use a 170mm+ length modular FlexATX PSU like the GEEEK custom modular, you will lose the position for the power button. I am working on a fix for that so you can use your 170mm+ PSU. Keep in mind, I have not tested the design with any FlexATX PSU with 90 degree connectors. If you want to try it and report the findings to me, I can make accommodations to the design. </p><p>You can use any GPU riser cable that matches the SGPC design. I recommend that length, but you can always go ~10mm longer. </p><p>I do not recommend using a chungus 3-slot+ GPU… The case will probably fall over. ASUS Pheonix RTX 3060 should be ok because it's short. </p><p>I also do not recommend using a chungus of a CPU tower cooler for the same reason. The case will probably fall over. Tallest one I've used is an AMD Wraith Prism, but my go-to is the AXP90-53x Full Black. </p><p>Updated 11/2/2022: </p><ul><li>The backplate IO area is now bridgeless to simplify the GPU install procedure</li><li>The GPU bracket screw area is countersunk slightly to accommodate the screw heads</li></ul><p>Updated 11/3/2022: </p><ul><li>Motherboard Tray (v1.1) now include cable tie points. </li></ul>
With this file you will be able to print spiggytech Monolith Open Chassis (FlexATX PSU Version) with your 3D printer. Click on the button and save the file on your computer to work, edit or customize your design. You can also find more 3D designs for printers on spiggytech Monolith Open Chassis (FlexATX PSU Version).