Spindle Control and Power Box
thingiverse
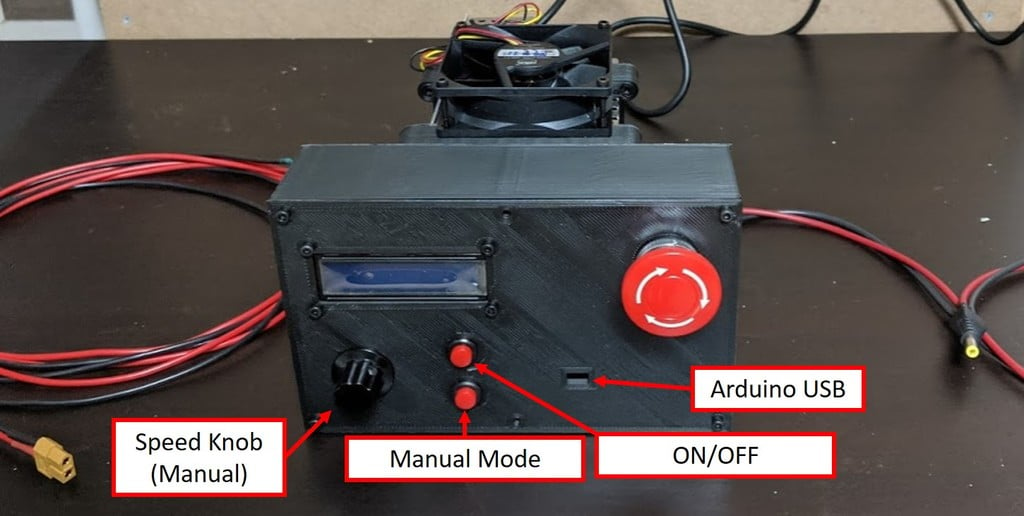
WARNING: This is a non-isolated PSU for the 500W spindle. Take care when working with high voltage that can shock and kill you. Also when plugged in the back near the plug has line voltage, Always unplug before wiring and servicing. Not responsible for injury or death. I would advise grounding the CNC frame to trigger the fuse instead of your body. FINAL UPDATE 1/31/2020: TLDR; Don't make this, instead make this -> https://www.thingiverse.com/thing:4198567 Some times its more important to admit when you did something that really wasn't that useful... I did learn a ton about noise and electronics. I find myself mostly using manual mode which negates most of the electronics. Knowing RPM is not as useful as I thought since sound of the bit in the material is more important than a number on an excel from the last board. As for vibrations checks slap a pair of googly eyes on your router and they start jiggling you know you have chatter and a feed-speed issue along with the sound. Eventually I am going to strip out everything but the relay and Kill switch and print a new cover for just a push button for on/off, the manual control knob, and the kill switch. I will make the kill switch kill the line voltage of the box. The relay will be a multi throw 12v relay that will turn on mains voltage to the drill and a vacuum. Will probably upload that as a separate thingy. UPDATE 8/26: New PCB works. I uploaded BOM and Arduino code. Still need to debug PWM reader from CNC and Hall sensor code but that will require more parts. This point good enuf. Going to take off the work-in-progress. Will update if i fix bugs. UPDATE 8/11: Updated PCB and waiting on next delivery from JLCPCB.com. Will post Build Guide after 2nd attempt works and get the code finished. Added spacer between back plate and front plate to give room to new PCB and more room for wires. UPDATE 7/29: You build and you learn... Optocoupler works great. I did need to adjust the MAX voltage screw in the PSU to get 100 volts at 100 PWM signal but all works out good. I should have used a pull up resistor configuration on my buttons. Also the PWM signal from ramps is actually on the ground side so my whole voltage divider is dumb. Will be designing a new PCB after I test to make sure i didnt screw up the hall sensor. UPDATE 5/28: WARNING: After starting into the circuits I learned this is a non-isolated PSU for the 500W chineasium spindle. That means you cannot connect it to your Arduino and then computer. Them were some angry pixies... Hella super angry pixies. Also at zero volts on the controller you are really floating at line voltage so treat the spindle cabling as if it were wall socket angry pixies. I decided to still use the banana clips for the hookups but printed shielding caps so there is no exposed metal when plugged into the box. So I plan on using a relay module and an optocoupler for the cutoff and speed control respectively. Still working on repairing the fuse and new Arduino nano... RIP little buddy. ORIGINAL TEXT: Wanted to mount my power supply boxes in a neater configuration. Was using (https://www.thingiverse.com/thing:3353444) which was great, but I had lots of boxes laying around my space with cables and all the power cords staring at me straight in the face. Consolidated the two PSU boxes for the MPCNC and added upgrades for spindle control. Goal is to - Allow both manual and G-code spindle control - Measure RPM directly with hall sensor on spindle and calculate load. - Possibly adjust Spindle voltage to target RPM commanded - Display all this data on a pretty LCD controlled by a Arduino Nano All lofty goals requiring me to sit down and finish the circuit. So work in progress because I would like to get back to cutting things so really Kill Switch and manual control is only implemented. Need to print 2 PSU brackets. Those are locked in place by the screws attaching the fan and two holes in the bottom that should attach the case. Then the back, spacer, and front are screwed on to that bracket. As usual with me... poorly hacked together FreeCAD file attached so you can modify to how you want.
With this file you will be able to print Spindle Control and Power Box with your 3D printer. Click on the button and save the file on your computer to work, edit or customize your design. You can also find more 3D designs for printers on Spindle Control and Power Box.