Spitfire (Remix)(7 Color Print)
thingiverse
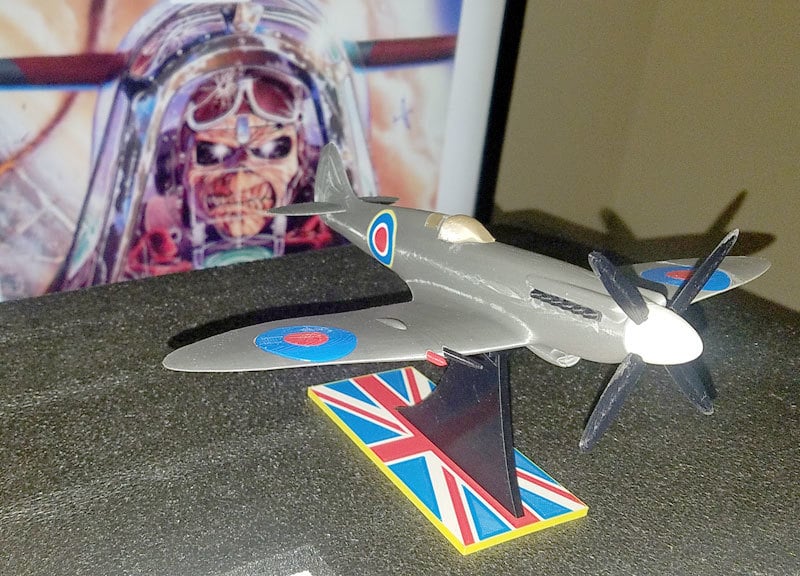
UPDATE 4/27/2020 I added a piece to the top of the base, giving it a slight curvature that perfectly cradles the Spitfire and eliminates any teetering issues. This new piece is included in a separate file called "Base_Update_Piece" and has also been integrated into the "Base_Basic" file for those who prefer the standard design. For users interested in printing the Union Jack base, I have provided the necessary files to create this unique design. Please note that all color layers should be printed with either 0.16mm or 0.24mm layer heights due to their thickness of 0.48mm. To achieve optimal results, slice these colors with Z-Hop enabled and a minimum height of 0.5mm. The files required for the Union Jack base are: 1st - "Base_1_Yellow" (you can choose any color you like; I used yellow to match the decals on the side of the aircraft) 2nd - "Base_2_White", remember to enable Z-Hop and set your layer height to 0.5mm or higher 3rd - "Base_3_Blue" 4th - "Base_4_Red_Plus" Additionally, I have included a new file called "Base_Union_Jack_Top" containing only the two top pieces needed for this design. I also made some significant updates to the engine exhaust, ensuring that it is now parallel and can be printed in two distinct colors: black for the rectangular block section and gray for the pipes. Regarding assembly, I fit the tail pieces together and attached them to the body. To add a touch of realism, I included printable decals on the original model. Furthermore, I designed three nose cones for 3,4, or 5 bladed propellers, ensuring they fit snugly in place. The accessories were also modified to appear more authentic, and the cockpit received some attention to make it look more realistic. In terms of modifications, I separated the engine exhaust into two distinct parts that can be printed in different colors. I also beefed up the base slightly for better stability. This was my initial attempt at printing this model, and I scaled it down to accommodate smaller printers. However, upon further inspection, I realized that scaling it down may have been a mistake due to the thin tail pieces not printing well. In future prints, I will aim to scale it up as large as possible to avoid any issues with frayed edges. Before gluing the body together, make sure to add the decal rings to the body and wings. The engine exhaust, blades, front cockpit piece, two body halves, and pegs require super-glue for proper assembly. Please note that the red/white/blue/yellow decals are extremely tight and should not be glued. Printing parameters: - Layer height: 0.16mm - Speed: 50mm/s - Time: 8 hours and 15 minutes per body half The base is suitable but could be improved to cradle the underside of the Spitfire rather than sitting flat, allowing for smoother movement left or right.
With this file you will be able to print Spitfire (Remix)(7 Color Print) with your 3D printer. Click on the button and save the file on your computer to work, edit or customize your design. You can also find more 3D designs for printers on Spitfire (Remix)(7 Color Print).