Spot Welder Case (V2.11) for a DIY battery spot welder
thingiverse
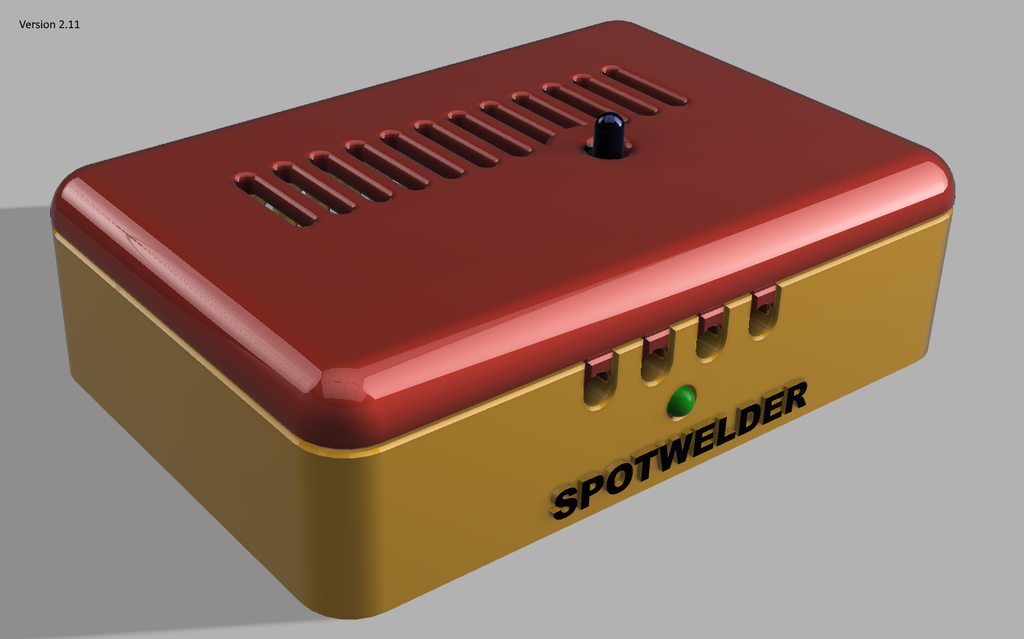
Ein **Gehäuse mit Schnappverschluss-Deckel** für ein DIY Batterie/Accu Punktschweißgerät wie auf Amazon erhältlich **passend für Platinen Version V5 - V8** (V5 wurde geprüft) In V8 ist die Taste auf der Platine etwas anders positioniert. Die Platine wird mit 2mm Schrauben für Holz oder Blech befestigt, der Schraubenkopf ist gerade groß genug um die Platte zu fixieren. Abhängig davon welcher Taster auf der Platine bestückt ist, muss die Taster Kappe angepasst werden. ggf. etwas Filament unter die Kappe einkleben um die Länge anzupassen oder den "pusher" anpassen und ankleben Leider wird für das Punktschweißgerät keine Bedienungsanleitung mitgeliefert. Der Taster muss etwas länger gedrückt werden (etwa 2 Sekunden) um die Betriebsart zu wechseln. Beim Anschließen/einschalten steht das Gerät auf Stufe 1, durch betätigen des Tasters (2 Sekunden) wird zur nächst höheren Stufe gewechselt. Es gibt 5 Stufen, welche jeweils stärker sind und nach der stärksten Stufen folgt der Modus 'aus'. Danach wechselt das Gerät wieder zu Stufe 1. Beim Wechsel blinkt die LED jeweils mit Anzahl der eingestellten Stufe und der Piezo piept entsprechend dazu. **Zum Schweißen:** Die Schweißstifte leicht auf das Nickelblech drücken und nach ca. 1 Sekunde Kontakt wird automatisch der Schweißimpuls ausgelöst. Es kann nur mit Nickelstreifen bis zu 0,15mm geschweißt werden. Schweißen von z.B. Kupfer oder anderen Materialien ist nicht möglich bzw. wird nicht funktionieren. A **housing for a DIY battery / accumulator spot welder with snap on top** as available on Amazon ** fits for PCB versions V5 - V8** (V5 tested) In V8 the button on the PCB is positioned a little differently. The board is attached with 2mm screws for wood or sheet metal, the screw head is just big enough to hold the PCBin place. Depending on which button is fitted on the circuit board, the button cap must be adapted. Glue some filament under the cap if necessary to adjust the length or use the "pusher" correct to lenght and glue it on. Unfortunately, no operating instructions are provided for the spot welder. The button must be pressed a little longer (2 seconds) to change the operating mode. When connecting / switching on, the device is on level 1, pressing the button (2 seconds) switches to the next higher level. There are 5 levels, each of which is stronger and the mode 'OFF' follows after the strongest level. The device then switches back to level 1. When changing, the LED flashes with the number of the set level and the piezo beeps accordingly. **To Weld**: Press the welding pins lightly onto the nickel sheet and after approx. 1 second of contact, the welding pulse is automatically triggered. It can only be welded with nickel strips up to 0.15mm. Welding of e.g. copper or other materials is not possible or will not work. __Links zu der Platine / links to the Spotwelder PCB:__ https://www.amazon.de/gp/product/B08NSRCS7N **Punktschweißgerät mit Strom versorgen** Zum Betrieb des Punktschweißgerätes verwende ich anstelle eines Bleiakkus einen LiPo Akku 5200mAh 3S 80C (Hardcase) Einen Stecker, welcher zum Akku passt, habe ich direkt an das mitgelieferte Kabel angelötet. Das Punktschweißgerät funktioniert mit dieser Konfiguration perfekt. **Power the spot welding device ** To operate the spot welding device, I use a LiPo battery 5200mAh 3S 80C (hardcase) instead of a lead battery. I soldered a connector that fits the battery directly to the supplied cable. The spot welding machine works perfectly with this configuration
With this file you will be able to print Spot Welder Case (V2.11) for a DIY battery spot welder with your 3D printer. Click on the button and save the file on your computer to work, edit or customize your design. You can also find more 3D designs for printers on Spot Welder Case (V2.11) for a DIY battery spot welder.