Sprenger Spindle Prusa V1/V2
thingiverse
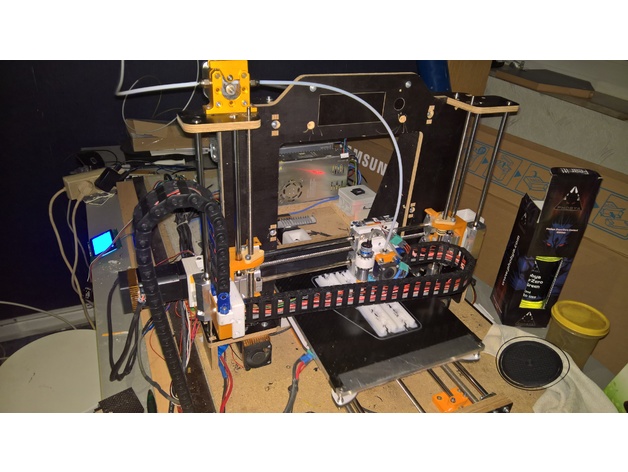
Originally it was a Prusa i3 from Geeetech. At the moment it's more brainstorming! How it began: A capacitive sensor! Then the GT2560 smoked away with 24V after 3 month. Then I used Ramps and changed the stepper motors! I decided to make it to a test object for my next printer. I bought a new frame from Capt Piquard.(http://www.thingiverse.com/Piquard/about) He's a great guy, very friendly, fast, helpful and very fine working ! So we decided to make a new project, testing steep-threaded spindles in x and y in combination with igus parts. Thanks to igus. They have a great support State: still working V1. The RADDS 1.5 with RAPS128 has come. This combi is still printing all the parts used for this mod! Nearly all the parts have been created in CAD (except the holder for the printer). The frame is ready. The last parts came this morning! (01.07.16) all the parts are here all the parts have been printed We'll see The new heatbed (completely. First come the other things)(Tiffany-style found at Dr-Henschke.de) Mods in Y: 6.35mm 25.4mm/turn steep-threaded spindles with two taps (4mm) and a Zero-Backlash nut from igus The side-bars have been stabilized with two rods every side, beneath the threated rod. You can use older rods or cheap one for that! It prevents to much pressure through wrong fixing the threated rod. You can use these rods to fix the printer, too! It's better than pressure on the threated rods Replacing the motor outside the side-bar The LM8UU in the bearing housings have been replaced with igus RJ4JP-01-08 The linear guides have been replaced by igus Drylin R EWM-08 -421mm both side-bars contain a SKF 4x16mm bearing. modified and self printed e-chain (two chambers for thermistor and heatbed). min and max endstop Mods in Z: new developed carrier with the possibility to weight the ballance (lower backlash on the other side of the motor) A second linear guide every side for more stabilization! Threated rods (igus drylin) with 5mm taps and a SKF 5x16mm bearing in the top-holder. Using igus dryspin lead screw nut with camber (DST-JFRM-LC-0001-TR8x1.5) for lower backlash Mods in X: 6.35mm 25.4mm/turn steep-threaded spindles with two taps (4mm) and a Zero-Backlash nut from igus The LM8UU in the bearing housings have been replaced with igus RJ4JP-01-08 The linear guides have been replaced by igus Drylin R EWM-08 both side-bars contain a SKF 4x16mm bearing. The Extruder Carrier has been modified! The Z- and Y- axis is working very fine. The decay isn't corrected, the second extruder not correctly defined, the new printbed isn't ready, but the first prints are great, better than all the other before! The fat Nozzles from mapa-refining are great! V2: The Display isn't working with RADDS. Therefore I bought a Sparklab LCD with Adapter - it runs fine Piquard has holidays. He has the new print Bed for CNC workings He makes the CNC things for my new developed quick change aluminium extruder carrier All the printed (except the prusa holders) will be printed again with Bridge Nylon. Most parts have been modified to get mor space for the x-axis, or for easier construction. Hall-E-Endstops have been ordered - I got them RADDS Expansion board has been ordered - I got it Ordered 4 other stepper motors from nanotec. ST4118L1804-A with 0.5 Nm for Z ST4118D1804-A with 0.8 Nm for X/Y Z is running fine, but a little bit slow, I hope the nanotec is a little bit faster (the motor holds 0.5Nm up to 300 turns/minute) X/Y looses steps, beause the motors have not enough power to hold the point when the direction change after a travelling period I'll change to E3D V6 Hotends. The Dual MK8 Extruders are too heavy. I demounted one and the prints don't loose steps. The prints are fine, but it's not fast enough It looses steps, not as much as with two extuders, but when Vref is all right, the motors become too hot. If Vref is a little bit too low, the motor hasn't enough power! Cooling the motors helps. I ordered two mk8 heatsinks and two 30mm cooler for the x-y stepper motors! The Raps 128 become very hot, too. The RADDS housing will be recreated with 100mm cooler I ask me, why some people say that they can print 300mm/s! with a GT2 2mm Belt, 20-22 tooth -> 40-44mm/full turn. A standard NEMA 17 from Asia makes not more than 100/120 turns/min (12V) -> 1.x-2 turns/s -> 70-88mm/s. I don't say 300mm/s is not possible, but you need nearly 8 turns/s or 480 turns/m I think about the Diamond Nozzle and a marzipan extruder for the quick change extruder carrier If someone knows the parameters to print multicolor with RGB colors instead of CMY with the diamond nozzle, your welcome. I want to use 5 Nozzles. the Diamond with RGB, one with black and one for PVA (e.g. Innosolve) Update: 25.07. The nanotec stepper motors works fine. I'll tell more about them, when Piquard has sent me the new CNC parts. The height adjustable endstop holder for Hall-E are working fine.http://www.thingiverse.com/thing:1689289 (When minimizing the height, you have to change the height value in EEPROM and save it. Use a smaller value than the real one. After that you have set G29) I'm sorry, but the illness of my wife takes a lot of time and money. So, I finished that project without any new information here! I got a new heater for the printing bed. It was expensive, but it has been built for me by a professional company. The e-chains are from igus. The V2 is ready. Photos and more will follow! Next Step is a full water-cooled edition of this spindle Prusa. V3 can you find here:https://www.thingiverse.com/thing:2835175 But then it ends! The printer works very fine, but the prusa has conceptional mistakes. So, I'll develope a totally new concept. Tho most things are in my head. I'll try to find some sponsors to help me developing it.
With this file you will be able to print Sprenger Spindle Prusa V1/V2 with your 3D printer. Click on the button and save the file on your computer to work, edit or customize your design. You can also find more 3D designs for printers on Sprenger Spindle Prusa V1/V2.