Spring Coiling Machine
thingiverse
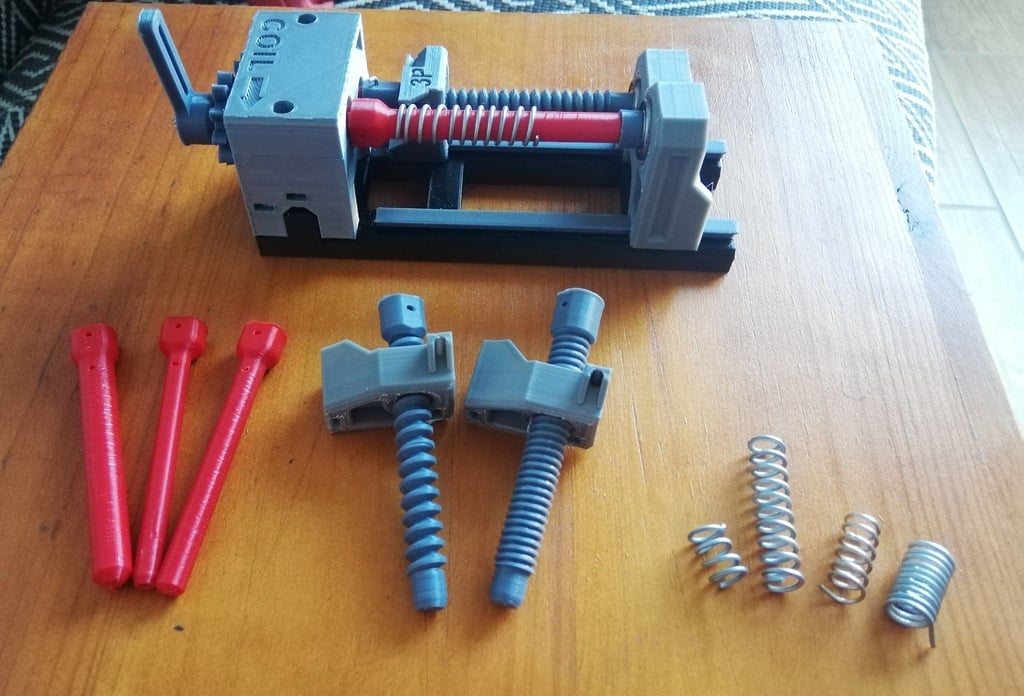
Imagine having complete control over creating custom springs for your innovative designs. Introducing the Spring Coiling Machine, a game-changing tool that empowers you to craft springs tailored to meet the unique demands of your projects. This ingenious device is designed to produce springs with precision and accuracy, catering to various applications by offering: • Spring diameters ranging from 7mm to 11mm • Wire diameters between 0.5mm and 1.25mm (with a recommended maximum of 6mm or 7mm for mandrels) • Three spring pitches: 2mm, 3mm, and 4mm • A maximum spring length of 50mm Here's how it works: The Spring Coiling Machine consists of two essential components: the Mandrel and the Lead Screw. The Mandrel determines the spring diameter, while the Lead Screw controls the spring pitch. Before starting, ensure you have chosen the correct mandrel, lead screw, and wire guide for your project. Align the wire guide hole with the mandrel's hole and feed the spring wire through until it is visible on the other side of the Mandrel. Turn the handle in the direction indicated by the machine until the spring reaches the desired length. Remember to keep the Mandrel pressed firmly against the back support to prevent damage to the Mandrel or Main Shaft. Once the spring is coiled, remove the mandrel and use a side cable cutter to trim the excess wire inside the Mandrel. Your custom spring is now ready for use! For further clarification, watch this video: https://www.reddit.com/r/3Dprinting/comments/hljb16/hate_when_you_need_springs_for_3d_printed_designs/?utm_source=share&utm_medium=web2x I've attached some valuable files to assist you in building the tool and designing your own springs. I've also included STEP Files, making it easy for anyone to modify or improve the design. Enjoy creating custom springs with complete control!
With this file you will be able to print Spring Coiling Machine with your 3D printer. Click on the button and save the file on your computer to work, edit or customize your design. You can also find more 3D designs for printers on Spring Coiling Machine.