Spyda500 FPV skids 2.0
thingiverse
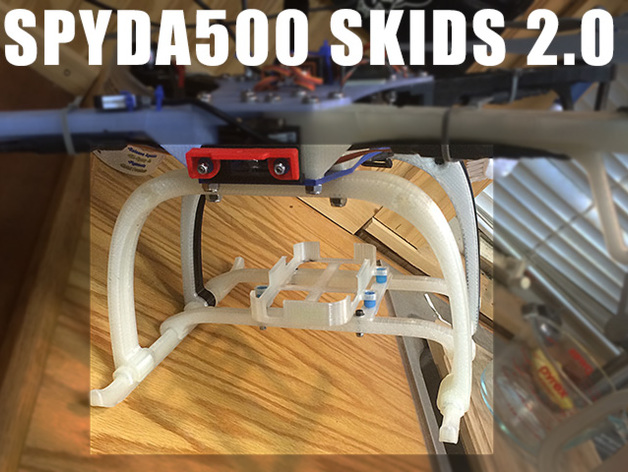
I designed an improved set of skids from my previous version, which were too lightly designed. http://www.thingiverse.com/thing:396403 Everything is beefed up. This fits the Imperial measurement version of the Spyda500. However, the cross brace has M3 holes for mounting a platform of your own design if desired, such as an iPhone 5S mount like this http://www.thingiverse.com/thing:897681 The files are: Front arm, Back arm, Long Skids (print two), and cross Brace (print 1 or more) See the instructions page for more details. Instructions I printed the arms and skids at 50% fill with 2 walls and the braces at 30% fill in PLA. They are strong, but still light. You could certainly boost the fill and change to a stronger material, but I would not go less. There are some flutes that help lighten the design, you may or may not need supports to make them come out correctly. I printed without them. After printing, test the fit of all the parts. To assemble: First, I attached the front and rear arms to the quad. Next, I spread some 5-minute epoxy on the notches in the long skids. Then on a level surface, set the quad down on the skids, making sure the bottoms are laying flat and all the parts are mated. Now, let it be until the epoxy is cured. For the cross braces, you could glue a single brace or a couple across the skids wherever you like. I wanted to be able to exchange platforms as needed, so I used two layers of electrical tape wrapped around the skids at the mounting locations to snug up the brace's fit and that works fine for now. Warning-this print will take every bit of your 250mm print bed, so make sure it is clear.
With this file you will be able to print Spyda500 FPV skids 2.0 with your 3D printer. Click on the button and save the file on your computer to work, edit or customize your design. You can also find more 3D designs for printers on Spyda500 FPV skids 2.0.