Squirrel cage / centrifugal fan 80 mm
prusaprinters
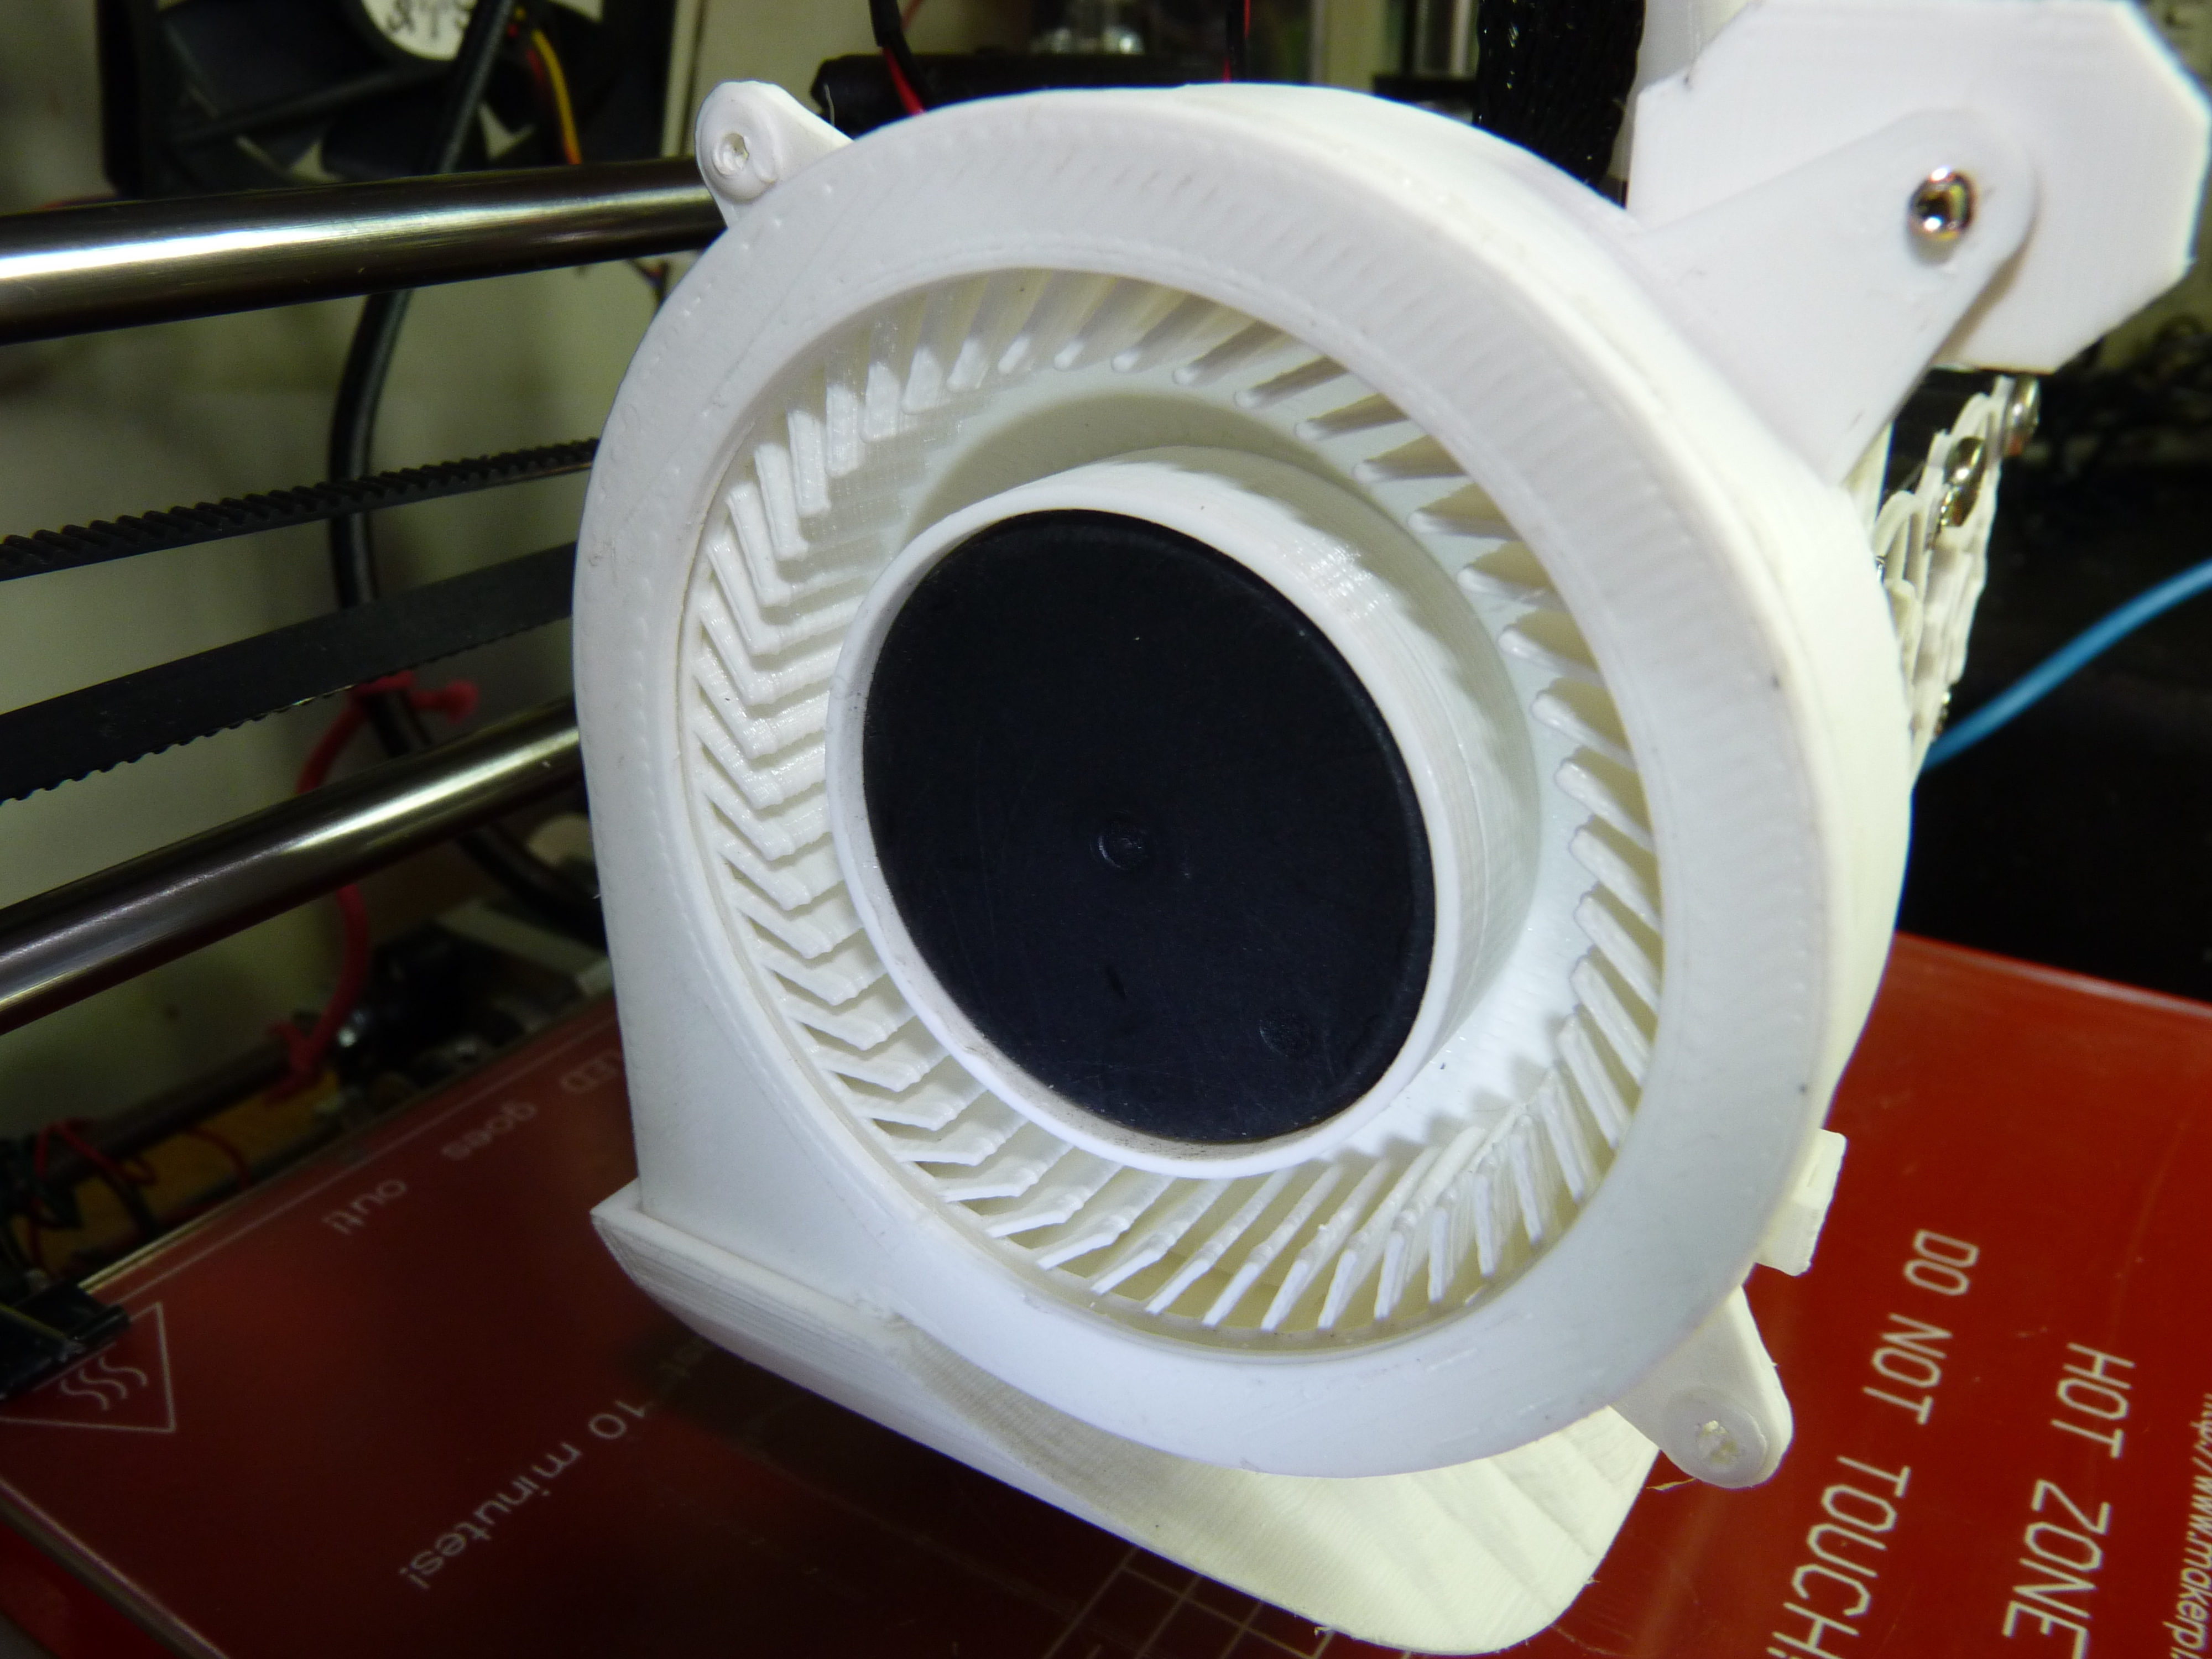
<p>This is your basic centrifugal "blower" fan, using the motor from an old PC fan. The blades' center hole is 39.35mm in diameter, sized to press-fit over the motor/hub from a Coolmax 8015M12S ND1 fan (after removing the blades and sanding it down smooth).</p> <p>There's a shallow indentation in the inside-bottom of the main housing, into which the motor should fit after trimming.</p> <p>The whole thing is about 18.8 mm thick after assembly, and the mounting holes are patterned to match those found on a common 80 mm axial fan (though I don't know what the correct hole pattern would actually be for a blower this size). You'll have to scale/adjust the blades in your model editor if you need to fit a different hub.</p> <p>This Thing includes both true "squirrel cage" blades and a sort of hybrid version based on the blades from a dead laptop fan. In both cases, they are "backward-inclined" blades, when assembled as in the second photo. You can also (after some sanding) press the blades on "upside down" (with the support ring inward), making it a "forward-inclined" fan, but I am not sure how the performance will differ from the "backward" arrangement, in practice.</p> <p>The fan inlet is 63.3 mm in diameter, and the outlet measures about 20 x 15.4 mm inside, 24.2 x 18.8 mm on the outside.</p> <p>Assembly:</p> <ul> <li>Find a fan similar to the one described above. If you have a sufficiently-full junk box, this shouldn't be hard. :-)</li> <li>Break the four spider bits on the back that hold the hub/motor to the main fan housing, and discard the housing.</li> <li>Remove the brand/model label from the back of the motor. Save it for later, or perhaps affix it to the outside of the squirrel cage fan's base.</li> <li>Trim the edges of the remaining plastic so that it's as round as possible - or at least, nothing sticks out past the actual round parts of the motor's base.</li> <li>Remove the old blades from the donor hub and carefully scrape and sand it down smooth. It should be 39.20 mm in diameter after cleanup.</li> <li>Pass the motor's wires through the small hole in the base and glue it to the baseplate.</li> <li>Press the new blades onto the hub, with the narrow support ring toward the top edges of the housing, taking special care to keep everything level and aligned perfectly - give it a spin by hand every so often to make sure. Press the blades almost all the way down, taking care to leave a small, even gap between the blades and the bottom of the housing.</li> <li>Apply power and check for interference/dragging, and if good, glue the cover on.<br/> Included are my original Blender work files. Contained in each file are the three main parts of the fan (each as a solid object), and a second copy of the fan blades as a group of parts that can be modified and then combined using boolean modifiers.</li> </ul> <h3>Print instructions</h3><h3>Licence: Creative Commons - Attribution Category: DIY Print Settings</h3> <p><strong>Printer Brand:</strong> RepRap</p> <p><strong>Printer:</strong> Prusa i3</p> <p><strong>Rafts:</strong> No</p> <p><strong>Supports:</strong> No</p> <p><strong>Resolution:</strong> 0.2 mm</p> <p><strong>Infill:</strong> 20%</p> <p><strong>Notes:</strong></p> <p>Take special care regarding your extrusion rate/flow rate when printing the blades, as you want to avoid the nozzle skipping across them during printing. Consider adding Z lift during travel moves. As these are very thin blades (0.7 mm nominal thickness), your printer will need to be particularly well-calibrated. Use your best filament and a small nozzle size for this (mine's 0.4 mm but smaller would probably have been better). For the centrifugal design, print with the narrow support ring down on the plate. For the squirrel cage blades, print with the wide, flat disc side on the plate. Have a suitable drill bit handy, as you'll probably want to ream the housing's mounting holes out a bit.</p> <h3> Post-Printing</h3> <p>Expect to need to do some sanding of the blades' edges and the inside of the housing. There's only about a 1.5 mm gap between the two, much of which gets taken up by normal inaccuracies in the printing process.</p> <h3> How I Designed This</h3> <p>I started by drawing a few cylinders in Blender, after taking some measurements of my donor fan. Some scaling here, faces deleted there, more faces added over in that spot, on and on until the base was done. The top cover was just the top edge of the base/housing, copied-pasted-extruded.</p> <p>For the blades, I used a dead squirrel cage fan as a guide, first drawing one simple, rectangular blade placed right on the edge of and tangent to the hub. Then I tapered the bottom edge toward the center, and added a shorter blade rotated 15 degrees from the first one (held only by the outer support ring). Then just copied and pasted around the hub until I had a full set.</p> <p>Next I added little reinforcing prisms at the junction between one of the blades and the support ring, then copied and pasted that around.</p> <p>I then created a second copy (the squirrel cage version) with the blades redrawn from scratch (but all other parts derived from the centrifugal version).</p>
With this file you will be able to print Squirrel cage / centrifugal fan 80 mm with your 3D printer. Click on the button and save the file on your computer to work, edit or customize your design. You can also find more 3D designs for printers on Squirrel cage / centrifugal fan 80 mm.