Stackable/expandable USB (and 12V) charging station case
thingiverse
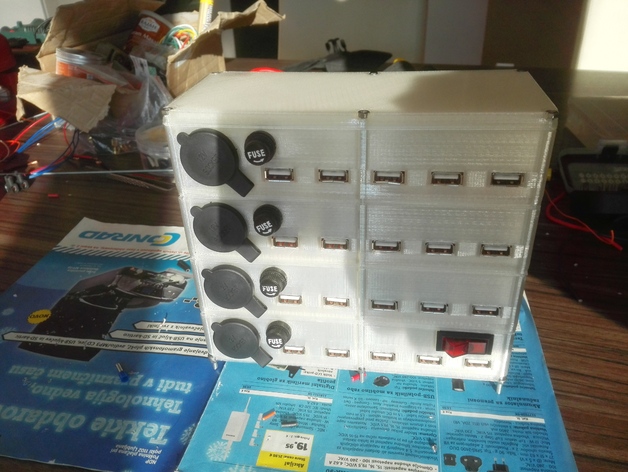
Human: This is a complete kit to create a multi-functional charging station capable of accommodating both 12-volt and USB chargers. The essential components are three basic elements, all accessible here: Bottom component for installation with 5 standard USB charging ports along with one standard automotive 12-volt socket. To make it efficient, a standard snap-in switch is added; however, you'll need to attach a glass fuse holder as well. A secondary piece, known as the intermediate case, holds space for both USB chargers and another automotive socket without a switch present. On top of this design, a protective cap called "top_cover" safeguards all from any damage. They are securely linked together with six M3 threaded rods, supported by twelve bolts (with one attached on the bottom and another to the top part) using twelve standard nuts. You can install covers designed as screw covers, both aesthetically pleasing and functionally practical. There have been repeated demands from customers for this design without a 12V socket installed instead focusing solely on USB chargers alone due to space reasons they appear thinner and work just fine without this extra part included. Print settings are optimized using craftbot specifically tailored for its maximum potential, giving best results every time. In printing options one can easily switch off support structures completely. If preferred transparency of materials will make sure you can enjoy glowing chargers on your desk. Here's what you do with the printed elements: Screw together these three separate parts - a bottom piece with sockets and modules that have an included screw for power delivery at five points. For optimal aesthetics install screw covers that cover every single nut in all the 12 points of view while securing everything tight by pressing little clips provided inside those plastic screws as a standard part. You should only need some minor adjustments based upon what's installed prior - but if issues persist contact customer service for prompt help! In case you encounter difficulties make sure there are proper electrical wiring connections.
With this file you will be able to print Stackable/expandable USB (and 12V) charging station case with your 3D printer. Click on the button and save the file on your computer to work, edit or customize your design. You can also find more 3D designs for printers on Stackable/expandable USB (and 12V) charging station case.