Standoff for Heat Bed Power Module Expansion Board (MOSFET) for Monoprice Maker Select, Wanhao i3, Cocoon Create
thingiverse
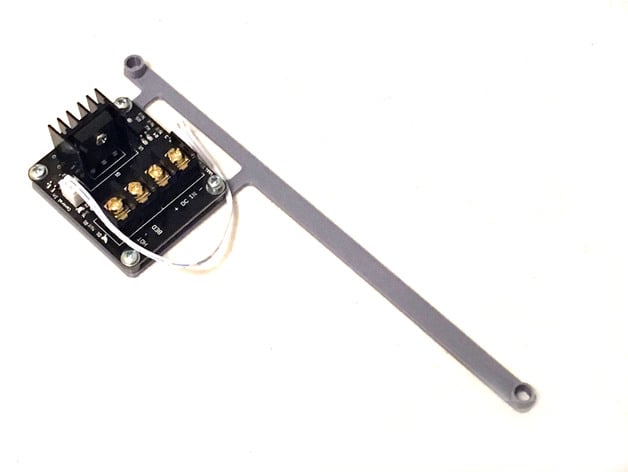
If you like this thing, please subscribe to Ethan Makes' 3D Printing YouTube channel for his support. The kid really needs your backing and he's aiming for 500 subscribers. Here are some updates and new configurations. You might need to rotate the model to make it fit on your bed. There are multiple models available so you can choose a configuration that suits you best. The left configuration seems to be the most popular choice. If you want the MOSFET board on the left, pick the model marked with "left". Anyone using a Monoprice Maker Select, Wanhao i3, or Cocoon Create who uses the heated bed should consider moving the high current and heat off of the main Melzi board to ensure its long life. The Heat Bed Power Module Expansion (MOSFET) board makes this possible and is easy to install: You can find various sellers offering this board from multiple sources such as Amazon, eBay, and Ali Express. Some people are printing standoffs and taping or hot gluing them in place. I wanted something a bit easier and more secure. This standoff fits over two existing standoffs for the main board and is firmly screwed in place. Parts needed (single MOSFET board): * 4 x M3x5mm 0.5mm pitch screws (can use up to 6mm length) * 4 x nylon washers * 14awg or 12awg wire The threads on the standoff are M3 0.5mm, the same as the original standoffs for the main board. Buy 4 M3X5mm (0.5mm pitch) screws and 4 nylon washers to mount the expansion board to the standoff. Purchase Links: * MOSFET board * 14awg Wire * Ring Terminals * Terminal Connectors (preferred) * Terminal Connectors (pluggable) Installation Instructions: 1. Remove the SD card from your printer's control box. 2. Disassemble the control box. 3. Remove the existing Melzi main board from the control box (keep the screws and washers). 4. Screw the MOSFET expansion board to the printed standoff using the 4 new washers and screws. 5. Place the larger, unthreaded holes of the printed standoff over the middle two standoffs built into the control box cover for the main board. 6. Screw the main board back in over top, using the original 4 washers and screws. 7. Use the wiring diagram for your MOSFET board (provided by the seller) to finish the installation. Remember to remove the SD card before you remove the main board to avoid damaging the SD slot when removing the board. Read more about the problem here: The Melzi Problem, or Why Did My Wanhao i3 Duplicator Catch on Fire? Control box disassembly video: https://www.youtube.com/watch?v=bXQ1gAid17Y Print Settings: * Printer: Monoprice Maker Select * Rafts: No * Supports: No * Resolution: 0.2mm * Infill: 100% * Notes: Don't forget to rotate the standoff to fit on the bed.
With this file you will be able to print Standoff for Heat Bed Power Module Expansion Board (MOSFET) for Monoprice Maker Select, Wanhao i3, Cocoon Create with your 3D printer. Click on the button and save the file on your computer to work, edit or customize your design. You can also find more 3D designs for printers on Standoff for Heat Bed Power Module Expansion Board (MOSFET) for Monoprice Maker Select, Wanhao i3, Cocoon Create.