Star Trek Enterprise PADD
thingiverse
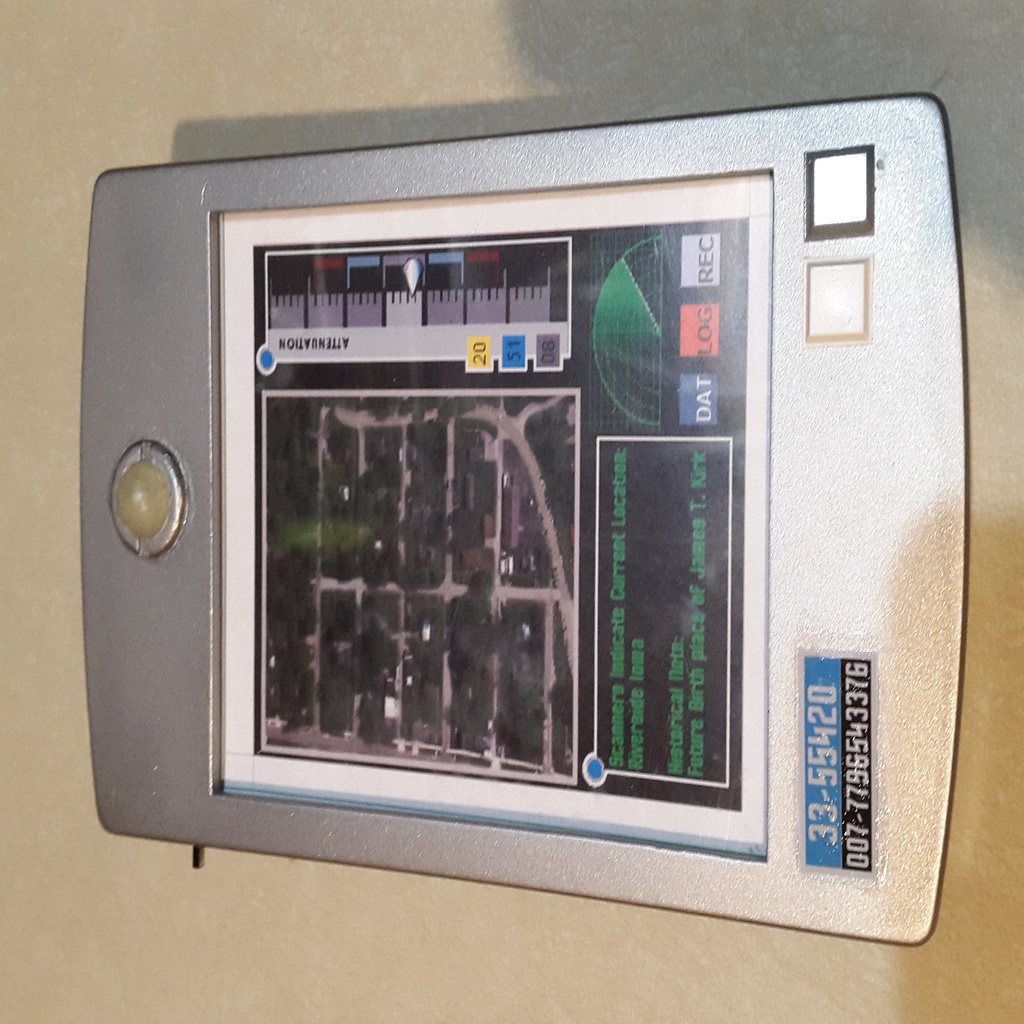
Hello. This is "my first post" so I hope I get it right... Before you go on know that I have no CAD or 3D experience at all - this is a complete first. Here goes. I love the "hands on" look and feel of the show Enterprise so I thought I might try hand at making a prop. I used: Inkscape, FreeCAD, and I bought a Prusa I3Mk3 printer. Research tells me the Enterprise PADD was a "CL 5000 cabin light box" so those are the dimensions I used. There is a: Top, Bottom, Dome Bezel, Back ribs and Cutting Guide. The top & bottom are setup to go post-in-hole for alignment. The cutting guide will cut your plastic for the protective window and a photo print you can make for the display screen. There is no need to prep the cutting guide so print it first that way while you do some of the things below you can use it to cut out your plastic (2 identical pieces) and a display image. Also, while waiting for the paint to dry, go download the STAR TREK TOS FONT for the serial number decal you will make. I looked over the www and found some ideas to make a "display picture" behind the plexiglass and the serial number - do these with a color laser jet. I printed all the parts: Generic PLA and sanded, in stages, "forever". I had a little switch from a broken kids toy so I manually cut the hole to fit (two part epoxy will hold it and fill if you make the hole a tad big, paint will go over epoxy to hide it). Drill your holes, see the photo attached. You will drill a 'marker' hole for the LED. After that, If you center your half dome, you can drill through the marker hole (back to front) into the dome to mark where to make the cup for the LED to fit in the dome. As the dome will flush/flat fit you will need to drill out (cup) a small space for the protruding LED to fit. Next I washed and dried the plastic parts (dawn cuts oil) before gluing on the ribs and dome bezel. NOTE: insert the LED from the underside of the top section up but don't glue it, put the dome on it, then slide the bezel on to get a perfect alignment. You may need to sand the dome base a bit with extra fine sandpaper if it is too snug. When the bezel glue has dried gently pull out the LED and use a pencil to push the dome out of the bezel for later installation. Prime, paint. Sand between coats for extra smooth finish. Put on the S/N sticker after you paint but before you clear coat. Add clear coat to protect it. Wire it up but don't glue in the LED yet - it comes last with the dome. I ran the wires, a simple on/off light circuit, down the sides to the bottom where I put the coin cell battery. Trial and error for length and fit so go slow with the wire and dry fit your plexiglass as you go to check for interference. Insert the LED, you will probably need to remove some paint from the hole, and glue it. I used a jewelers file. Now glue in the half dome, again you may need to remove some paint from the bezel and/or adjust your cup size or sand the dome - hence it is last. You had earlier made and cut an image to display and your plexiglass sheets to size with the cutting guide. Insert the two plastic sheets and: cut, sand, finagle the plastic to fit in place with the four corners. Insert the image between the two sheets to protect it and just set it in. Then use the Plumbers foam pipe tape as needed (I cut 1/2" squares, one for each corner, you can build layers) to support it all by sticking the tape side to the base or bottom - it will be springy and push the screen up to prevent any movement or wobble. You may also need to cut some of the plexiglass at the bottom to install the coin cell battery depending on if you use a battery holder or not. You may also need to make room for the LED at the top by drilling or notching the plexiglass at the top. This part was trial and error. I suggest you take a drill and cut a very small indent in the plastic where the screws will go so they will sit flush with the plastic. The 4-40 screws will cut their own threads when you put them in. This was my 1st project with 3D printing, I hope you liked it. Parts/Purchases List---------------------------- 01] The 2 square FAUX switches are: 3M mounting fixings [aka bumpers] https://www.mouser.com Mouser #: 517-SJ-5008GY Mouser #: 517-SJ-5008WH 02] Glue for Serial Number Sticker Mod Podge; Matte-Mat-Mate Waterbase sealer, glue & finish 03] Glue for bottom ribs Super Glue 04] Sanding Papers [3M] -1st- 180 grit -2nd- 320 grit -3rd- 400 grit -4th- 800 grit wet 05] Primer; spray Rust-Oleum Sandable Primer; all purpose-Fast drying 260737 sandable primer white 06] Paint; spray Supli-Color; Stainless Steel SS100 Stainless Steel 07] Screws, 4 total 4-40, 1/2" Phillips Countersunk {Note: use a 7/32 drill bit, drilling ONLY the depth of the cutting 'point angle' allows the screw to go flush} 08] Mold making & Casting Material; two-component silicone putty https://www.michaels.com/easymold-silicone-putty/10184918.html EasyMold Silicone Putty 09] One: 14mm Marble or other sphere Used with casting material to make half dome at top Or purchase a Plastic Pearl, Half Dome, 5mm 10] Two Part Epoxy, Clear used to make the half dome from marble cast 11] One: 3v, 5mm, Blinking/Flashing/Color changing L.E.D. 12] One: 4mm x 8mm slide switch 13] 26AWG Wire: about 2-3 feet Recommend: One Red insulation (+) One Black insulation (-) Suggestions: https://www.allelectronics.com/item/26rd-100/26-ga.-red-hook-up-wire-stranded-100/1.html https://www.allelectronics.com/item/26bk-100/26-ga.-black-hook-up-wire-stranded-100/1.html https://www.allelectronics.com/item/hw-50/red-and-black-hook-up-wire/2-x-25/1.html 14] One: CR2032 (or equivalent) 3v coin cell battery 15] One: CR2032 (or equivalent) 3v coin cell battery holder Suggestions: Search this www site and print one! 16] Plumbers foam pipe tape acts as a cushion between bottom and plastic stopping any movements 20] Miscellaneous Soldering Iron, Solder, Painters tape, Drills, Needle File Set, plexiglass
With this file you will be able to print Star Trek Enterprise PADD with your 3D printer. Click on the button and save the file on your computer to work, edit or customize your design. You can also find more 3D designs for printers on Star Trek Enterprise PADD.