Star Trek Next Generation Tricorder - TR-580 v1 (arduino)
prusaprinters
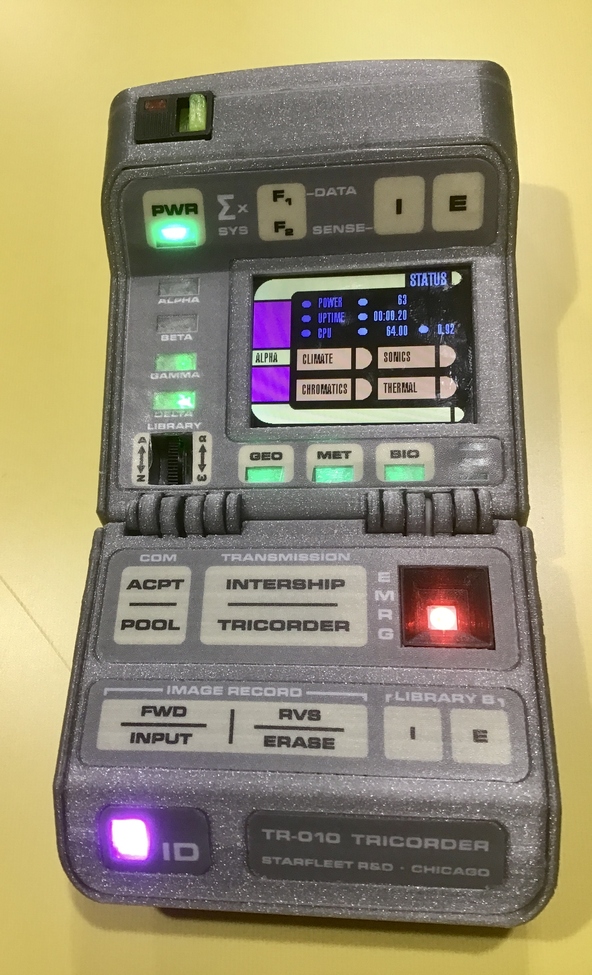
<p>This model is just a shell, as this is meant to hold electronics for working lights, buttons, sensors. All pictures with 2 tricorders side by side are this project vs the 90s playmates toy.</p><p>HIGHLY RECOMMEND PRINTING MAJOR PARTS WITH TEST FILAMENT FOR BASIC FITTING FIRST.</p><p>Demo internals video will show this uses an adafruit bluefruit sense board, a 2.0" screen, some buttons, some LEDs, and a thermal camera from pimoroni. You'll need to be comfortable with a soldering iron to build this, and you'll probably want to be comfortable with making your own female dupont wires. Custom circuit boards will make assembly easier and add lights to the buttons, but they are not required. Custom board designs that can be used to order from oshpark or jlcpcb are on the github.</p><p>All Glass models should be printed with clear filament. I used Sainsmart clear TPU with maximum layer height, 100% infill concentric pattern. You want to orient all glass parts so that you are looking through layer lines.</p><p>Any "glass" section with 2 pegs sticking out of it is meant to have a neopixel breakout mounted there. If you are not using the custom board with extra lights, you need to wire the neopixel pin from the board to PWR LED->ID LED->EMRG LED, in that order. With the custom board, it'll be PWR LED->Button LED IN->ID LED->EMRG LED. Try to take note of the direction of the neopixel breakouts in the door.</p><p>Door shell top is the hardest part to print. Cleanest look is with as many parts as possible using layer lines all running in the same direction when the shell is assembled. The hinge does take a bit of effort to pop into place, but you should only have to do that once. I have only assembled this using FDM-printed parts, so I can't speak to the behavior of resin.</p><p>Light pipes were printed in TPU, and were cut to be flush to the top curve of the hat after they were fit into those slots. Glue these into place after you test fit them with the board laid on the mounting points from the body shell. After gluing, cut them flush.</p><p>All custom PCB files are on github, and custom board(s) can be ordered via EasyEDA or OSHPark.</p><p>Code for the sense board is also on github:<br><a href="https://github.com/lambtor/ArduinoTricorder">https://github.com/lambtor/ArduinoTricorder</a></p><p>Hardware used, shown in one of the reference pictures:</p><ul><li><a href="https://www.adafruit.com/product/4516">NRF52840 bluefruit sense board</a></li><li><a href="https://www.adafruit.com/product/4311">Adafruit 2.0" 320x240 LCD</a></li><li><a href="https://www.adafruit.com/product/1608">1/4 sized breadboard PCB</a> OR custom PCB for buttons</li><li><a href="https://www.adafruit.com/product/1756">Adafruit sequin LED, Green x4</a></li><li><a href="https://www.adafruit.com/product/1312">Neopixel x3</a></li><li><a href="https://www.adafruit.com/product/4183">Silicon push buttons 6mm * 3</a></li><li><a href="https://www.digikey.com/en/products/detail/e-switch/EG1206/251333">Main power switch</a></li><li><a href="https://www.digikey.com/en/products/detail/cui-devices/cdm-10008/2791823">Small sound speaker</a></li><li><a href="https://www.adafruit.com/product/2210">Adafruit Audio Board with amp, 2MB</a></li><li><a href="https://smile.amazon.com/gp/product/B013FPKCMM">16mm x 3mm 10k Potentiometer</a></li><li><a href="https://smile.amazon.com/gp/product/B07C82R5DD">qi Charging receiver</a> (smallest size possible, want 5V 1A if you can find it)</li><li><a href="https://www.adafruit.com/product/1833">Micro USB-B female breakout</a></li><li><a href="https://shop.pimoroni.com/products/mlx90640-thermal-camera-breakout?variant=12536948654163">Pimoroni Thermal Camera module</a></li><li><a href="https://www.mouser.com/ProductDetail/Harwin/R25-1000502?qs=sGAEpiMZZMsqIr59i2oRcpNOIMGu5%2FAq3JWq%252B91Z78Q%3D">m2.5 hex standoffs, 5mm length *6</a></li><li>m2.5 hex standoffs, 6mm length *4</li><li><a href="https://smile.amazon.com/gp/product/B01KQ2LHFI">26 or 28 AWG wire</a> - SILICONE stranded</li><li>Dupont connector kit and crimping tool</li><li>Electrical Tape</li><li>Soldering Iron & Solder</li><li>Male breadboard headers, right angled. Both types are needed. <a href="https://www.adafruit.com/product/1540">Adafruit version</a> has plastic after the pin angle for the button board. Standard Dupont is needed for the sequin and Neopixel LEDs. Assembly instructions will show that you can remove the angled pins and re-insert after re-orienting them if you only get one type</li><li>Unconfirmed: small piece of 100 grit sandpaper</li></ul><figure class="media"><oembed url="https://youtu.be/6vZDpknSyDs"></oembed></figure>
With this file you will be able to print Star Trek Next Generation Tricorder - TR-580 v1 (arduino) with your 3D printer. Click on the button and save the file on your computer to work, edit or customize your design. You can also find more 3D designs for printers on Star Trek Next Generation Tricorder - TR-580 v1 (arduino).