Star Wars F's Lightsaber collapsing blade
prusaprinters
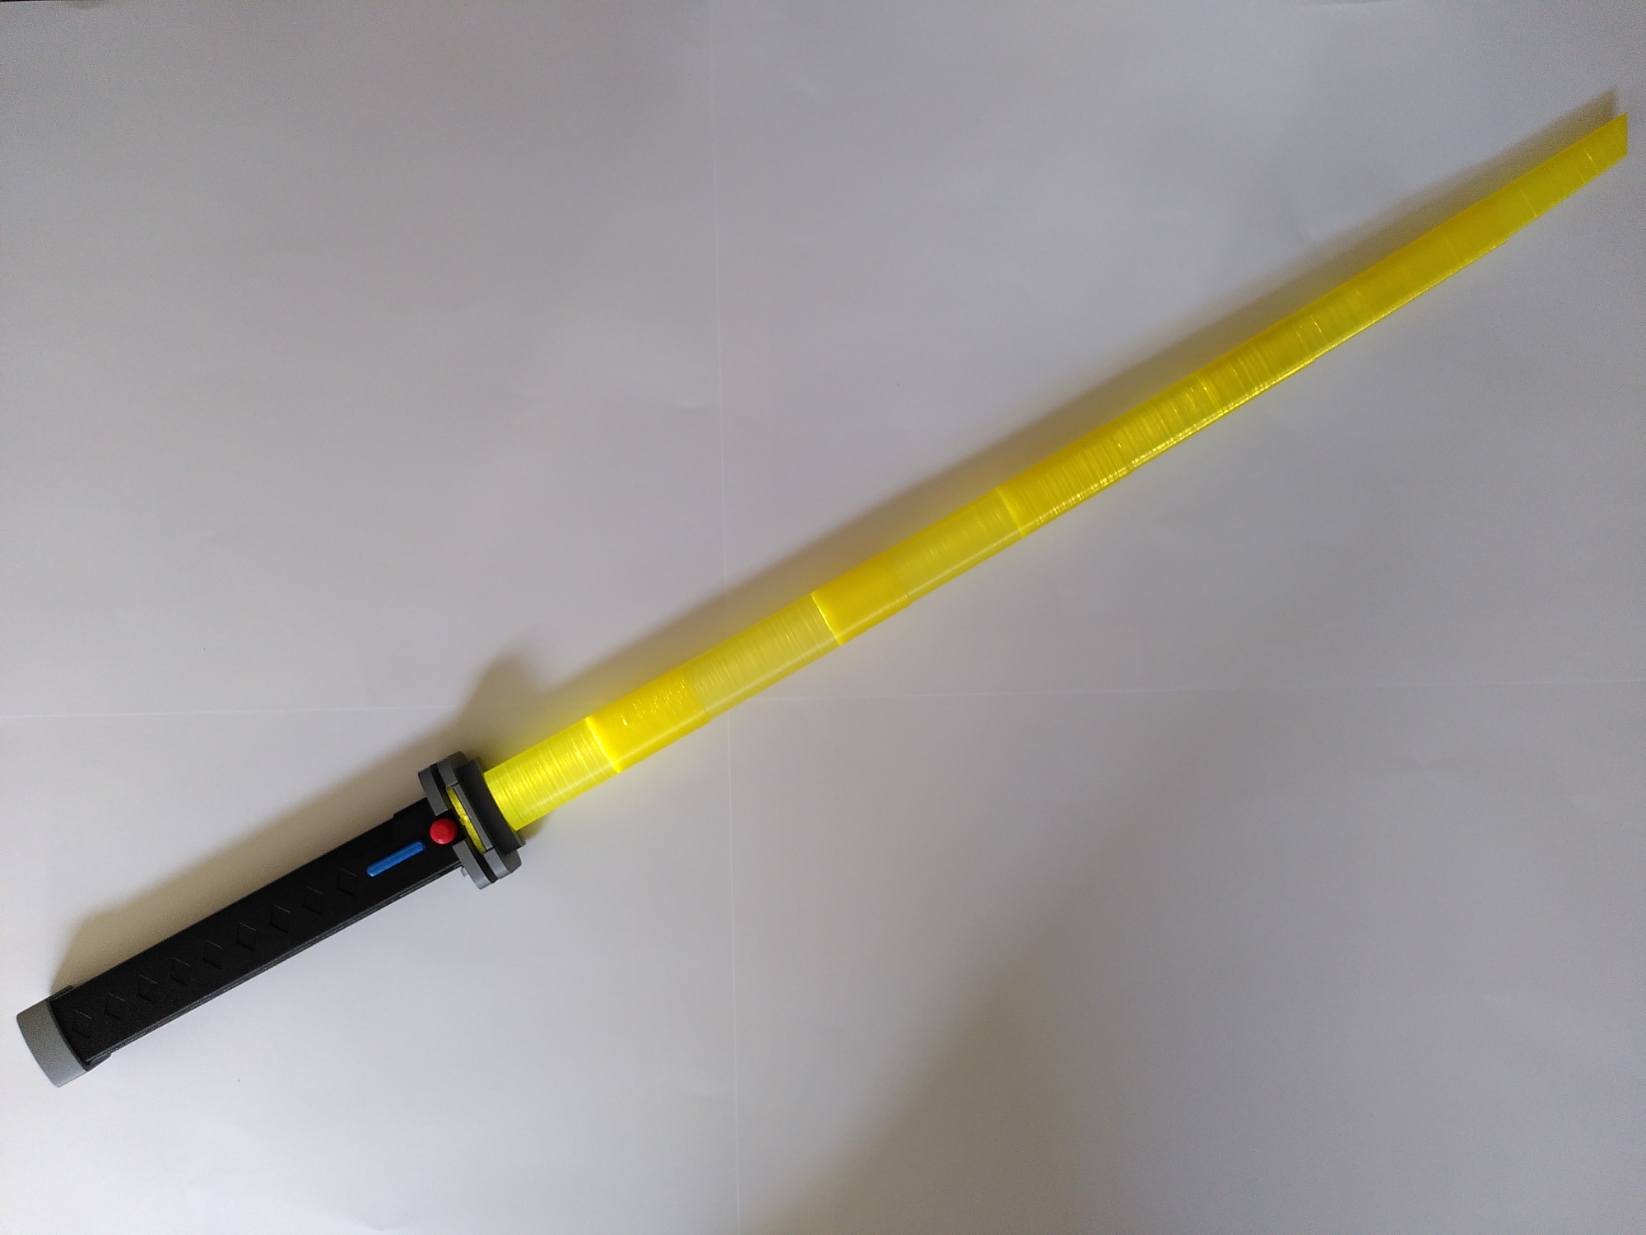
<p>This is my third model of the lightsaber seen in Star Wars Visions - The Village Bride. The Jedi who wields it is called “F” in the credits.</p><p>It has a collapsing blade and space for a mini flashlight. I have modeled it for a <a href="https://lumintop.com/product/edc01/">Lumintop EDC01 Flashlight</a>, which is 66*14.5mm and runs on a AAA battery. </p><p>The emitter can open and close by sliding the blue switch up and down. While the emitter is closed, the blade is blocked off and can not be extended.</p><p>This is my third attempt at this particular lightsaber. Compared to my previous attempt, it is better suited for carrying around due to the collapsing blade, but the illumination is worse. (The previous, second attempt was illuminated by a LED strip running the full length of the blade.)</p><h3>Print instructions</h3><h4>Main Parts</h4><p>Everything was printed at 0.2mm layer height, unless stated otherwise.</p><figure class="table"><table><thead><tr><th>Part</th><th>Copies</th><th>Color</th><th>Additional Settings</th></tr></thead><tbody><tr><td>upper_emitter_silver</td><td>1</td><td>silver</td><td>ironing, supports on buildplate</td></tr><tr><td>inner_emitter_transparent</td><td>1</td><td>transparent</td><td>supports on buildplate</td></tr><tr><td>lower_emitter_silver</td><td>1</td><td>silver</td><td>ironing</td></tr><tr><td>button_red</td><td>2</td><td>red</td><td> </td></tr><tr><td>knob_silver</td><td>1</td><td>silver</td><td> </td></tr><tr><td>switch_blue</td><td>2</td><td>blue</td><td> </td></tr><tr><td>upper_hilt_black</td><td>1</td><td>black</td><td> </td></tr><tr><td>lower_hilt_black</td><td>1</td><td>black</td><td> </td></tr></tbody></table></figure><p>If you want to use a flashlight, you will also need:</p><figure class="table"><table><thead><tr><th>Part</th><th>Copies</th><th>Color</th><th>Additional Settings</th></tr></thead><tbody><tr><td>flashlight_screw_any</td><td>1</td><td>any color</td><td>vase mode, no bottom layers, 0.1mm layer height</td></tr><tr><td>pommel_flashlight_silver</td><td>1</td><td>silver</td><td> </td></tr></tbody></table></figure><p>Otherwise, if you don't want to use a flashlight, print:</p><figure class="table"><table><thead><tr><th>Part</th><th>Copies</th><th>Color</th><th>Additional Settings</th></tr></thead><tbody><tr><td>pommel_silver</td><td>1</td><td>silver</td><td> </td></tr></tbody></table></figure><h4>Blade</h4><p>The blade is printed in vase mode. You should use transparent filament for a flashlight.</p><p>While printing, the parts might start to wobble, resulting in poor print quality. This can be partially counteracted with good bed adhesion, using a brim and reducing print speed. There will still be some wobble, so you might have to print some parts twice to get a better quality.</p><figure class="table"><table><thead><tr><th>Part</th><th>Copies</th><th>Color</th><th>Additional Settings</th></tr></thead><tbody><tr><td>blade_vase_1_yellow_transparent</td><td>1</td><td>transparent yellow</td><td>vase mode, no bottom layers, brim</td></tr><tr><td>blade_vase_2_yellow_transparent</td><td>1</td><td>transparent yellow</td><td>vase mode, no bottom layers, brim</td></tr><tr><td>blade_vase_3_yellow_transparent</td><td>1</td><td>transparent yellow</td><td>vase mode, no bottom layers, brim</td></tr><tr><td>blade_vase_4_yellow_transparent</td><td>1</td><td>transparent yellow</td><td>vase mode, no bottom layers, brim</td></tr><tr><td>blade_vase_5_yellow_transparent</td><td>1</td><td>transparent yellow</td><td>vase mode, no bottom layers, brim</td></tr><tr><td>blade_vase_6_yellow_transparent</td><td>1</td><td>transparent yellow</td><td>vase mode, no bottom layers, brim</td></tr></tbody></table></figure><h3>Assembly</h3><p>The following render shows how all pieces fit together. A purple arrow means that the pieces are supposed to be glued together. Where there is a green arrow, no glue should be used.</p><p>In situations where the orientation of a piece is relevent, the connection is asymmetrical to ensure it can not be connected the wrong way around. (The same applies to the thread on the pommel and lower hilt.)</p><p>The switches are glued only to the lower emitter. They are not glued to the upper hilt.</p><p>The flashlight is inserted into pommel_flashlight, then secured with flashlight_screw.</p><figure class="image"><img src="https://media.printables.com/media/prints/245389/rich_content/16028af3-f6bd-47af-a76d-b3f076aa698f/f4-exploded.png#%7B%22uuid%22%3A%228edea4cb-ba8c-4fd1-9444-ae1a4d4b27df%22%2C%22w%22%3A1080%2C%22h%22%3A1920%7D"></figure>
With this file you will be able to print Star Wars F's Lightsaber collapsing blade with your 3D printer. Click on the button and save the file on your computer to work, edit or customize your design. You can also find more 3D designs for printers on Star Wars F's Lightsaber collapsing blade.