Star Wars - Sith Holocron
thingiverse
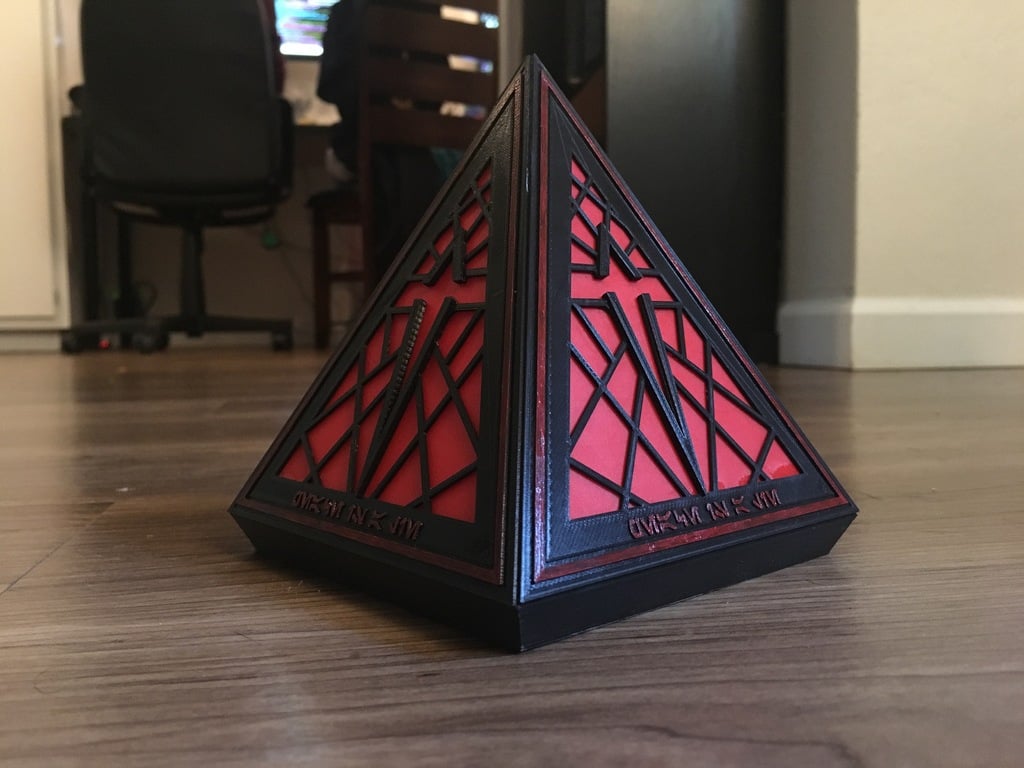
# Darth Azaryia's Holocron Get ready to channel the dark side of the Force and create your very own Sith Holocron! There are three options for the holocron: - *NO ELECTRONICS...* One version designed not to have any internal electrical components. Just print the inner panel (x4), the outer panel (x4), and the no-holes base and you're good to go! - *LIGHT, SOUND, MOTION, AND MORE...* This version is designed to be made with the hardware/software that will be described below. This one requires printing the inner panel (x4), the outer panel (x4), and the base designed for the Feather M0 microcontroller. - *DESIGN YOUR OWN...* Finally, if you're feeling extra creative, I included a blank copy of the outer panel so you can design your own holocron! ### Hardware There are unlimited possibilites for what can be used as guts, but here's a list of what I used: - Feather M0 Express <https://www.adafruit.com/product/3403> - Prop-Maker FeatherWing <https://www.adafruit.com/product/3988> - NeoPixel Jewel https://www.adafruit.com/product/2226 - Small Speaker (the one below plugs in nicely to the Prop-Maker Wing) <https://www.adafruit.com/product/3923> - LiPo Battery and/or MicroUSB Cable - Latching Button or Switch (the model is designed to fit a 6mm x 6mm button) - Wire, Solder, Headers, etc. :) The circuit itself is pretty simple. Solder female header sockets on the Feather and male headers on the FeatherWing. The FeatherWing brings out the enable pin from the Feather: solder one side of your switch to this pin and the other side to ground. The LiPo battery plugs directly into the Feather (it has regulators built-in!), and the speaker plugs directly into the FeatherWing. There is a spot on the FeatherWing to plug in a NeoPixel strip. I didn't have the connector, however, so I removed the plug and soldered the Jewel directly to the pads. Thats it for hardware! :) ### Software All code written for this project was in CircuitPython. The Feather M0 Express has an onboard flash chip that makes saving and running Python scripts possible. If you plan on using a different microcontroller, please keep in mind you may need to additionally use an external microSD card. If you haven't heard of CircuitPython: <https://learn.adafruit.com/welcome-to-circuitpython> Install CircuitPython and additional libraries to your Feather: <https://circuitpython.org/board/feather_m0_express/> Download the code from my GitHub: <https://github.com/Krystine/holocron> Make sure you installed (at a minimum) both the neopixel.mpy and adafruit_lis3dh.mpy libraries on your Feather. Next, pick a sound or song that you want your holocron to play. Just keep in mind the clip should be in .wav format and that the onboard flash chip on the Feather M0 Express only has a capacity of 2MB. Once you have a chosen .wav file, drag and drop it onto your Feather in the root folder. Make sure you edit the code in main.py to reflect the song name that you chose! Then, upload the script to your Feather! I used Mu to do this (see the welcome to CircuitPython link above). Now the internal guts of your holocron are ready to go! All that is left to do is assembly! Superglue works wonders here. There also are screw holes in the holocron base so the Feather can be secured. I used ESD tape to secure the battery and the speaker to the holocron base (I chose not to make housings for these components within the base, since different components could be used here). That's it! Please post any pictures of makes, I would absolutely love to see them!
With this file you will be able to print Star Wars - Sith Holocron with your 3D printer. Click on the button and save the file on your computer to work, edit or customize your design. You can also find more 3D designs for printers on Star Wars - Sith Holocron.