Starfury Model
prusaprinters
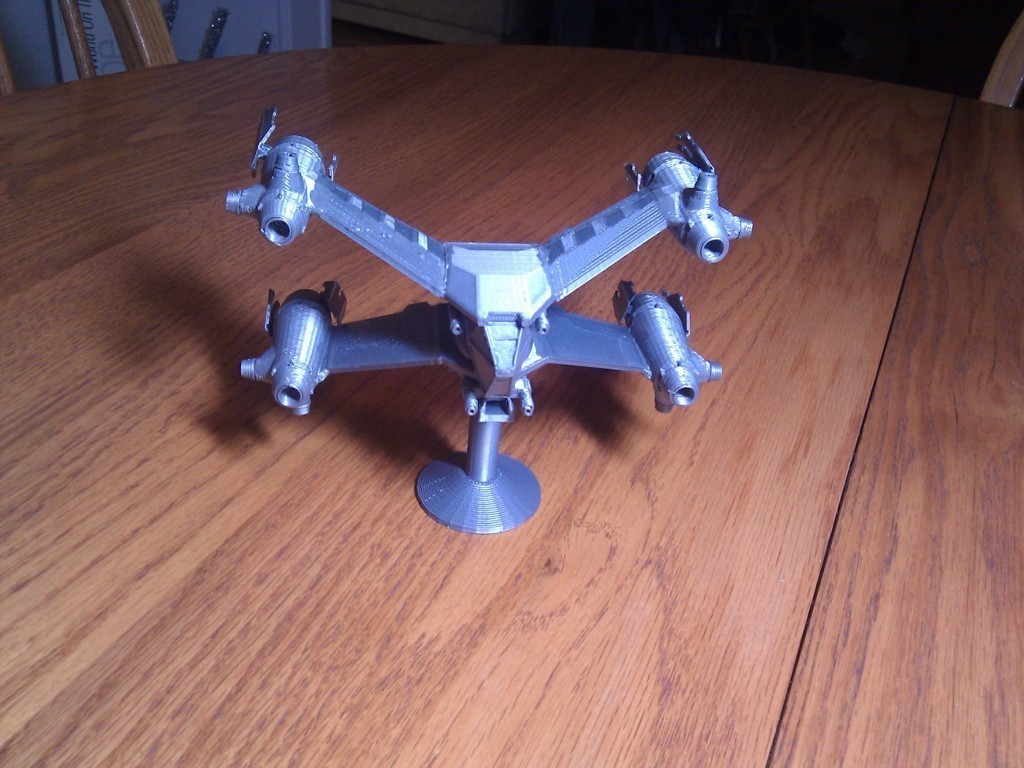
<p>This model is my first attempt to create an Aurora-class Starfury (<a href="http://en.wikipedia.org/wiki/Starfury">http://en.wikipedia.org/wiki/Starfury</a>) from the television show Babylon 5. I've always liked the design of this one-man fighter craft and decided that it would be a fun and challenging design project.</p><p>The included STL files were designed for efficiency of printing and assembling a single model. You can use the included OpenSCAD files to print individual parts or make modifications. I hope to make the OpenSCAD files easier to modify at some point.</p><p>Although this is a pretty good first attempt, there are several features that are not quite correct.</p><ol><li>The upper supports are much simpler than they should be.</li><li>The forward guns are not as well-formed and sturdy as I would like.</li><li>The detail on the sides of the body could use some work.</li><li>The back of the model has no detail at all.</li></ol><p>As my design skills improve, I hope to revisit this model.</p><p>UPDATE: The instructions have been improved and the extra thruster nozzles have been removed from the engines4 model.</p><h3>Instructions</h3><p>The model is made up of a number of pieces that must be glued together to make the final piece. I used an ABS/acetone mixture as glue. I assume superglue or model cement would work as well.</p><p>You need to print one each of</p><ol><li>stand.stl - support for model</li><li>body.stl - main body</li><li>struts.stl - connect the engines to the body</li><li>engines4.stl - mount at the ends of the struts</li><li>thrusters.stl - small thruster engines at right angles to main engines</li><li>baffles_all.stl - baffles mounting to the rear of the main engines</li></ol><p>Note: The body (body.stl) has four conical supports that snap off after the print is complete. Sometimes these will disconnect when you remove the body from the build platform. That is not a sign of a problem. If any of the supports remain attached to the body, they should snap off relatively easily.</p><p>Note: Almost all parts should be relatively insensitive to minor differences in printer configuration. However, I found that the baffles_all.stl only prints well with extra shells set to 0 and 100% infill (in the Fill plugin).</p><ol><li>(stand.stl) Glue the flat part of the cross shape on top of the shaft, inserting the pin on the top of the shaft in the hole on the top.</li><li>Glue the wide portion of one pair of struts (struts.stl) to the upper support on the body (body.stl). The flat portion of the struts will be on the bottom. Both the side of the strut and the mount point are angled, so the result should angle upward. (Look at the pictures to determine which part of the body is the top.)</li></ol><p>If necessary, sand off any rough spots to allow for a good fit.</p><p>You will need to hold or tape this piece in place until the glue dries.</p><ol><li>Glue the wide portion of the other pair of struts to the supports on the lower sides of the body. The flat portion of the struts should face up. Both the side of the strut and the mount point are angled, so the result should angle downward. If necessary, sand off any rough spots to allow for a good fit.</li></ol><p>You will need to hold or tape this piece in place until the glue dries.</p><ol><li>Now is a good time to attach (not glue) the body to the stand. This will make further work easier, since there is no flat portion of the model that you can set down. The longer portion of the top of the stand should match with the front of the model.</li></ol><p>There are two pair of rectangular supports on the bottom of the body. These supports should match the gaps in the side rails of the top of the stand. A little pressure should friction-fit these pieces together.</p><ol><li>Each of the engines (engines4.stl) has a pair of holes at right angles on the side of the engine. These are mounting points for the little thruster nozzles (thrusters.stl). Glue one nozzle with the shaft inside each of the two side holes on the engine. Repeat for each of the four.</li><li>There are two different versions of the engine (engines4.stl). Find the engine that matches with the top right strut (looking at the small end, the thrusters will point up and right and the engine mount will be on the top left).</li></ol><p>Glue the engine mount to the end of the top right strut. If necessary, sand off any rough spots to allow for a good fit.</p><p>You will need to hold or tape this piece in place until the glue dries.</p><ol><li>Find the engine that matches the top left strut (thrusters point up and left, engine mount on top right). Glue the engine mount to the end of the top left strut. If necessary, sand off any rough spots to allow for a good fit.</li><li>Find the engine that matches the lower right strut (thrusters point down and right, engine mount on lower left). Glue the engine mount to the end of the lower right strut. If necessary, sand off any rough spots to allow for a good fit.</li><li>Find the engine that matches the lower left strut (thrusters point down and left, engine mount on lower right). Glue the engine mount to the end of the lower left strut. If necessary, sand off any rough spots to allow for a good fit.</li><li>The baffles (baffles_all.stl) require some minor modification before mounting. With the flat side down, there are two grooves that run lengthwise down each baffle. The sides of the baffle should be bent upward about 10-15 degrees on each side.</li><li>Each of the little<i>fingers</i> at the end of the baffle also need to be bent slightly upwards (maybe 5 degrees).</li><li>Repeat steps 10 and 11 for all 8 baffles.</li><li>The smaller baffles mount on the side of the rear nozzle closest to the body. There is a small hole that matches a small pin on the top front of the baffle. (It is relatively close to the angle of the support strut.)</li></ol><p>Glue this pin in the hole. You will need to hold this for some time until the glue sets. Try to keep the fingers pointed directly to the rear of the module.</p><ol><li>Repeat step 13 for all of the small baffles.</li><li>The larger baffles mount on the outside of the rear nozzle. There is a small hole that matches a small pin on the top front of the baffle. (It is very close to directly opposite the angle of the support strut.)</li></ol><p>Glue this pin in the hole. You will need to hold this for some time until the glue sets. Try to keep the fingers pointed directly to the rear of the module.</p><ol><li>Repeat step 15 for the rest of the large baffles.</li></ol><p>Congratulations, you have your own Starfury model!</p>
With this file you will be able to print Starfury Model with your 3D printer. Click on the button and save the file on your computer to work, edit or customize your design. You can also find more 3D designs for printers on Starfury Model.