Stars tracker
thingiverse
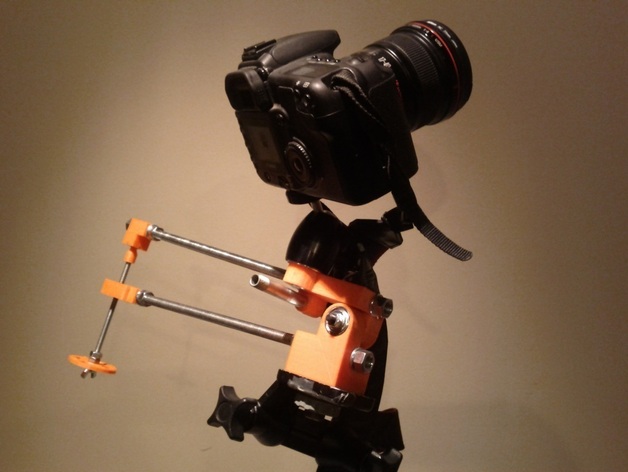
To take pictures of the night sky you need to shoot long exposures in order to grab as much light as possible. The problem is that, because of the rotation of the earth, the stars are constantly moving in the sky. This mechanism allows you to cancel the apparent movement of stars while taking long exposures of the night sky. The way this version has been designed, you need to turn the threaded rod once every minute. Using a 50mm lens, the stars movement will start to be visible on your picture after 20 to 30 seconds. I recommend turning the handle once every 15 seconds. I uploaded a pictures of all the FAIL parts I printed for this project. I love development by prototyping! Instructions This still is a work in progress. I'll post the source files, a video and more detailed instructions later ... 1 - Print all 5 stl files 2 - Press fit a 1/4" nut in the bottom of the hinge6.stl part 3 - Press fit two 608 ball bearings in the hinge6.stl part 4 - Insert the 1" long 3/8" bolt in the hinge5.stl part 5 - Insert the alignment scope tube in the hinge5.stl part 6 - Press fit two 608 ball bearings in the hinge5.stl part 7 - Attach the wheel to one end of the 1/4" filted rod using two 1/4" nuts and the butterfly 1/4" nut 8 - Screw the cylindrical lock screw on the 1/4" threaded rod 9 - Screw the ball of the ball joint to the other end of the 1/4" filted rod 10 - Screw hinge6.stl and headdown.stl to the 12" long 3/8" filted rod. There must be 11.5" between the center of the bearing and the center of the slot where the cylindrical lock nut will be inserted. 11 - Screw hinge5.stl and the ball join head to the 13" long 3/8" filted rod. Make sure there is 11.5" between the center of the bearing and the center of the ball join hole. 12 - Insert the 1/4" rod assembly into the headdown.stl piece. The cylindrical lock nut should snap in place. 13 - Attach both 3/8" assemblies together using the M6x8 shoulder bold. 14 - Snap the ball join head on the ball join ball. To start shooting follow these instructions: 1 - Attach a camera tripod heat to the stars tracker using the 1" long 3/8" bolt. 2 - Mount the stars tracker on a tripod using the 1/4 nut on the bottom of the hinge5.stl part 3 - Ajust the tripod so that the celestial north pole appear in the center of the alignment scope tube. 4 - Point your camera to your subject and start the exposition. 5 - Turn the wheel 1/4 turn clock wise every 15 seconds until the end of the exposure. I suggest starting with 2 minutes exposures at more than 800 ASA.
With this file you will be able to print Stars tracker with your 3D printer. Click on the button and save the file on your computer to work, edit or customize your design. You can also find more 3D designs for printers on Stars tracker.