Starship Fan Duct for Prusa RepRap
thingiverse
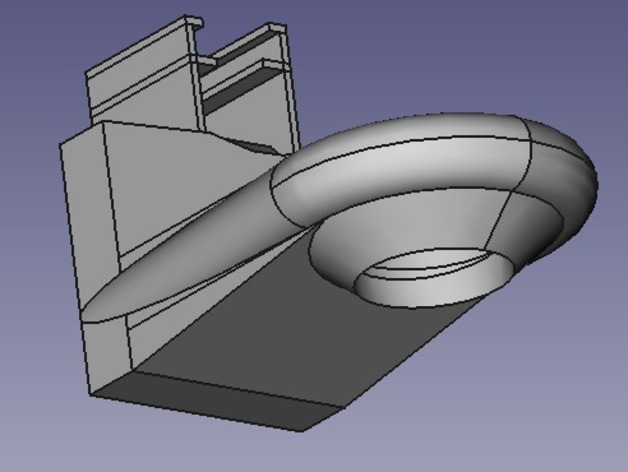
These are the voyages of the Starship Fan Duct. It's continuing mission: to explore strange new 3d models. To seek out new prints and cool them. To boldly go where no RepRap has gone before. Before designing this part, I had used simple angled bracket to hold my fan (no ducting) and found that the side of my prints which faced away from the fan would not cool as well as the sides which faced it(duh!). This design is an attempt to cool more evenly from all sides. The provided STL has only been used and tested on my own reprap with prusa2 x-carriage, and j-head hotend. I can't really guarantee it will fit anything else. However, the design is a fully parametric FreeCAD python script which can be tweaked to hopefully fit other configurations. EDIT: I've marked this as work in progress, due to issues I just realized with the duct melting/warping near the nozzle. It doesn't touch the nozzle, but it's close enough that it causes problems. I printed this in PLA. ABS would have probably been better, but I'm not sure if that would still melt when using printing more ABS. I'll have to do more testing, possible tweak the design more so that there is more space between the hotend nozzle/j-head and duct nozzle. Instructions HEY... LISTEN! Before you go wasting a bunch of filament, this is a solid model, and is designed to be printed with 0 infill, 0 solid layers, and only 1 perimeter. Print this at the thinnest layer height that you are comfortable with printing. Thinner layers will leave less gaps on the flatter parts of the rounded surfaces. I printed mine with a 0.5mm nozzle, at 0.1mm layer height. Some parts of the print are tricky: the middle section of the cones (doesn't matter since it will be cut out post-print), and the very top of the print(the end of the torus). I had holes on the end and simply patched this with tape. After printing, you will need to cut out the middle section of the cone shaped nozzle. I used a dremel at low speed with a small paper sanding disc to do this. Clean up the edges with hobby knife, sandpaper, or jeweller's file. To install, remove your extruder body from the x-carriage, so that the hotend can fit into the center of the duct hole. The fan should press fit into the duct, and the duct presses onto the carriage. One the duct is on the carriage, re-attach your extruder. Script Tweaking Instructions: This script was created for FreeCAD, and requires the included EasyPart.py library, which simplifies the python API a bit. Use the "Tools -> Macros" menu to open the script for editing or execution. From this dialog, you can view or edit the "Macro Destination" which will need to be where you place both FanDuct.py and EasyPart.py You can load your carriage STL into FreeCAD and position the model to see how it will fit before printing. To export the shape, select it, and use "Meshes -> Create Mesh from Geometry...", then select the new mesh and use "Meshes -> Export mesh..." to save as STL.
With this file you will be able to print Starship Fan Duct for Prusa RepRap with your 3D printer. Click on the button and save the file on your computer to work, edit or customize your design. You can also find more 3D designs for printers on Starship Fan Duct for Prusa RepRap.